Planning
Planning
Planning - How Do I Create a Home Network?
This section will attempt to help you figure out what equipment you need to set up your home network and how and where to install it. Determining this depends on several factors including what's supplied by your ISP (if you have one), the tasks for which you'd like to use your network, and on the physical layout of the room(s) in which a network is to operate. I'm always surprised by the number of people who think step one of putting in a home network is buying the equipment. If you are putting a new addition onto your house, step one isn't buying the lumber. Step one is figuring out what you want the new addition to be used for. Step two is deciding on the way it will be constructed. Step three might then be buying the lumber. Your home network should be approached in the same manner. First, decide what you want you want to get out of your network. Next, figure out how you are going to wire and connect your network (or wireless your network as the case may be) to get it to all the devices that need network access. Don't forget that many digital DVRs and many gaming consoles like the Xbox 360 also can take advantage of a network connection. Then go out and buy the equipment. This section covers the first two topics, network purpose and planning. The topics of purchasing and installing the equipment are handled in the next chapter.
Determining the Purpose of Your Network

Determining the purpose of your network is not rocket science, and it won't take you long to do. It's important that you do know what it is you want your network to do. The two main goals that I usually hear about are to share something like a printer or files between two computers and to share a high-speed Internet connection. I like to separate the first from the second because the first only requires a Local Area Network or LAN and can be installed and configure even if there is no Internet connection in the plan. The second type, the Broadband Connection Sharing home network is where some type of connection to the Internet is shared. Typically, this will be a high-speed cable, DSL or FiOS connection, but even a modem connection can be shared. (I avoided using the name "Internet Connection Sharing" for the second type in order to avoid confusion with Microsoft's Internet Connection Sharing service, which is a way of using one computer to share the internet with others.)
Note that a Local Area Network is really a degenerate case of the Broadband Connection Sharing (BCS) network because the latter is part LAN as well. In addition, as the name implies, it shares a broadband connection, which brings the Internet to every computer and device on the network. I believe the best approach to getting a BCS network up in running is to first get the LAN portion established and then add the broadband connection to the mix. Analogous to the term "LAN," the Internet side of the network is called the "Wide Area Network" or "WAN." We will start by talking about the LAN and then proceed on to the broadband connection portion. From experience, the majority of readers are interested in the BCS network. Still, it's important to realize that there are two major pieces to get working: the LAN portion and the WAN portion.
Given the purpose of your home network - either a simple LAN or BCS - the next consideration is the physical layout of the network itself. Keep in mind that to this point, we've not purchased any equipment yet. This is a good. It's a good idea to know what we want the network to do and how we are going to lay it out before buying anything. Don't fret if you already went out and bought some things or had some equipment included with the Internet service you got from your ISP. We'll likely make good use of it.

We've reached a chicken-and-egg situation here. It's hard to describe the physical layout of a network without using terms like "router" and "cable modem," but those terms aren't discussed in detail until the different types of equipment needed for a particular type of network is discussed. On the other hand, until you know your physical layout, it's hard to know exactly what equipment you'll need for your network. Back and forth, it goes. More complicated networks that need to cover larger areas like several floors of a house or a small to medium-sized business usually require more equipment than your average dorm room. Exactly what equipment may well depend on your network's purpose. Try to bear with me here, but you may need to re-read these sections on planning the network and buying & configuring the equipment a couple times to get the full picture. The equipment can be (and often is) different for the LAN versus broadband sharing types of networks. (I'll attempt to point out the differences as we go along.) What I will have to do is introduce some equipment in this section with a brief explanation of its purpose in terms of planning your network. Later, we will discuss that equipment in detail.
Planning 2
Planning 2
Planning Your Physical Network Layout
Before purchasing networking equipment, you need a plan as to how the network will be run through your house. If everything to be networked is in one room, you may only need a very simple sketch. Such a sketch can still be very worthwhile. For example, it may make you realize that even though two of the computers are only seven feet apart physically, that doorway between them means that you'll need to run the cable to opposite way around the edge of the room, and therefore, you need a 25 foot cable for the job. If your network is going to be more complex - for example, you have some devices in a home office, one or two in bedrooms, and yet another in the den - you might want to get a copy of or draw a floor plan that is reasonably to scale and pencil in your network on that. The physical portion of running a wired network consists of running cables from the various devices to one or more central locations where the cables will be connected together. If there are walls (floors, ceilings) and long distances involved, you'll need to plan more carefully so that you can buy or make cables of the proper length. If a cable would be particularly difficult to run, using wireless networking for part of the network may make sense. In this section, we'll look at a few typical layouts in order to show the types of decisions you may have to make.
In order to discuss the physical layout, we need to know a couple terms that will be discussed in greater detail in the next couple chapters. Here, we need only a brief introduction so that the discussion makes sense. Once you have read the following sections discussing the equipment needed for networks, you may find yourself needing to revisit this section for this all to be clear. The first terms are "router," "switch" and even "router/switch." For this discussion, all of these terms refer to a family of devices that allow network cables coming from devices like PCs and Xboxes to be connected together. Think of it as a fancy version of the 2-to-1 phone jack splitter that allows you to connect a phone and fax answering machine to the same phone jack. In the case of a switch, however, we may be connecting four, five, eight or more network cables together. (Also, I often use the term "device" or "network device" rather than just saying computer, because we are increasingly hooking up things like DVRs, streaming media boxes like a Roku, Xboxes and Playstations, which aren't computers, but do use network connections.) I also refer to a "Wireless Access Point" in one example, which is a device that allows wireless network connections between devices using radio signals rather than physical cables. Again, these will be discussed in greater detail in the following pages.
Example 1: DSL modem in home office and all devices are in the same room.
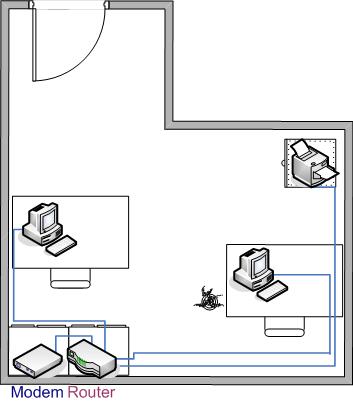
This example happens to be how many home networks get started. In it, you have a new computer and an older computer (or two) that you would like to network in order to share files and the printer. I show the printer as being network capable in this example, but oftern the printer is connected to one of the computers and shared that way instead.
Additionally, maybe you've got some form of internet connection (cable or DSL) that you would like to share. (If that is not the case, the difference is that you would not have a modem and the router could be replaced with a simple switch, but we are getting ahead of ourselves.) Note that the "modem" referred to is a high-speed Internet modem (generally supplied by your a cable or DSL provider), not the traditional telephone modem found in computers.
For this example, setting up the network is pretty simple. Cables are run around the edge of the room from each device to a common point where the router/switch is to be located. It's a good idea to use staples or some other means to semi-permanently affix the cable to a baseboard or the like. The cables are concentrated to the one spot where a router or switch will be used to connect them all. Sounds pretty simple, and it is.
Example 2: Cable modem in living room, most of the devices in the home office, one in the kids' room.
In this example, the scenario is that you have signed up for high-speed digital cable service. Your cable company's installer arrives and starts to put your cable modem right next to your TV. You explain that you really need the cable modem in your home office where your computer is, but your installer insists he can only install the cable modem within 6 ft of your TV cable box or he must charge you an additional exorbitant amount per linear foot. You decide to keep the money in your pension plan and run a single longer cable from the cable modem to a combination router/switch in your home office. You can then branch off to the other networked devices from there. The advantage is there is only one long cable run to make.
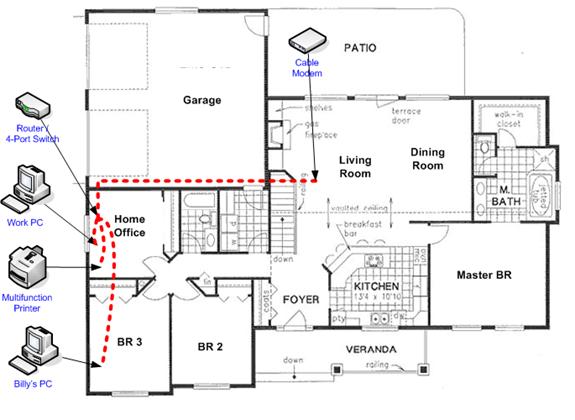
Once you have run the Ethernet cable from the cable modem to the home office, connecting the devices is more or less the same as in example 1. However, the difference in this example is that you also want to run a cable to "Billy's PC" in the adjacent room. There are several ways to do this. You can run a cable through the wall into the attic and then drop it down the wall into Billy's room. You can drill a hole directly into the adjacent room (the closet in Billy's room in this case) and shove the cable - connector and all - into the next room (and then patch as necessary). You can also cut two slightly offset rectangles into the drywall and install drop-in network boxes on either side. (You would connect the two boxes together with a short cable hidden in the wall. Then you connect the PC on one side and the router on the other side to their respective drop-in box you just installed in the wall. It all depends on how clean of a job you want and how much time you're willing to put into it.
Planning 3
Planning 3
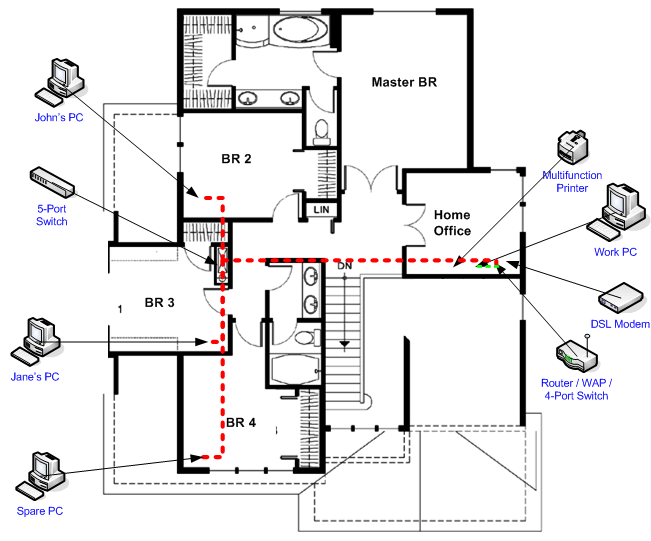
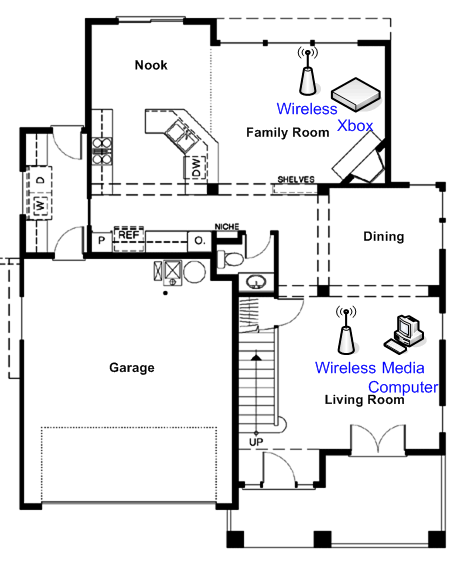
Example 3: DSL modem in home office, majority of the devices in the home office, one computer in each kid's room, spare computer, multimedia PC in the living room and Xbox in the den.
This is my everything-plus-the-kitchen-sink example. Still, it comes up quite commonly, especially in houses and townhouses where the devices to be connected are on more than one story. The network starts with a DSL modem in the home office on the second floor. In that room, a PC and printer are networked. On the same floor, there are computers in each of the kids' rooms and one to the "old" PC in the spare bedroom. Also, in different rooms downstairs are an Xbox 360 and a multimedia (home theater) PC we'd like to have connected.
Second Floor
First Floor
The physical network tentatively penned in for this network is to put the router/switch in the home office and connect up the devices there. However, rather than run three long cables to each of the bedrooms, run one long cable through the attic and drop it down into a utility closet near the bedrooms. In that closet, place a 5-port switch (a switch capable accepting up to five Ethernet cables) and connect the cable from the home office to the switch. Then, we run three shorter cables from the switch, through the attic and drop them down into each of the bedrooms. We could also put nice drop-in network boxes in the walls of each of the bedrooms and run a short cable from the wall boxes to the respective computers. The top floor is now taken care of. In a larger house or a small office, you may have networked devices in three or four clustered areas. It may make sense to put a switch in all of those areas if the cable runs from one area to another are long. That also allows for easy future expansion.
The router I'm proposing for this example also contains a wireless access point (WAP), which is capable of letting devices connect wirelessly to the home network. Many ISPs will provide a router with a WAP built-in. I use this in my example because while running cables in the attic is certainly some work, running them through adjacent floors can be much more difficult or nearly impossible. Instead, the two devices downstairs will be connected wirelessly.
Here's sort of the synopsis of what we looked at above. How many switches & cables you'll need and where to physically place them is one question you'll have to answer in your planning. If most of the devices to be connected to the network are in one area of the house, that's a logical place for the switch. If there are only one or two other devices to be connected, long cables to them will finish the job, but a good goal is to minimize the number of long cable runs.
Another variation is that the network needs to run from where the Cable or DSL modem is (e.g. living room) to a different part of the house (e.g., the home office on the other end) where most or all of the networked devices reside. In that case, you may want to make a single longer cable run from the modem to the router. Then, from that router, you can run shorter cables to separate devices near that end of the house. The advantage is that you run only one long cable from the router to the modem and then shorter cables from the switch to the devices presumably nearby instead of several separate, long cables from the router to each device.
For particularly long runs on different sides of the house, using multiple switches and running one cable from one router/switch to the other switch is a good solution. Then from the nearby switches, run the final shorter cables to the nearby devices. Lastly, if running a cable is difficult, wireless networking may be a good alternative. With these examples in mind, we need to finalize a specific set of equipment needed based on the type of network we are installing. This is the topic of the section, The Local Area Network. If part of your network is going to include wireless networking, there are a few more things to consider, which is the topic of the next section. If the router supplied by your ISP includes wireless networking, but you don't plan to use it, you should also read the next section topic on disabling your wireless network capability. (By default, it is usually on.)
Planning 4
Planning 4
Special Considerations When Planning a Wireless Network
A Wireless Access Point or WAP (pronounced "whap") is wireless equivalent of a wired Ethernet switch. (Technically, it's closer in operation to a hub, but since we haven't talked about either of those two in detail yet, you really probably don't care.) It receives data from one wireless device and retransmits it for all the other wireless devices to hear, so it effectively ties them together. However, it uses radio waves to send and receive data rather than electrical signals on wires. The strength of the radio signal diminishes with the distance traveled - at an almost alarming rate. With wired networks, the placement of the switch can be fairly arbitrary. The goal is to keep the length of the cable runs as short as possible, but if it makes life convenient, you can put the switch on the other side of the room and add 10 or 15 feet to the cables without causing any problems in most cases. This isn't true with wireless networking. Putting the WAP across the room may make that bedroom at the opposite end of the house just out of range. Putting a wired switch next to a big metal filing cabinet has no effect on its functionality. Putting the WAP next to the same filing cabinet (or steel computer case or any other large metal object) may kill the radio signals to a whole section of your house. Having a WAP isn't a requirement for a home network, but it may be beneficial. WAPs are often included in the router supplied by your ISP, so you may have it regardless if you plan to use it.
Mentally survey the rooms are areas you are likely to use wireless connected devices in. If you're thinking of roaming your around your home with a laptop using a wireless connection, will you want to use it on the deck? The bedroom? Garage? How about in the living room? Once you have the area of coverage in mind, place the WAP accordingly. If the area of coverage is fairly small - such as a 30 or 40 foot diameter - you can usually place your WAP where is it convenient. If the area is any greater than that, try to pick a location roughly in the center of that area. On the first floor of a two story home, placing the WAP up high such as on top of a tall bookcase where is above the influence of metal desks, chairs and filing cabinets can often help get a good signal to the second floor. However, if the WAP is on the second floor and the majority of the wireless devices are on the first floor, you may want to place the WAP on the floor instead. As already mentioned, try to avoid placing the WAP near large metal objects like (metal) computer cases, filing cabinets and refrigerators. Metal objects in your walls that you can't see will also affect the signal. This includes things like steel I-beams, electrical wiring, copper plumbing, and duct work. Since it may be hard to tell where these items are, you should experiment by moving the WAP to different spots to maximize its signal to the areas you want covered. If you're using a combination router/switch/wireless access point, you should place it with the largest consideration given to its function as a WAP.
Distance is the enemy of wireless networks. Manufacturers of wireless networking equipment state operating ranges for their equipment in hundreds of feet. The only scenario I can think of where that might work is if they test their equipment outdoors on a very flat wide-open field without a single metal object within 100 miles. My experience is that the maximum practical usable distance from a typical WAP to a wireless device is more on the order of 50-75 feet. If you are planning on a bigger wireless network, you may need to use a wireless range extender or more than one WAP.
A range extender is a device that acts as a signal repeater. Whatever signals it receives, it retransmits (and in the process, amplifies). The upside is that the range is extended as desired. The downside is that is sends the signal in all directions including back at the source, so it increases the traffic that the WAP sees and also the traffic to wireless Ethernet adapters within range of both the WAP and repeater. Also, the extra "hop" from the WAP to the extender and then on to the destination wireless device adds a delay or lag. Still, a delayed signal is better than no signal or a signal too weak to use. Finally, repeaters aren't standardized among manufacturers. That means, if you have a Linksys WAP, get a Linksys range extender (repeater) and so on. (I personally have not used a range extender, so this is only my "working knowledge" on the subject.) The section on networking equipment includes an example of a wireless range extender.
Another WAP (in addition to the one built in to the router) can sometimes help. If, for example, you have a wired network on one floor, but can't easily get that to the second floor then wireless networking is one solution. However, if the second floor is long or parts of it are too far away from the router/WAP, the signal may be too weak to be usuable. In this case, buying a dedicated WAP and placing it on the first floor on the opposite end of the house from the original WAP may fix the problem. (The WAP will be set up to look identical to the one built into the router.) The wireless devices will tend to connect to whichever WAP signal is the strongest. The section on networking equipment includes an example of a dedicated WAP.
Wireless networks can operate in two modes named "infrastructure" and "ad-hoc." When a WAP is used, the wireless network operates in infrastructure mode. The WAP acts as a controller for the wireless traffic. In ad-hoc mode, there is no WAP. Instead, every card transmits as needed and all cards within range get the data. Therefore, every wireless Ethernet adapter needs to be within range of all the other adapters it needs to talk to, so the effective range of the entire network is roughly a 50-100 foot diameter circle. Since a WAP retransmits the signals it receives, it effectively doubles that range to having a 50-100 foot radius or 100-200 foot diameter. This is another reason why having a WAP can be beneficial.
If you would like to use wireless connections with a broadband connection sharing type of network, a WAP is more-or-less required. The WAP functions to bridge the wired network (where the Internet connection is) to the wireless devices. (This bridging can also be done using a PC that has both a wired and a wireless Ethernet adapter. Windows 98 and beyond supports sharing an Internet connection through a PC. However, we're not going to cover that just yet. See Windows Internet Connection Sharing.) It may be that the only wired portion of your network is from the cable/DSL modem to your router/switch/WAP device. Everything else can then be wireless if that's what works best. Some combination of wired and wireless devices is more typical.