Building PCs for Fun and ... Well, More Fun
Building PCs for Fun and ... Well, More Fun
This area is dedicated to one of my favorite hobbies: building desktop computers from components. I've been building & upgrading PCs since the early 80's, when upgrading memory consisted of taking individual chips out of a tube and inserting them into sockets on the motherboard. Mostly, I build PCs to support one of my other favorite hobbies, which is computer gaming. However, I have often been convinced to use my powers to build PCs for friends and relatives with other purposes in mind. The topic areas are listed to the left to give the general categories. Choose any one of those topics to get the articles/entries.
PC Building Tips
PC Building Tips
This section is where I will try to impart some advice on building your own desktop PC. All the desktops I currently own, I have built myself. That's been true for nearly a decade, now. The topics will be limited to desktop PCs, because you really can't build your own laptop. I won't try to cover everything here .. at least not initally. There are a number of good sites containing tutorials and help on building your own desktop PC. I'll stick with a few tips to counter problems I see made when people build their own desktop computers and to help with the selection of components.
Where I Buy Components
Where I Buy Components
There are lots of websites with low-cost computer components. The best of these are very, very good. The worst of these are the stuff nightmares are made of. I will list sites I purchase from frequently or consult frequently. It's been Amazon (or sellers via Amazon) in the last couple of years. Before that, it was Amazon and Newegg. I also find deals at B&H Photo Video reasonably often, but usually when I'm in the market for home entertainment components and cameras. I have purchased a couple of monitors from them. Less occasionally, I pick up an item from Best Buy, but that usually consists of smaller items like cables. I've also been buying a few components directly from the manufacturers.
I used to use Amazon or Newegg pretty evenly as sources for computer components. Before I became an Amazon Prime member, I favored Newegg. I purchased my first item - a book - from Amazon in 2000 and my first item from Newegg in 2001. However, before Amazon Prime, I bought less than a dozen things from them yearly. Newegg has diluted its concentration from computer components by selling other things like appliances and car parts, and they added 3rd-party sellers - some of which have been less than reliable and honest.
Newegg and Amazon have fantastic order tracking and a complete, searchable order history of my purchases. If I revisit a product page of an item I've purchased before, Amazon puts a link at the top saying when I bought it with a link to the order. That's something Newegg doesn't do, and it's pretty handy. Amazon has reasonable product search functionality, but Newegg has them beat by far. I often do product research on Newegg and buy from Amazon. Amazon's prices are usually the same or cheaper, but the free Prime shipping usually tips the scale.
Recently, Amazon started offering Sunday deliveries in addition to Saturday deliveries. On some occasions, I need something for work on Monday, and this is quite handy. I don't know the exact number of orders I have had with Amazon, but it's somewhere in the hundreds. I've returned a few items; one was lost during shipping. I had no hassles getting my money back.
Newegg was one of my favorite websites from which to buy computer components. At last check, I have placed over 100 orders with them ranging from $7 to $1400. How do I know this for sure? Like Amazon, every order I've placed with them is available in my account order history on their website. This includes a complete listing of everything I've purchased and how much I purchased it for. I've used this several times to check what products I put in which build. It's quicker to look this up online than to look through my files or pop off the side of a machine. It also makes it very easy to buy another item of the same item and put it in a different machine or recommend it to someone. My first purchase from Newegg was a Leadtek TI200/TDH GeForce3 Ti200 64MB AGP 4X Video Card, which I bought in October 2001 for $229. I'm sure it was a bargain at the time.
Newegg's Guided and Advanced Search are good at whittling down items, but the Power Search is the real winner. I can reduce hundreds or thousands of potential components to the dozen or two that fit my build in mere seconds. No other site has search capabilities this broad.
Newegg also has daily "Shellshocker" deals. That at least gets me to look at the site once a day during the week. (On the weekends, the deals tend to be on things other than computer-related items.) I've purchased several of the deals, and they are good—sometimes fantastic deals. Newegg also has a mobile app that features one special mobile-only deal a day, and that one usually is a very good deal.
I used to be such a Newegg fan I practically shopped nowhere else, however, in the last couple years, there have been a few chinks in the armor. It used to be that all orders I placed with Newegg arrived in two or three days - most of those with free shipping. Newegg added "Super Saver" and "Standard" shipping options, which are often the only way to get free shipping nowadays. That's fine if the price is really good, and/or I'm OK if the item doesn't arrive for five to seven days. They've also started using the US Post Office for the Super Saver shipping. I get complete email tracking of when the order is accepted and charged and another (with tracking numbers) when it is shipped - until the USPS gets it. Then, I often get no tracking info until the item is delivered. That I am not happy with. I generally try to make sure to get the two to three-day shipping. If I can't get it that way from Newegg, I generally can get it from Amazon.
The second chink in the armor is that Newegg now allows other dealers to be listed in their searches and sell products through Newegg. In theory, that should be fine except that (at least for the things I am looking for), the prices of the other dealers are bad. Sometimes to the point of being laughable. The times when their other dealer's prices align with Newegg (or Amazon) are so few that I find their addition in the search results unwelcome noise. Oddly, having other sources like this is something Amazon has always done, but it doesn't bother me with them. There are several reasons why this is so, but at least I can check the Amazon Prime checkbox, which eliminates anyone who doesn't ship it for free and guarantees two-day shipping.
I've yet for Newegg to get an order wrong, but I have had to return a few items I bought, and RMAs are easy to request online. One item was a video capture card that refused to work with one motherboard. (I had purchased that video card before and had no issues with it.) I received refunds in about a week to two weeks. They charge a restocking fee, which I wasn't overly pleased with, but since they would have to sell the card (for less) as an open box item, it was not a great situation for anyone. It's not their fault the card was incompatible. (Not mine either.)
Even though I might have issues with Newegg, I've ordered hundreds of items since 2001. I wouldn't hesitate to ramp that up. They've yet to make a mistake on an order or be late shipping an order. My returns were handled fairly and efficiently. I've recommended Newegg to many friends, and those who purchased from them have the same experiences that I have. Very few companies online, or otherwise, run with this sort of quality.
Micro Center is my CPU and motherboard store. ... Next section.
No, that pretty much sums it up. If you are lucky enough to live near a Micro Center store, which I do, you can take advantage of their fantastic deals on CPUs. Depending on the CPU model, they are consistently $40 - $100 cheaper. You can get another $20-40 off a CPU/motherboard bundle if you aren't set on a specific motherboard. The motherboards offered in the bundle are pretty good ones, too. The catch is that these prices are in-store only; you have to go there and buy them in person. Of course, they hope to get you to buy other things (or everything) while in the store. They sometimes succeed, too. You must pay sales tax, but Amazon now collects that anyway, so that's not a factor. Every gaming PC I've made in the last 3-4 years has a CPU from Micro Center and often a CPU/Motherboard bundle.
B&H Photo Video is my first thought whenever I need audio or video equipment - especially cameras, projectors, A/V receivers, speakers, etc. Their catalogs - yes, they still mail out catalogs - are adult toy catalogs. In addition to all things audio and video-related, they sell computer components. While their prices are generally competitive, their selection is smaller than that of Amazon or Newegg, as components are not their focus. When I recently decided to upgrade to a higher-resolution monitor, I checked at B&H Photo Video since video-editing systems (and, therefore, monitors) are right up their alley. I found that B&H Photo Video had the monitor I was looking for, which was cheaper than Newegg and Amazon and had free shipping. (They didn't charge sales tax at the time, either.) They previously had a video card I was looking for that was cheaper, too.
PC Part Picker is not a place you can buy things from directly as it's not a store. However, it helps assemble a list of components with the least cost. The prices it quotes are the lowest of those taken from several stores it knows about. (The user can choose the store regardless of the cost.) The downside is that it doesn't have data about every single store. It has major ones like Newegg, Amazon, B&H Photo Video, and Micro Center. It also covers countries besides the US, like the UK, Australia, Spain, Germany, and Italy. I can't vouch for how good of a job it does for countries other than the US.
PC Part Picker tries very hard to ensure the components you put together when picking the parts for a system build are compatible. If you pick an Intel LGA 1700 socket CPU, the only motherboards offered later are those with an LGA 1700 socket. The memory offered will work with the motherboard, etc. It's getting pretty good at cross-checking. While picking each component, several filters are available that are specific to the component. They also have warnings, such as if a motherboard might need a BIOS update to be compatible with a CPU.
Popular Myths When Choosing Components
Popular Myths When Choosing Components
I often hear the same rumors or half-truths when helping someone build their first PC. They read X is better than Y in some article or blog; now, it's stuck in their brain. I have certain brands I tend to like above others, but I've been building these things long enough to see trends change. Today's "facts" become tomorrow's untruths fairly regularly. The following are some things I've heard or discussed directly or through forums with some patently wrong people. Try to avoid these when putting together the components for your build.
This is a rumor that toggles between true and false. At the high end in August 2024, AMD's recently released R9 9950X beats the Intel i9 14900K by a decent amount in high-performance applications like Blender and Photoshop. For gaming, the AMD 7800X3D still yields higher frames per second (FPS) results. When the 9800X3D comes out, that will probably supplant the 7800X3D. This is one of the rare times that AMD has both the performance and gaming CPU crowns. It doesn't help that Intel acknowledged issues feeding too much voltage to the cores in its 13th and 14th-generation processors. The "fix" for that is a microcode patch that is distributed by BIOS patches from various board makers.
The best approach is to determine the maximum you're willing to spend and then figure out the best CPU - Intel or AMD - within that budget. This marks one of the rare times AMD leads in gaming and production application performance (depending on which CPU we are talking about).
My favorite CPU and motherboard testing review sites are the YouTube channels Gamers Nexus and Hardware Unboxed. They cover other types of hardware in more depth than anyone else; it's all they do. As the CPU dictates what motherboards you can get, I pick that component first.
This is a rumor that I wish I felt was more of a rumor. In sheer number-crunching, Nvidia and AMD have done a pretty good job slotting their video cards into a line of price/performance - except at the very high end where the RTX 4090 is priced higher than it should be (in my opinion) because it has no competition. It should be as simple as figuring out your budget and buying whichever manufacturer's card you can get within that range. The truth - for me, at least - isn't that simple. If the "correct" choice is an AMD card, I balk. I'll choose Nvidia every time if it's in the budget to bump to the next highest Nvidia card from that initial choice. Why? The answers are video drivers and build quality.
I still have at least one AMD card in one of my systems. It is not, however, a gaming system. It's a Linux box with an AMD card typically used for home theater PCs. My last "gaming" AMD card was an ATI Radeon (R300) 9700 (from 2002). It had to be replaced because of bad capacitors, resulting in the display of the pink checkerboard of death when trying to play a game. I got it directly from ATI, so I had to ship it to Canada for replacement. I remember this because Canada wanted me to pay an import tax for the declared value on a card I returned for warranty work.
Later, a friend tried to use a card made by MSI based on an AMD R9 290X GPU. It was the correct card for his budget, and the R9 290X had decent reviews. His first card booted fine but would lock up whenever he tried a game. Any manufacturer can have an occasional build issue, so he got a replacement. The second one had the same issue. This time, we installed it in my gaming rig, thinking it might be some issue specific to his system. It got a little farther, but running 3DMark locked the system up within a minute. Eventually, that one died so bad that I couldn't even get back into Windows long enough to uninstall it. The AMD Catalyst drivers are so bad that I blue-screened when I tried to put my actual video card (by Nvidia) back into the system. I had to nuke and pave my OS to get the system working again. This could have been an MSI issue with AMD cards, perhaps. We replaced that card with an MSI card based on the Nvidia 970 GTX. It cost more, but there were no problems with his system. That leaves me somewhat soured on AMD cards.
The bottom line is, technically, you shouldn't necessarily pick Nvidia or AMD as always being the best. Look and see what makes sense for the budget available. My favorite GPU testing review sites are (again) the YouTube channels Gamers Nexus and Hardware Unboxed. Like CPUs, they cover GPU testing in more depth than anyone else.
This is a question I've answered online on more than one occasion. I have taken the liberty of copying myself. I'll sue myself for infringement later.
Computer power supply units (PSUs) are on-demand current draw devices. That is, they only supply as much power on the various voltage lines (3.3 V, 5V, 12V, etc.) as the components in your PC require. As such, if you were to replace your current power supply with a larger rated one (without changing any other components in your system), the difference in the current draw should be negligible. More than that, if you replace an old, poorly-designed 300W PSU with a new, more efficient 550W model, it's even possible the current draw will be decreased, not increased, due to increased efficiency. Efficiency is the ratio of power consumption from the wall socket compared to the power delivered to the computer components. A loss of efficiency manifests itself as heat generation. A PSU that is 85% efficient wastes less electricity in the form of heat than a 70% efficient PSU.
Power supplies operate most efficiently when driven at 50 - 75% of their rated maximum load. Let's say you've been adding hard drives over time (even external ones if the USB port powers them) and have also upgraded your video card. The 550W power supply was fine when you first got your system, but now, let's say you use 460W as a worst case. (It won't always draw that much, but when playing a video game driving the graphics card and the CPU hard, it may stay at that draw for extended periods.) Your 550W PSU is operating at 84% of its rated max. An 800W PSU, on the other hand, would only be operating at 58% of its rated max. The 550W power supply is affected by the loss of efficiency in converting 120V AC to 3.3V, 5V, 12V, etc. DC, and when loaded above 75%, it may pull more current from the wall to deliver 460W than the 800W supply would require. (It's more complicated than this because it matters how much current is needed by each voltage "rail," such as 12V compared to 3.3V, rather than just the total power. I've also ignored talking about thermal design power altogether.)
That said, it's a good idea to check the output of an existing PSU and upgrade it when adding components with a higher current draw. Some of the very high-end graphics cards now require 350-400W or more when they are running full blast. Pair that with a CPU pulling nearly 250-300W, and you see why 1000W supplies are needed. If you upgrade your graphics card, you will probably draw more current from the wall. Purchase a cheap Kill-A-Watt power meter to verify or measure the power requirements. Remeasure after upgrading a component to ensure the PSU is operating within safe margins.
2023 (September) Build
2023 (September) Build
2023 (September) Build
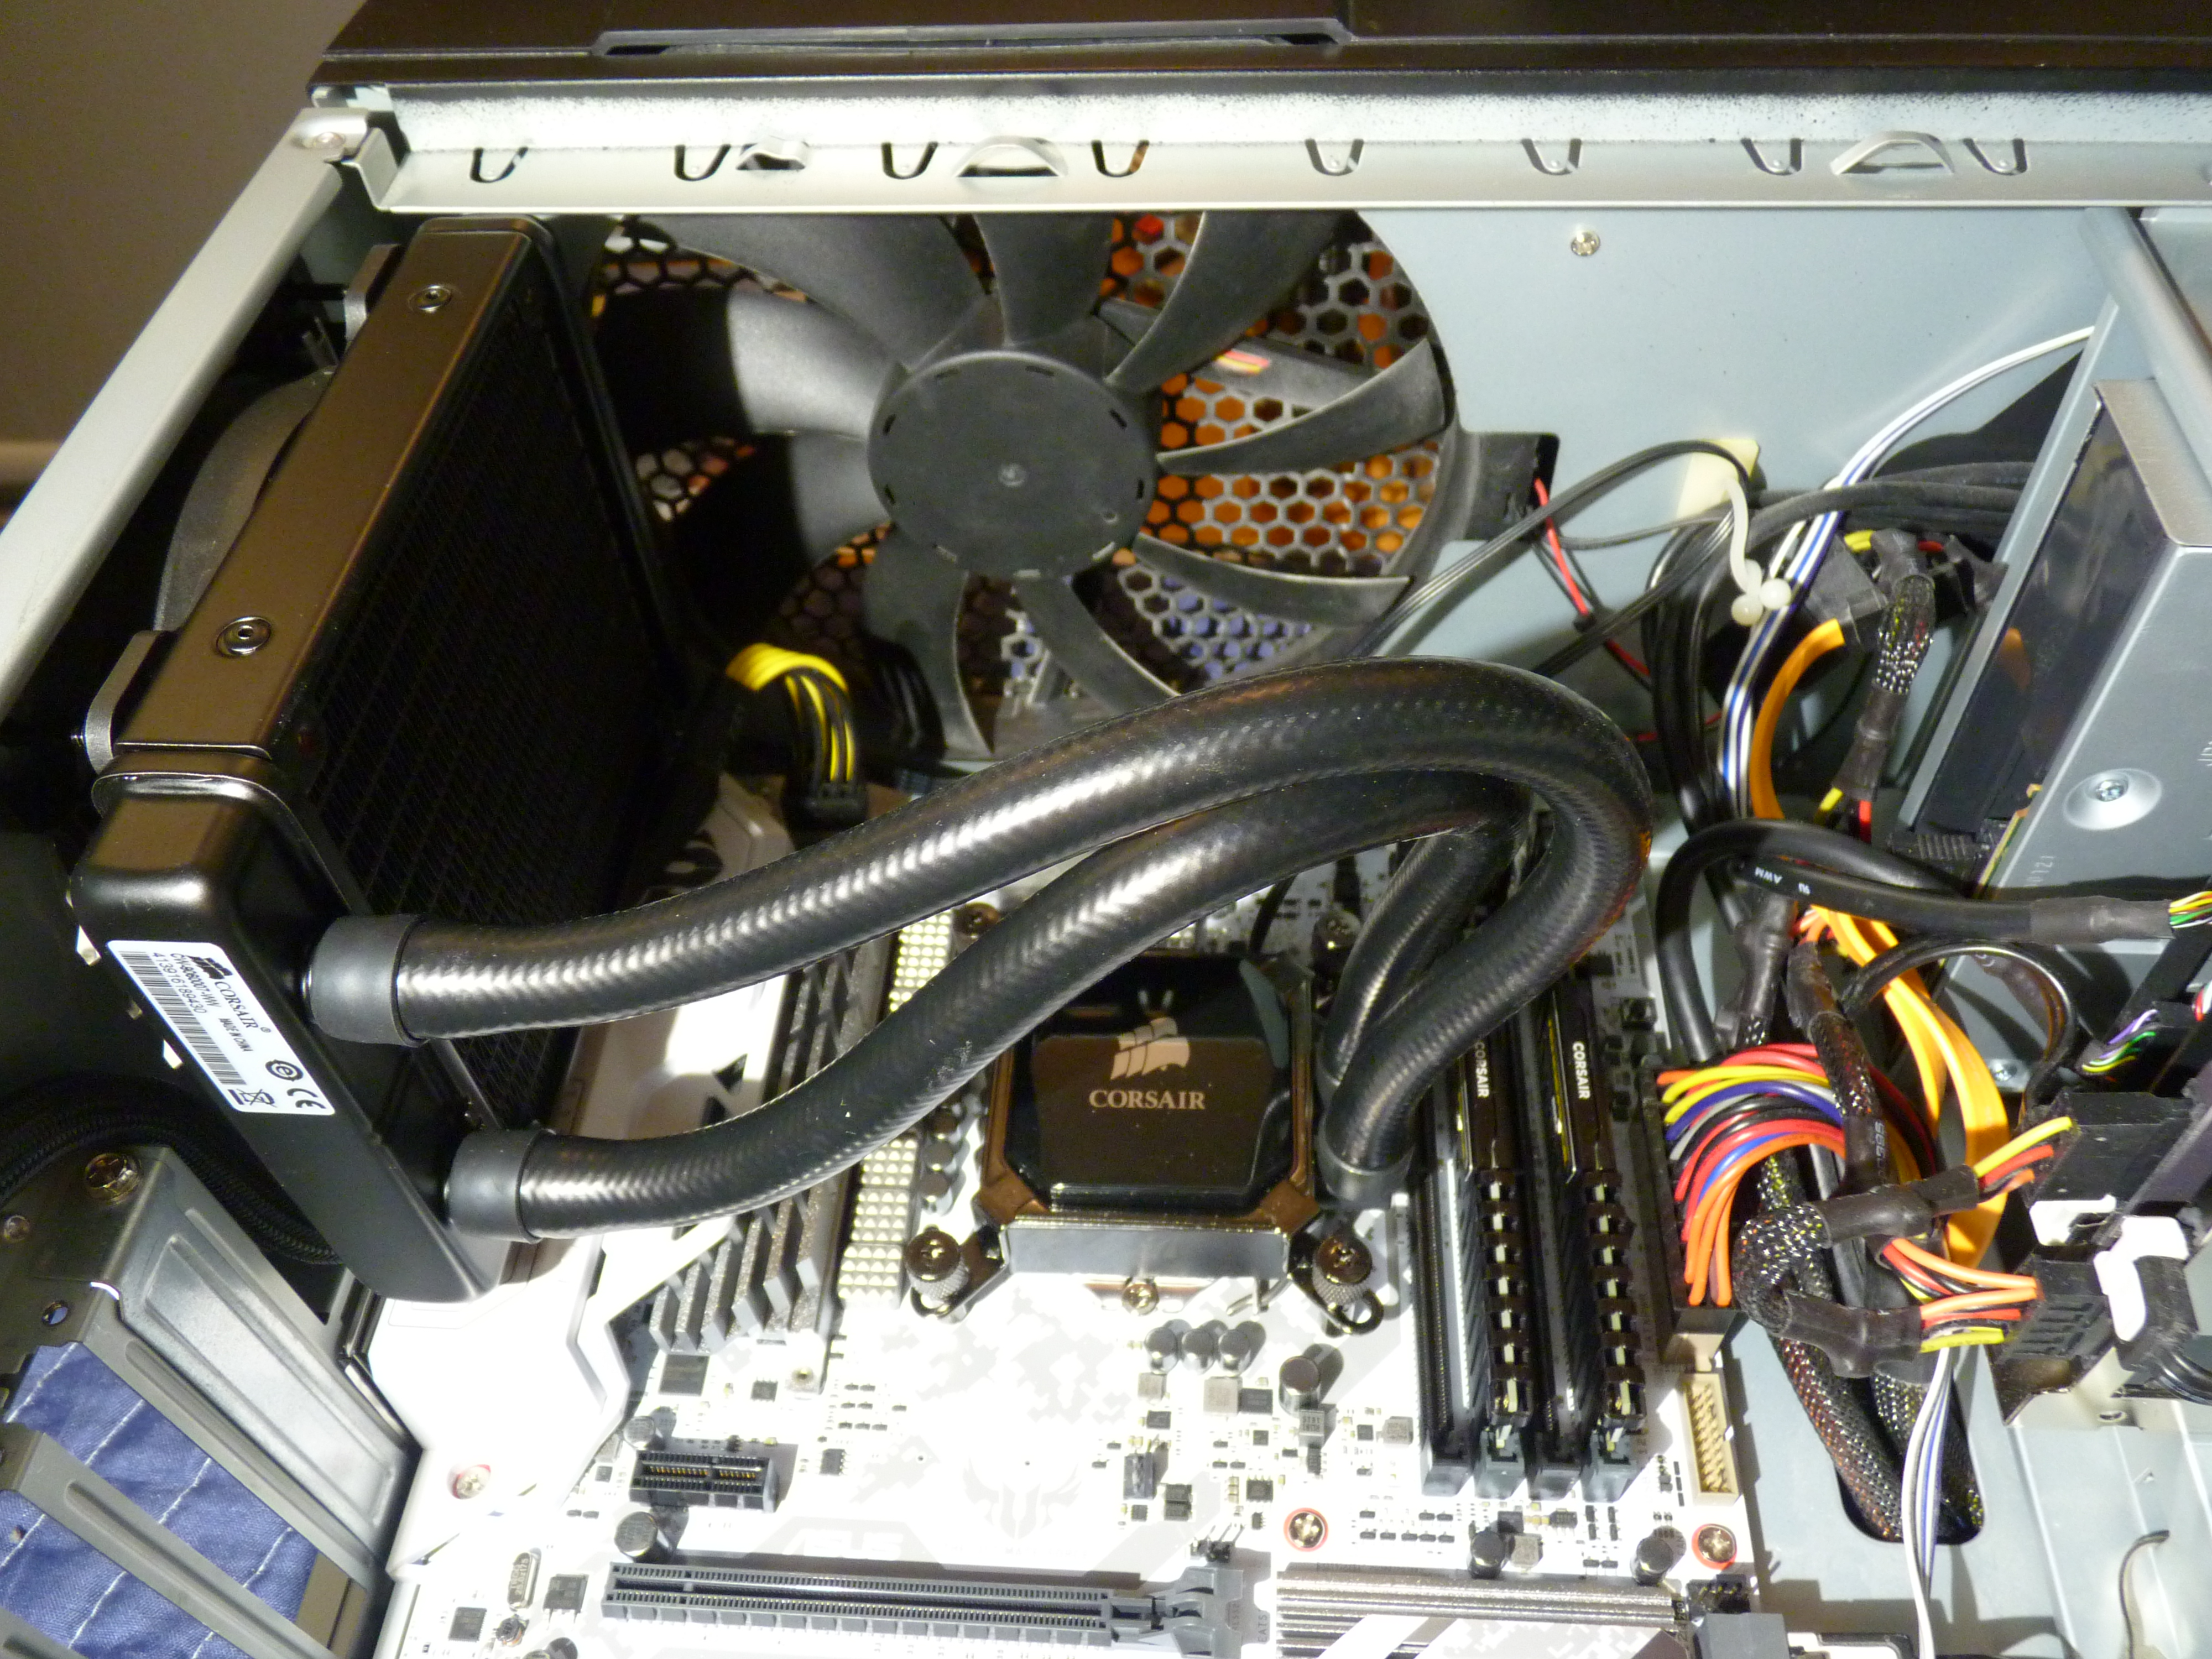
I didn't start out doing a complete upgrade. Mostly, I just wanted to upgrade my GPU. The EVGA 2080 Super's 8GB of video RAM was insufficient to run newer games at higher settings. I decided to change from water cooling to air cooling as well. As much as I liked the temperatures and silence from water cooling, changing the fluid every six to nine months was annoying. I wrote about the steps in maintaining the system in this blog post. It took hours every time. It had been two major GPU generations since my last upgrade.
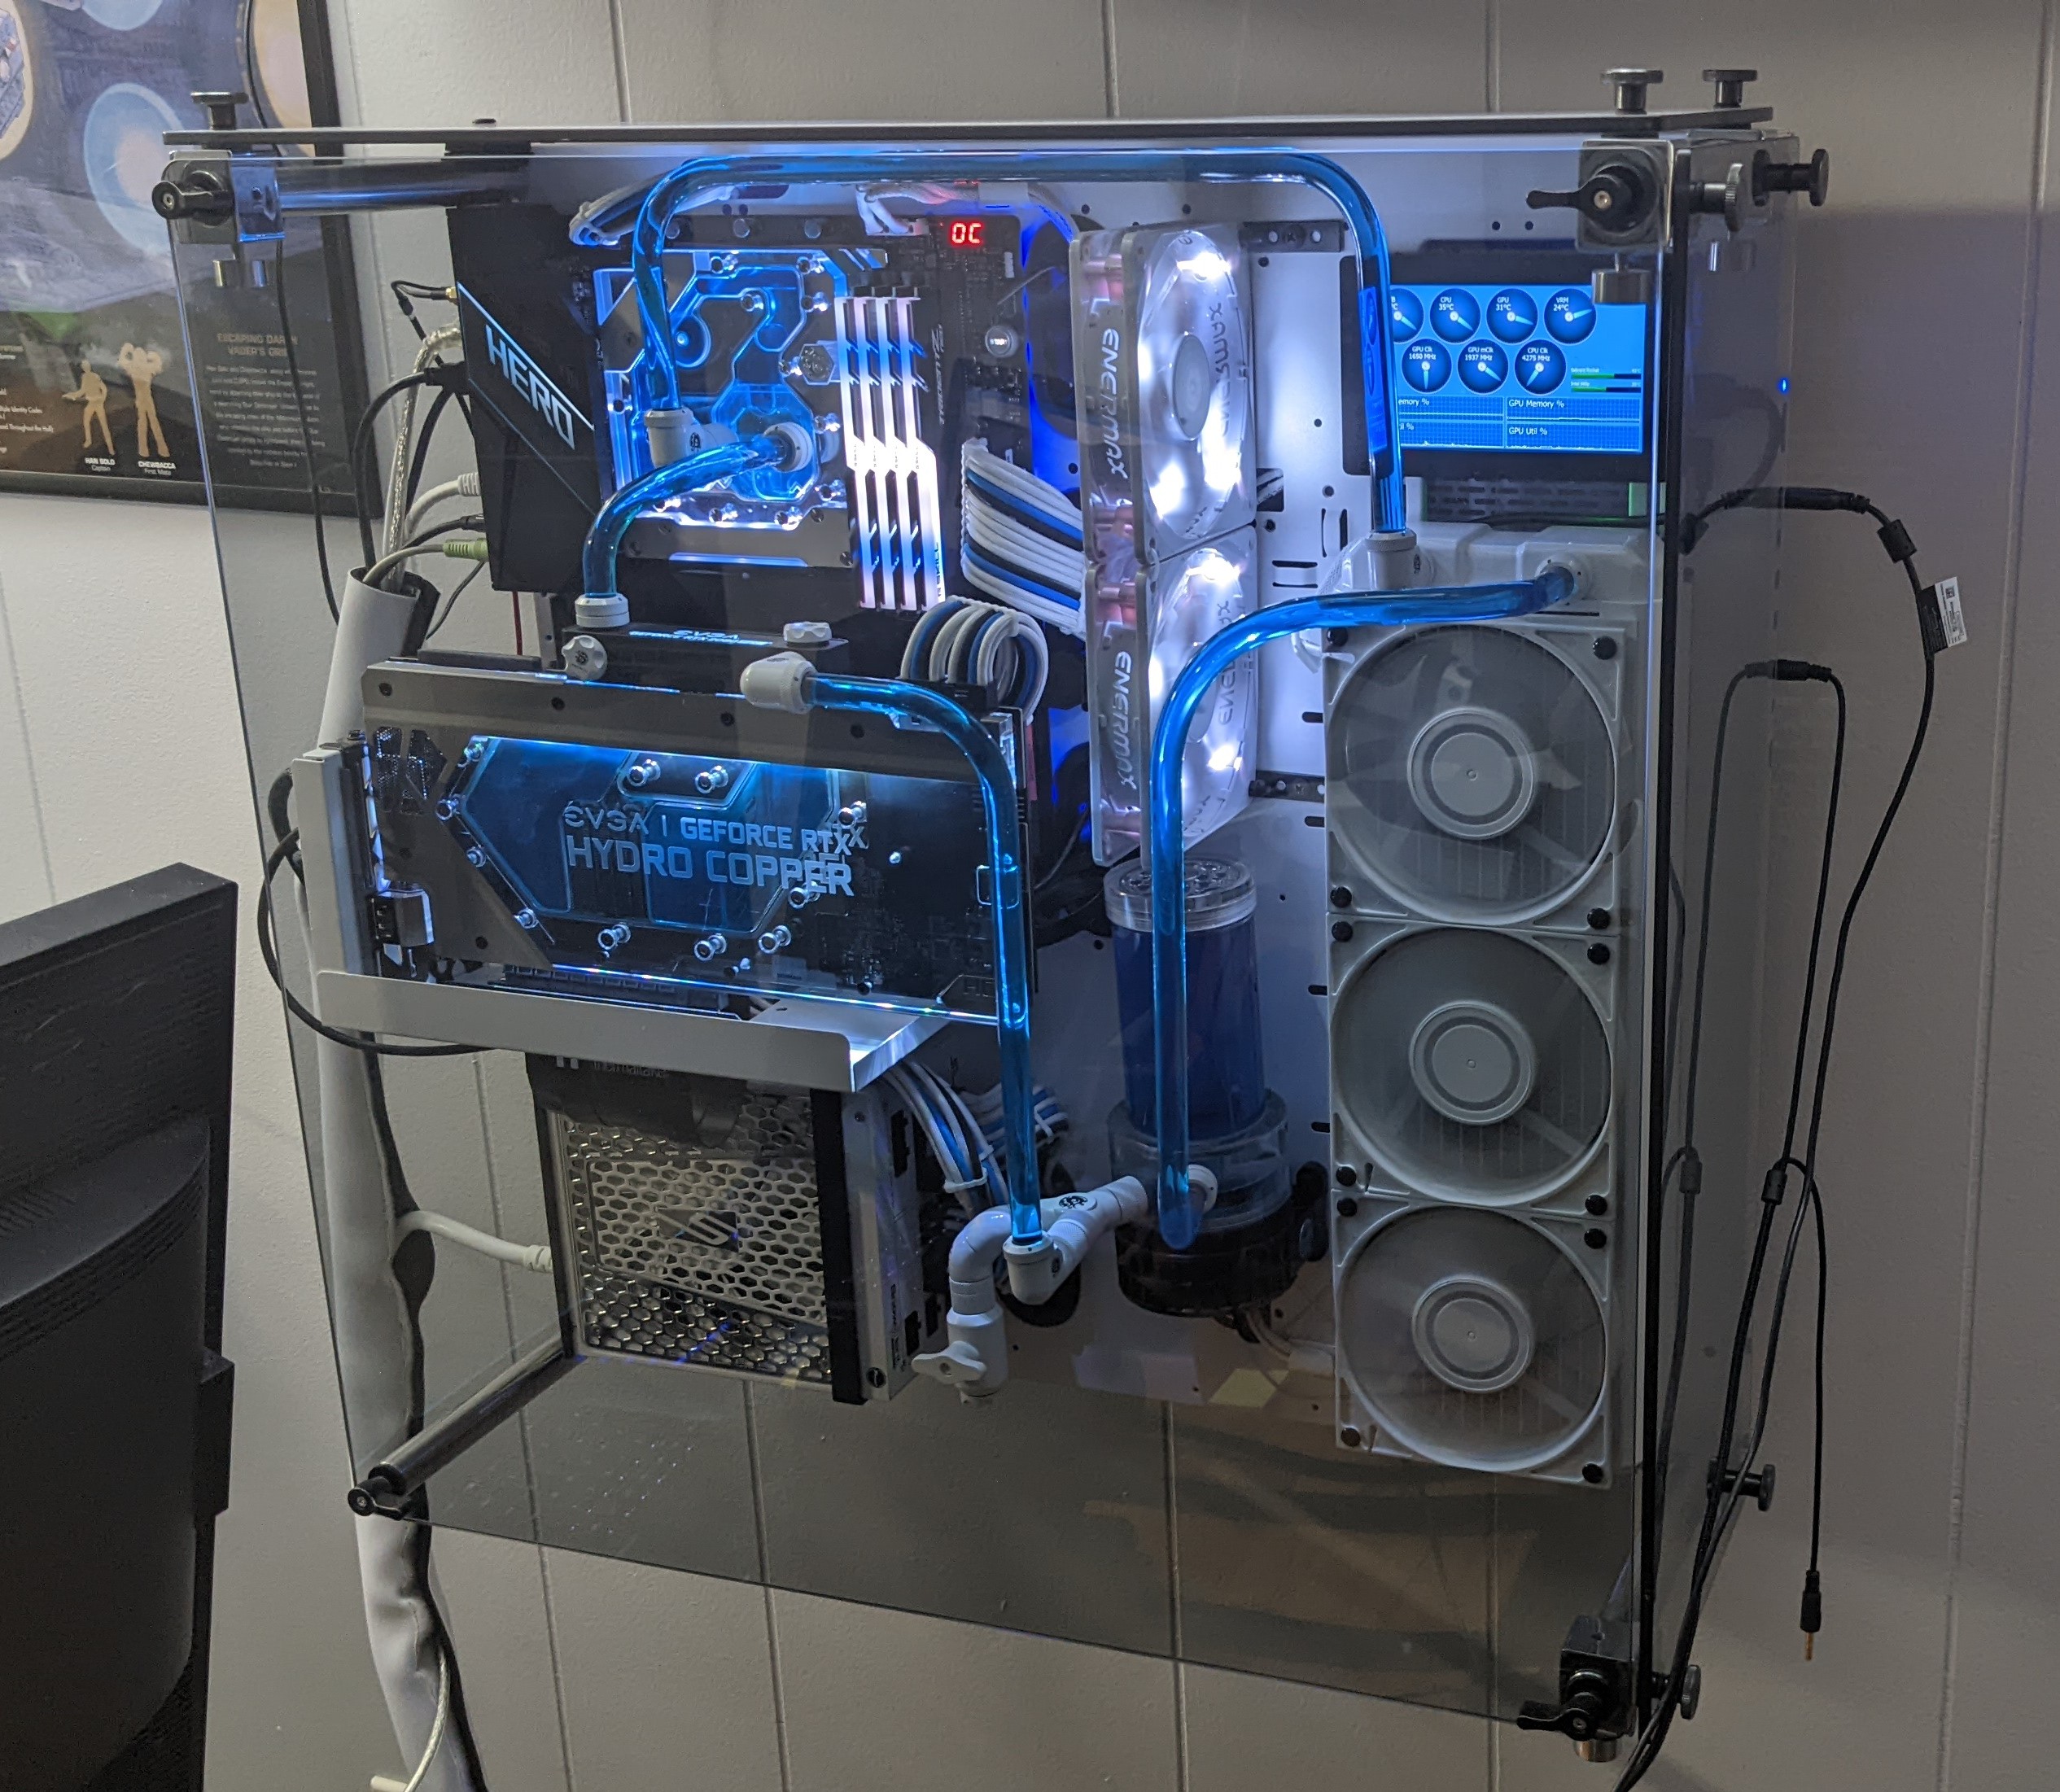
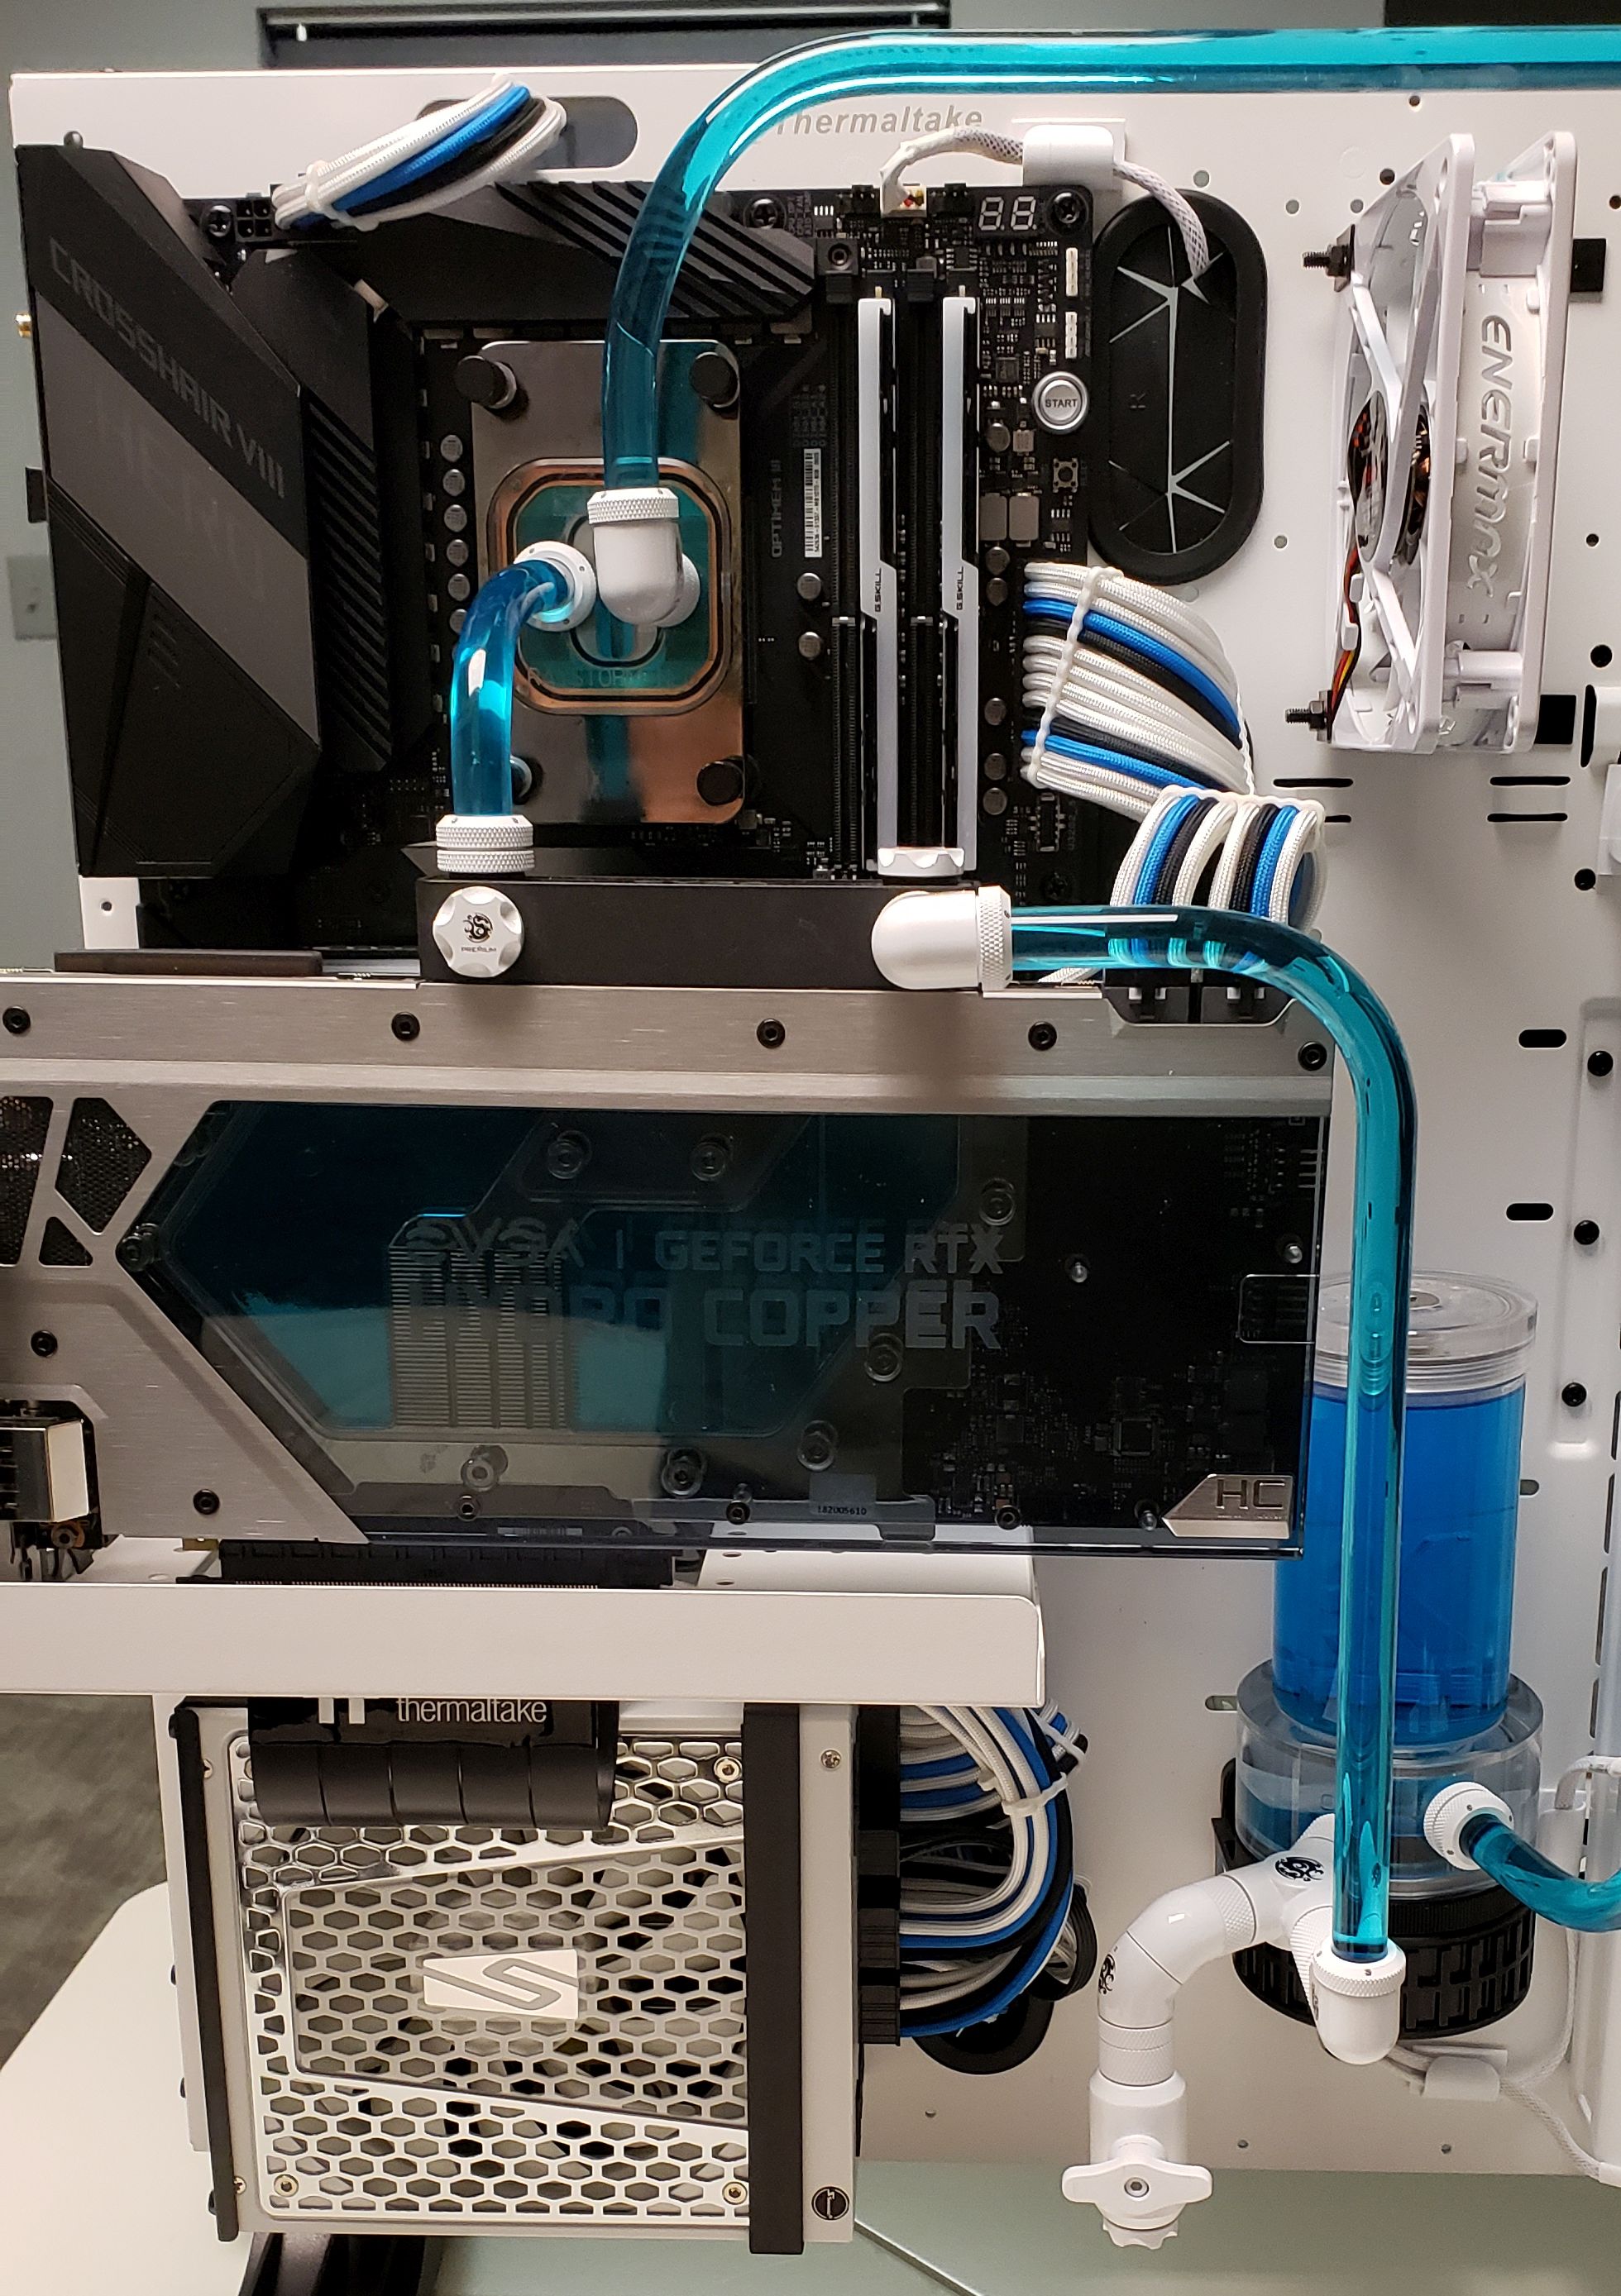
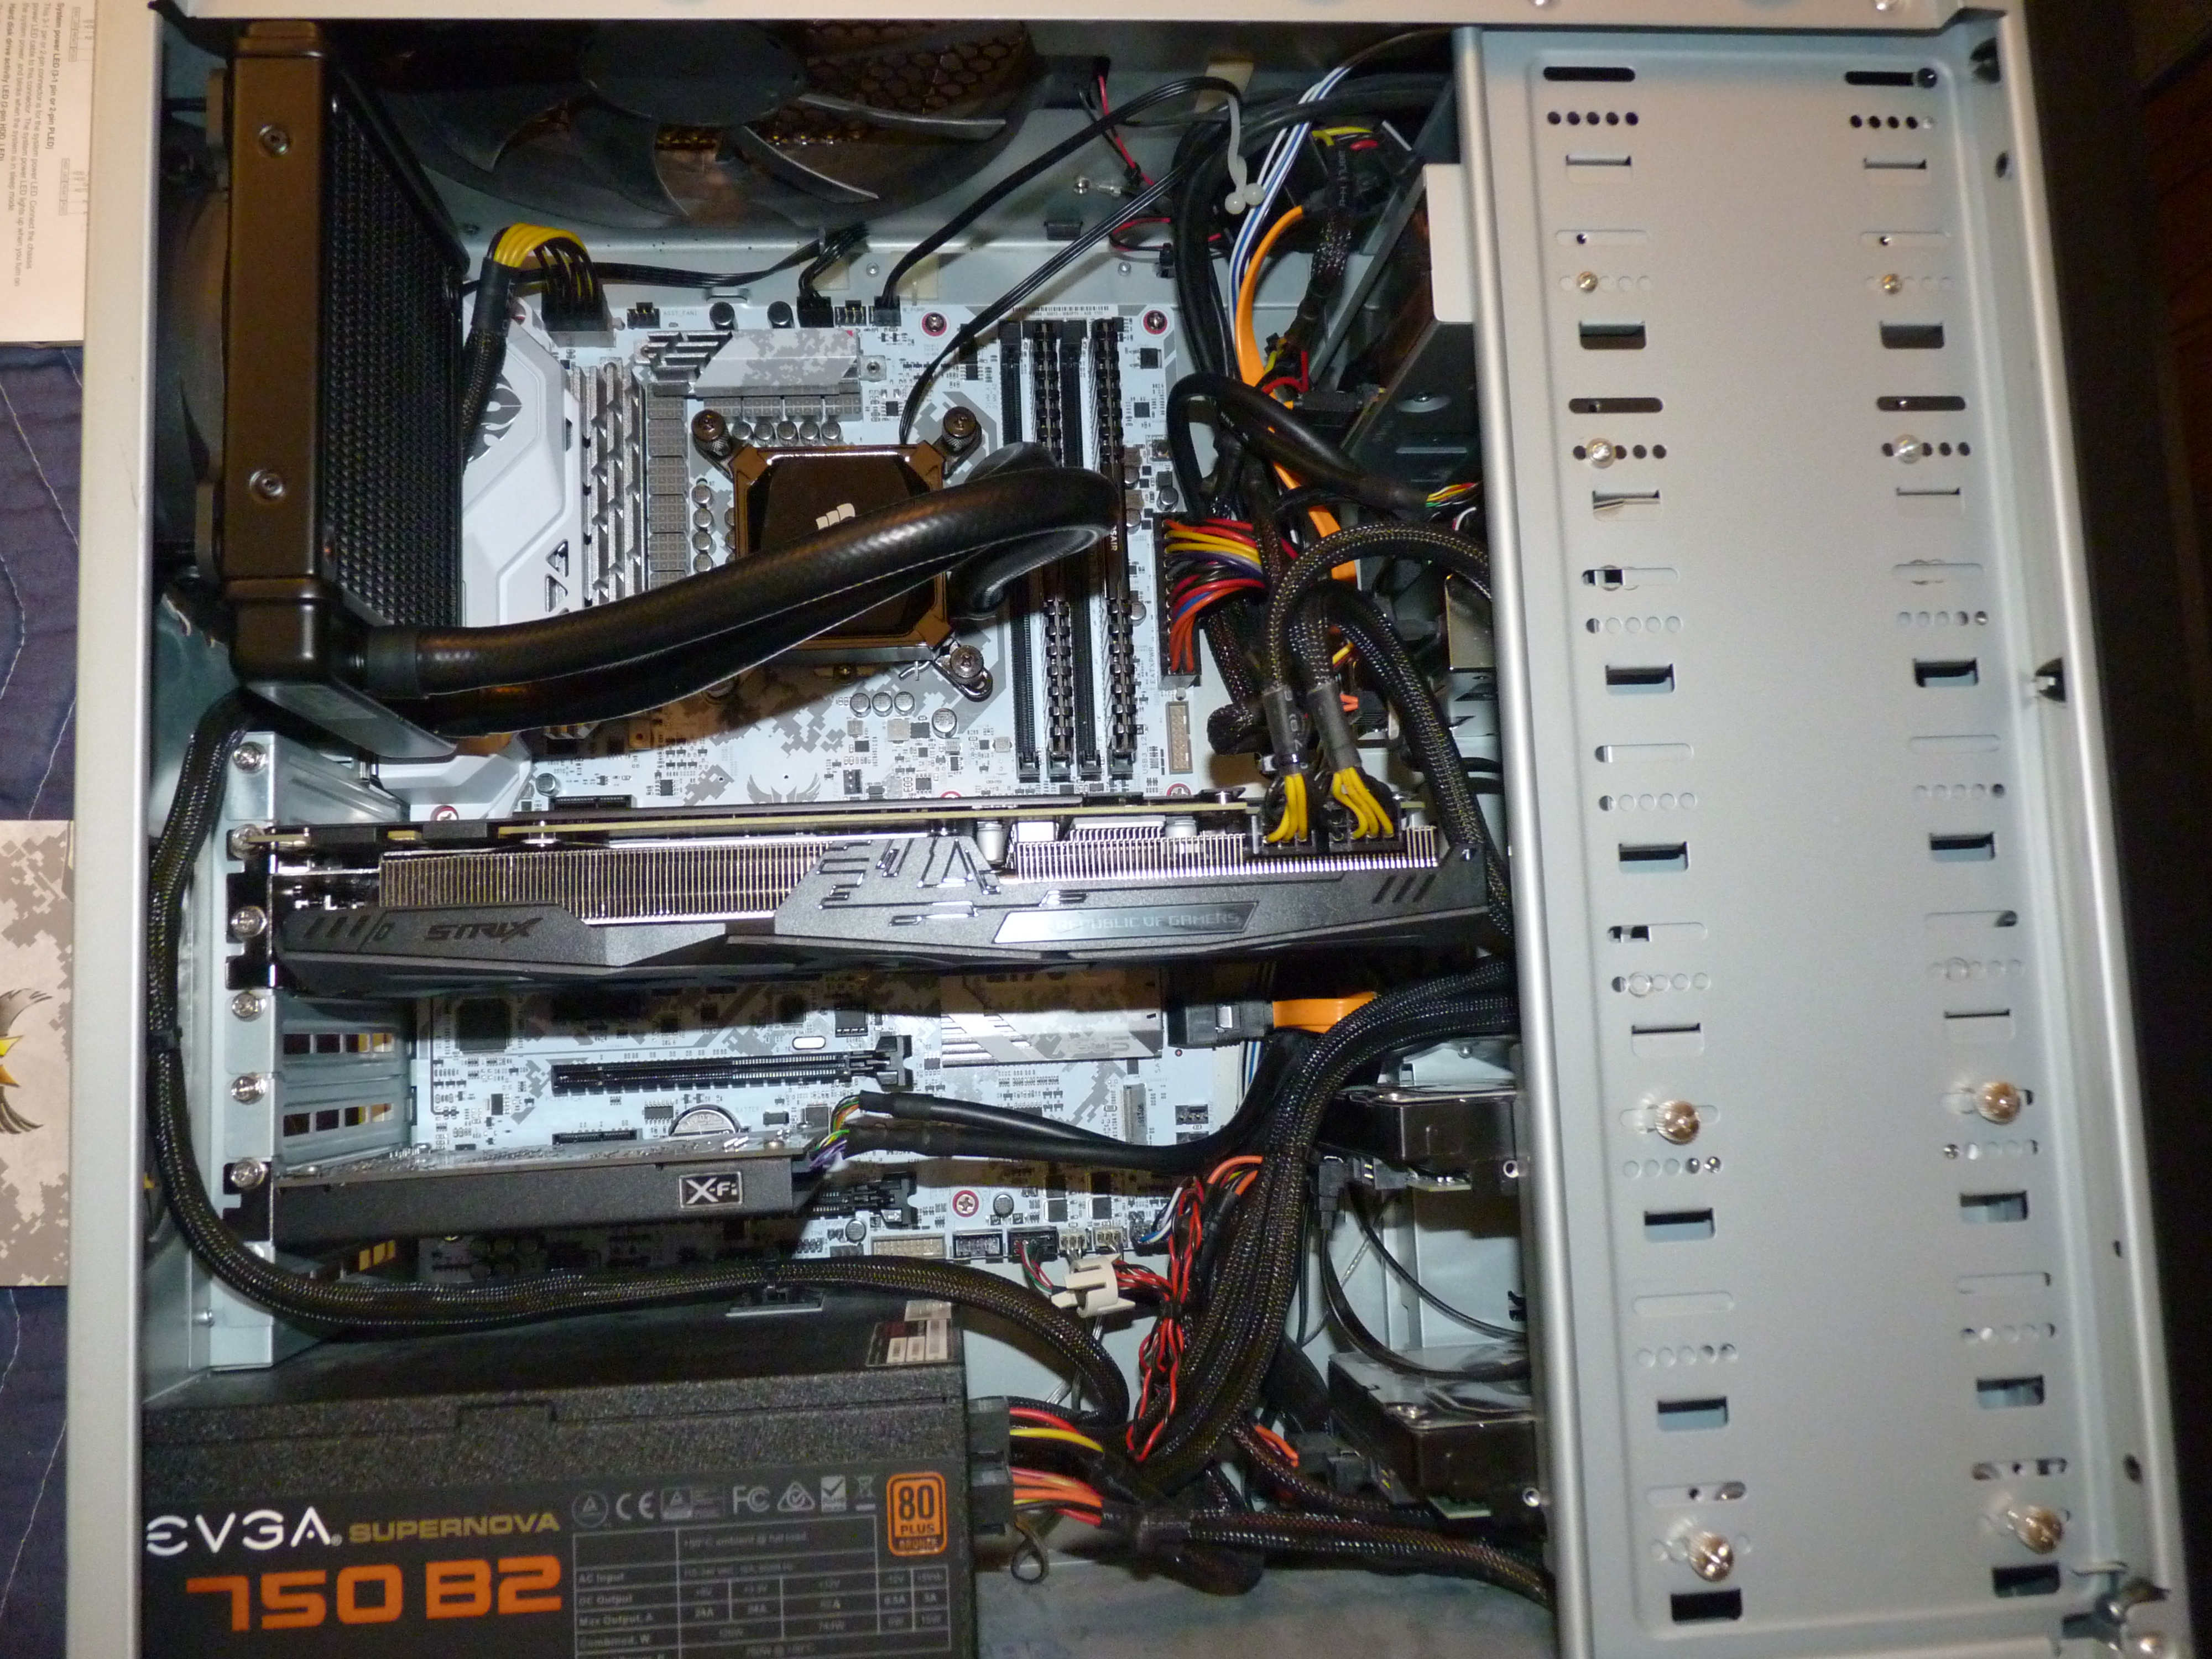
I decided to go all in on an Nvidia 4090 since prices were (finally) nearly at MSRP. (The prices went back up briefly but are now coming back into the range of the actual MSRP [or even lower].) Since 8GB of graphics memory wasn't enough, the 4090's 24GB of GDDR6X memory would make sure that wasn't an issue in the future. I upgraded the PSU to 1000W as recommended by Nvidia for 4090 GPUs. It's a Seasonic Vertex GX. Since the CPU also needed air cooling, I got a DeepCool AK620 CPU cooler (white). I reused the case, CPU, motherboard, and memory. I thought that would be fine for at least a while.
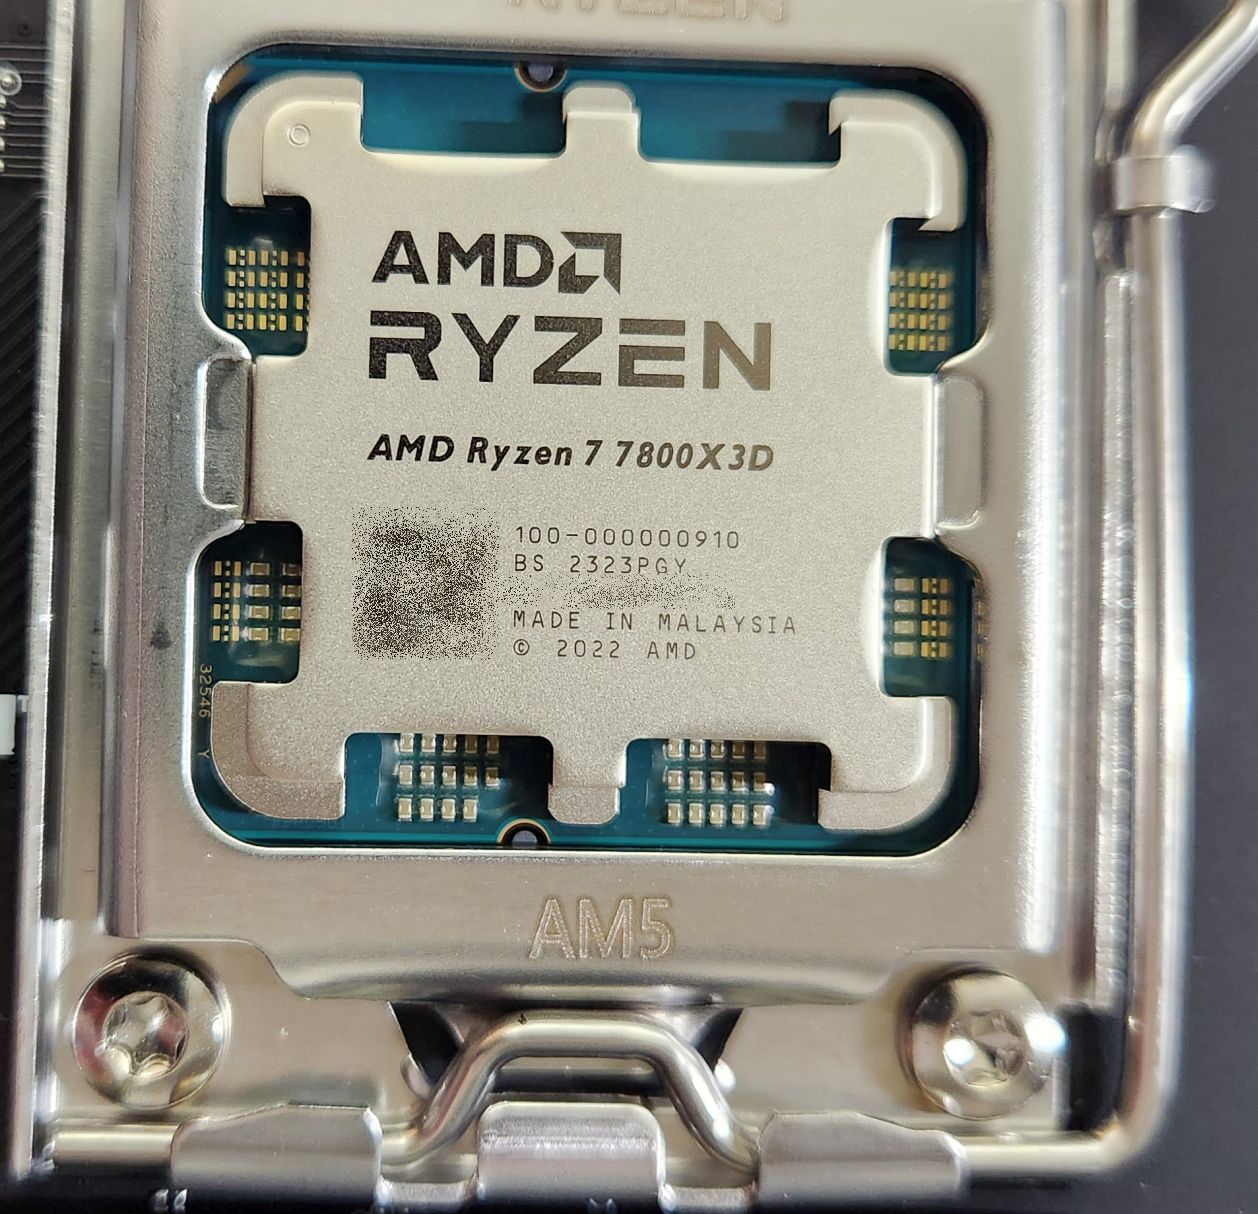
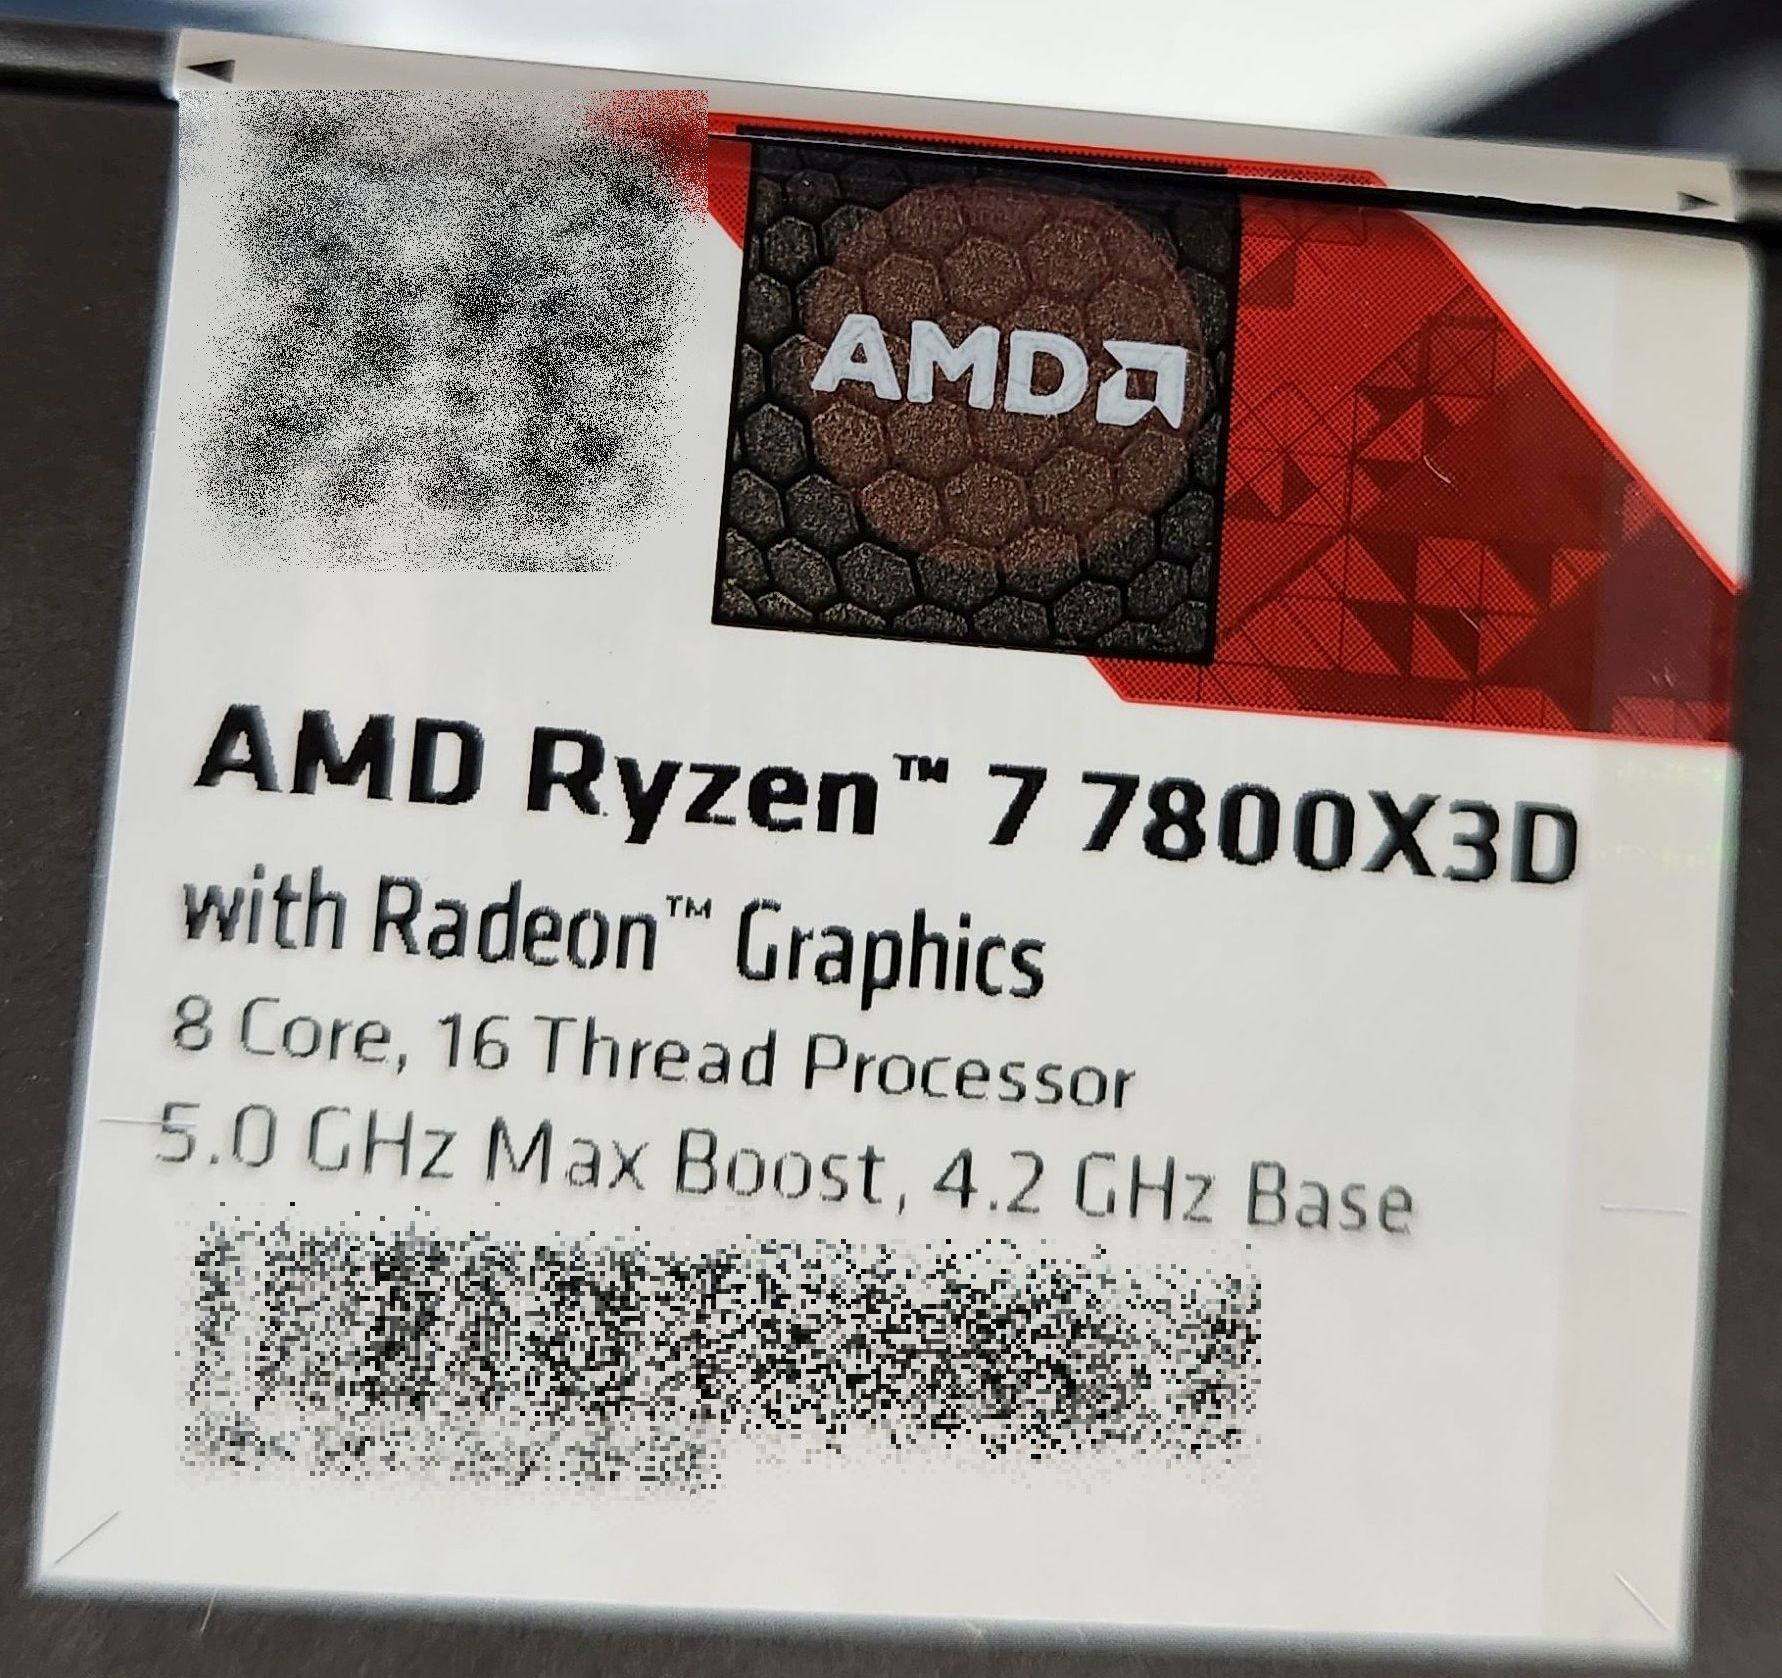
"A while" turned into about two weeks. I wasn't happy with how much the AMD 3900X CPU seemed to hold back the GPU, so I bought an AMD 7800X3D CPU, B650 motherboard, and DDR5 memory. Other than the case, I switched out everything—even the fans.
Contents
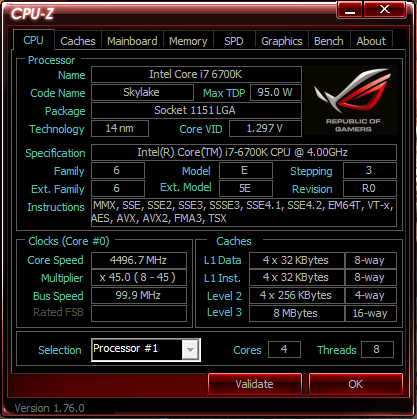
I switched from the AMD Ryzen 9 3900X to the AMD Ryzen 7 7800X3D for this build. After years of Intel CPUs, this was the second AMD processor in a row that I used in a gaming build. I was very impressed with the performance boost of the extra 3D cache in many games that several benchmark tests found.
I do a bit of video editing, and this CPU is slightly slower than the 3900X for that. That said, the base clock for the 7800X3D is the same as the all-core boost clock of the 3900X at 4.3 GHz. The boost clock of the 7800X3D is just under 5 GHz. In games, I noticed less stuttering. It just feels smoother overall.
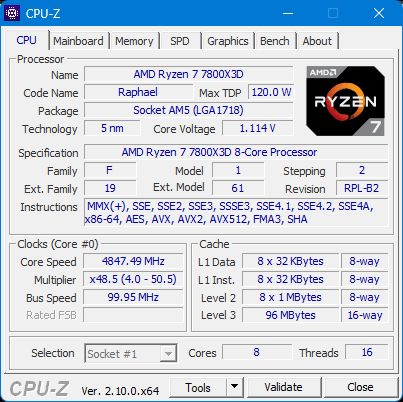
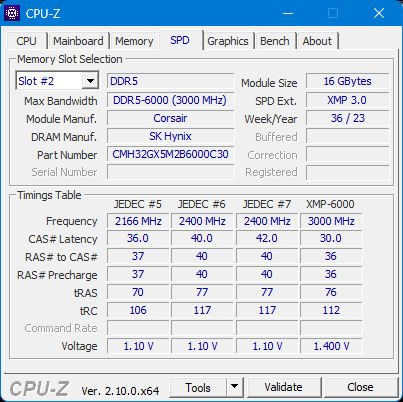
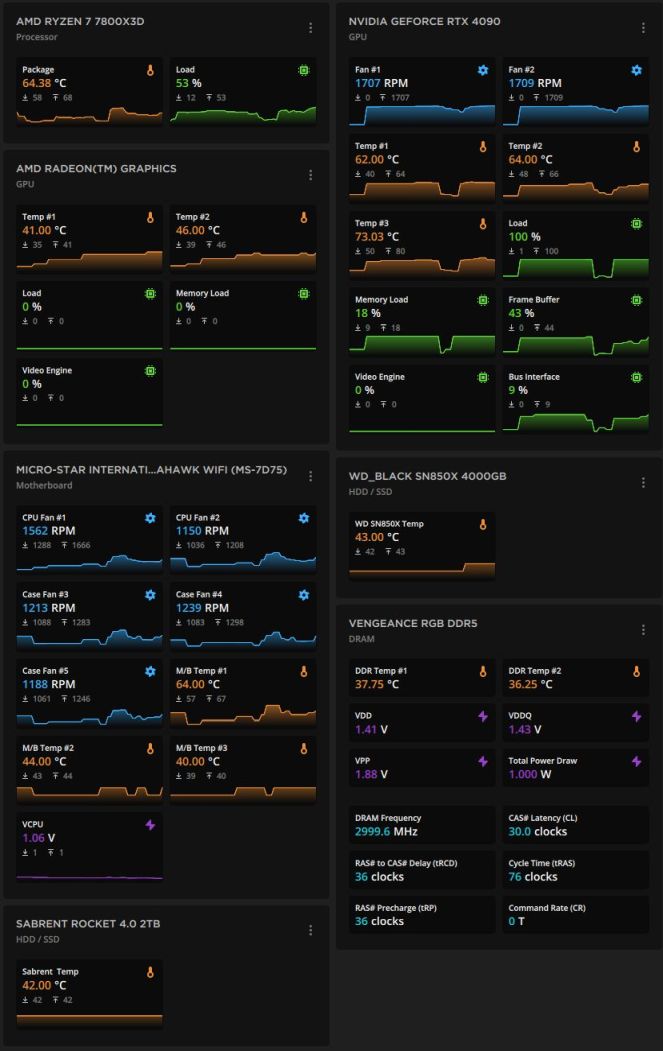
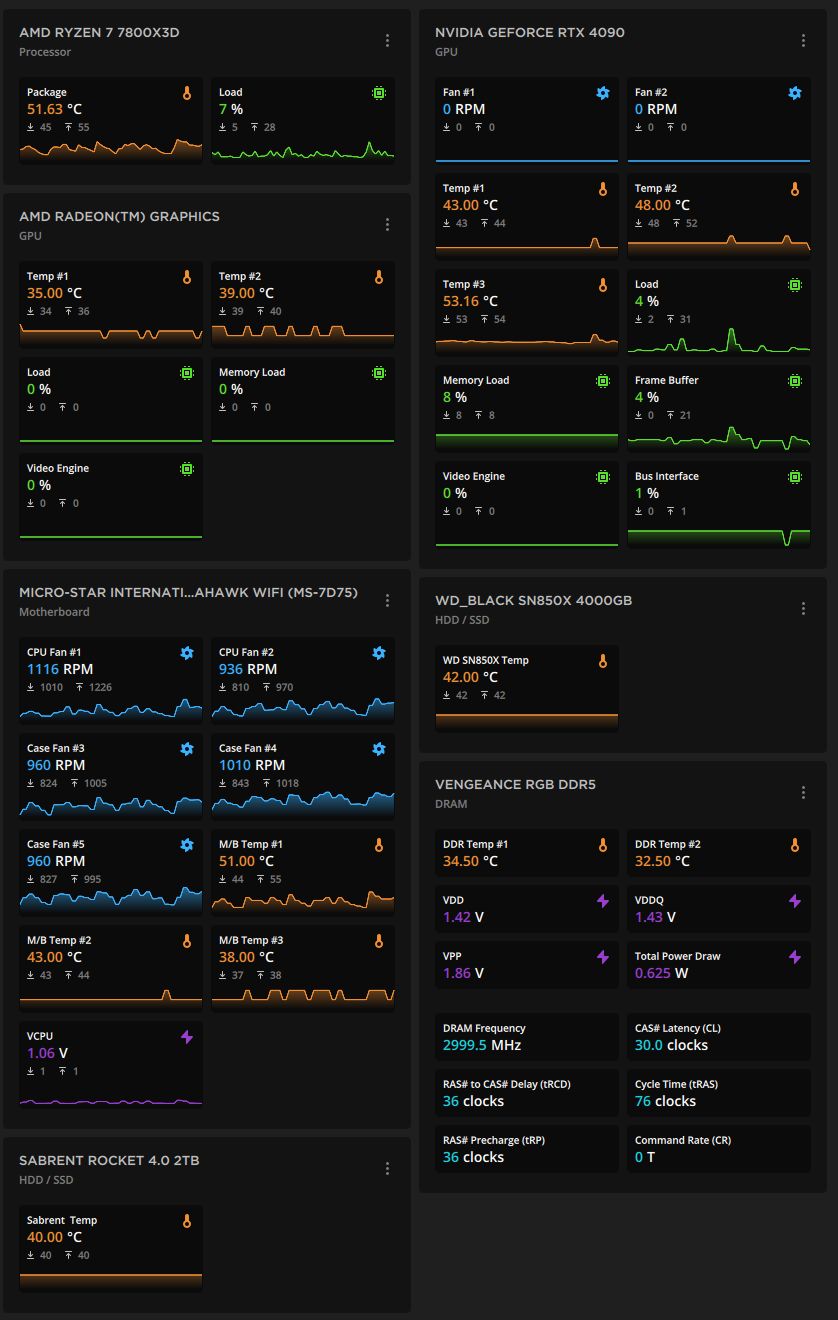
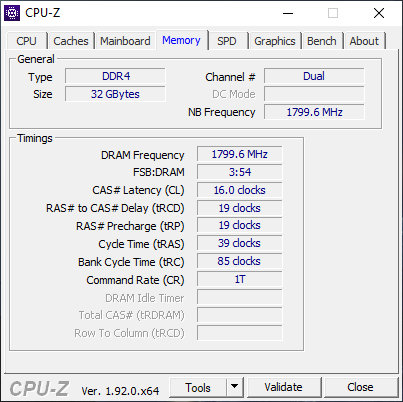
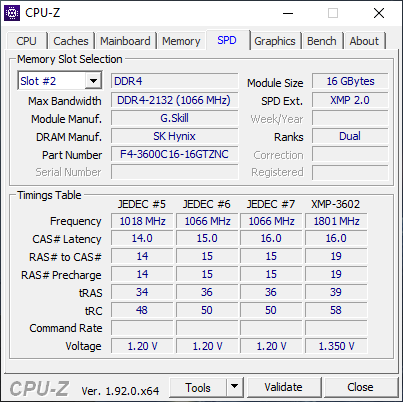
I am air-cooling this system, but it's still running relatively cool. Here are the specs according to CPU-Z (Version 2.10.0 x64 - July 2024).
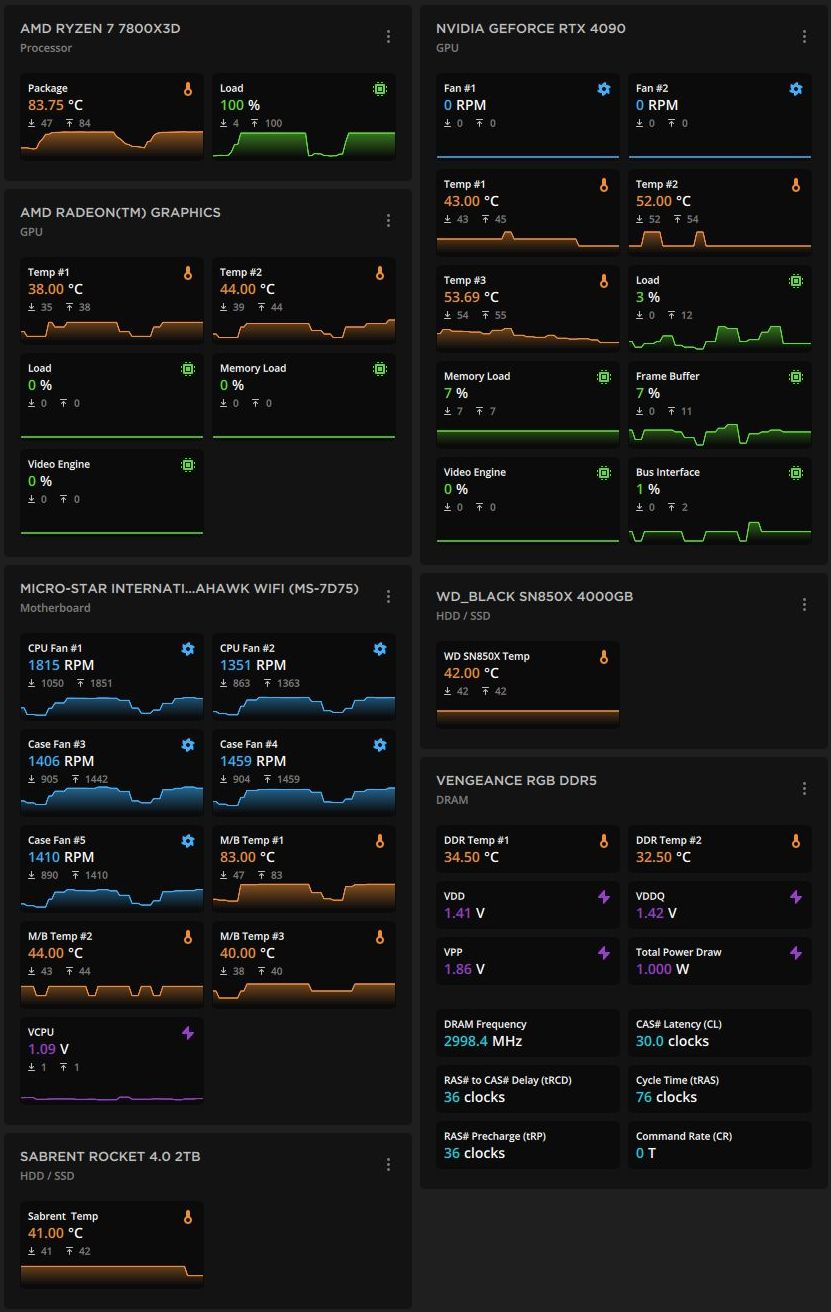
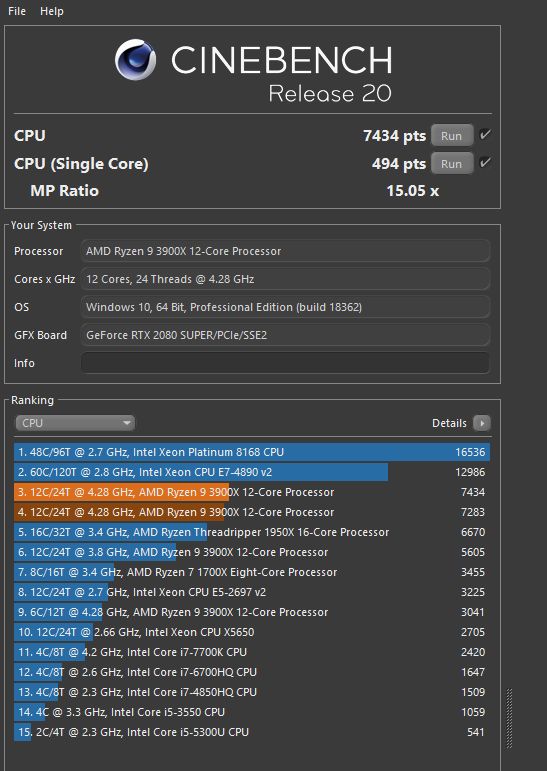
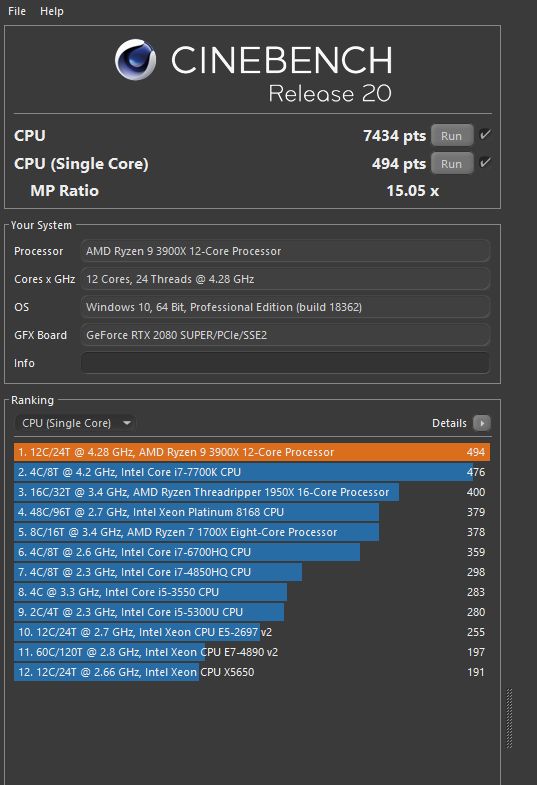
With the system built in 2019, I ran Cinebench 20 (CBr20) multi-core and single-core benchmarks. That benchmark has been superseded by Cinebench 2024. Still, I ran the older version against this CPU to see if the four fewer cores (8 cores in the 7800X3D versus 12 in the 3900X) and eight fewer threads (16 versus 24, respectively) would be countered by the higher clock rate and improved number of instructions executed per clock cycle (IPC) of the 7800X3D. In addition to the benchmark scores, I added a dashboard (from Corsair's iCUE software) showing the temperatures near the end of the multi-core run.
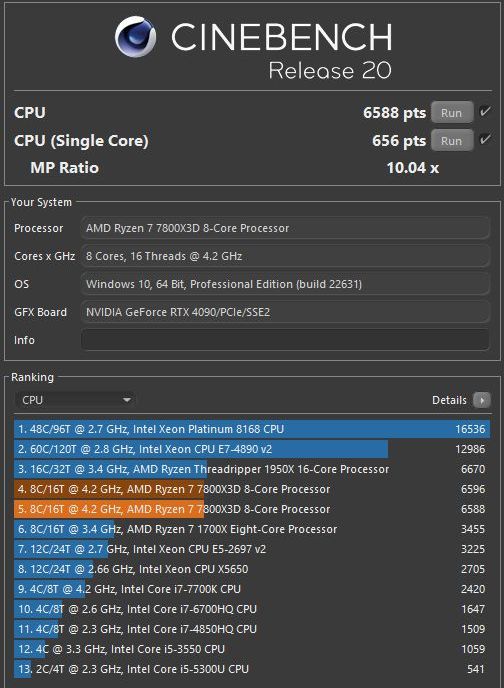
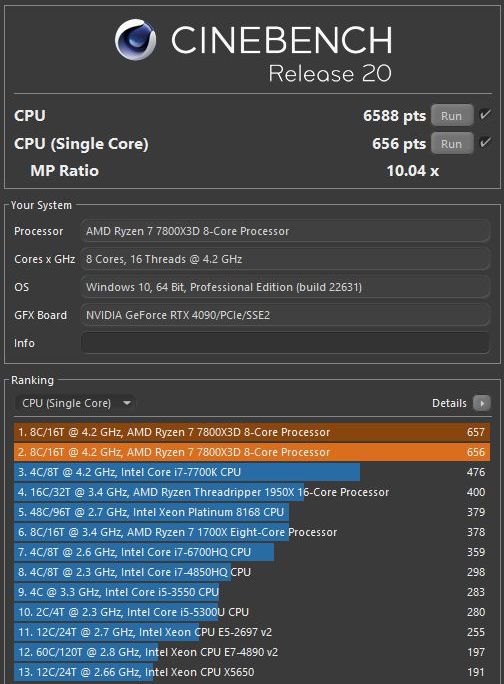
The multi-core benchmark for the 7800X3D is ~6596, compared to the score of ~7434 for the 3900X. That's lower but only by 11-12%, which is impressive since it has 33% fewer cores and threads. The single-core benchmark results show why it's that close; the 7800X3D scored 657 compared to the score of ~494 for the 3900X.
The 7800X3D's higher boost clock speed and better IPC make up quite a bit of ground, but for a multi-core workload, more cores from several generations back can still win. I also use this desktop to transcode and edit videos as I did with the previous system. The 3900X was faster. It's not a horrible difference, but the 7800X3D is slower. Since I use this system more for gaming than video editing, I'm okay with that.
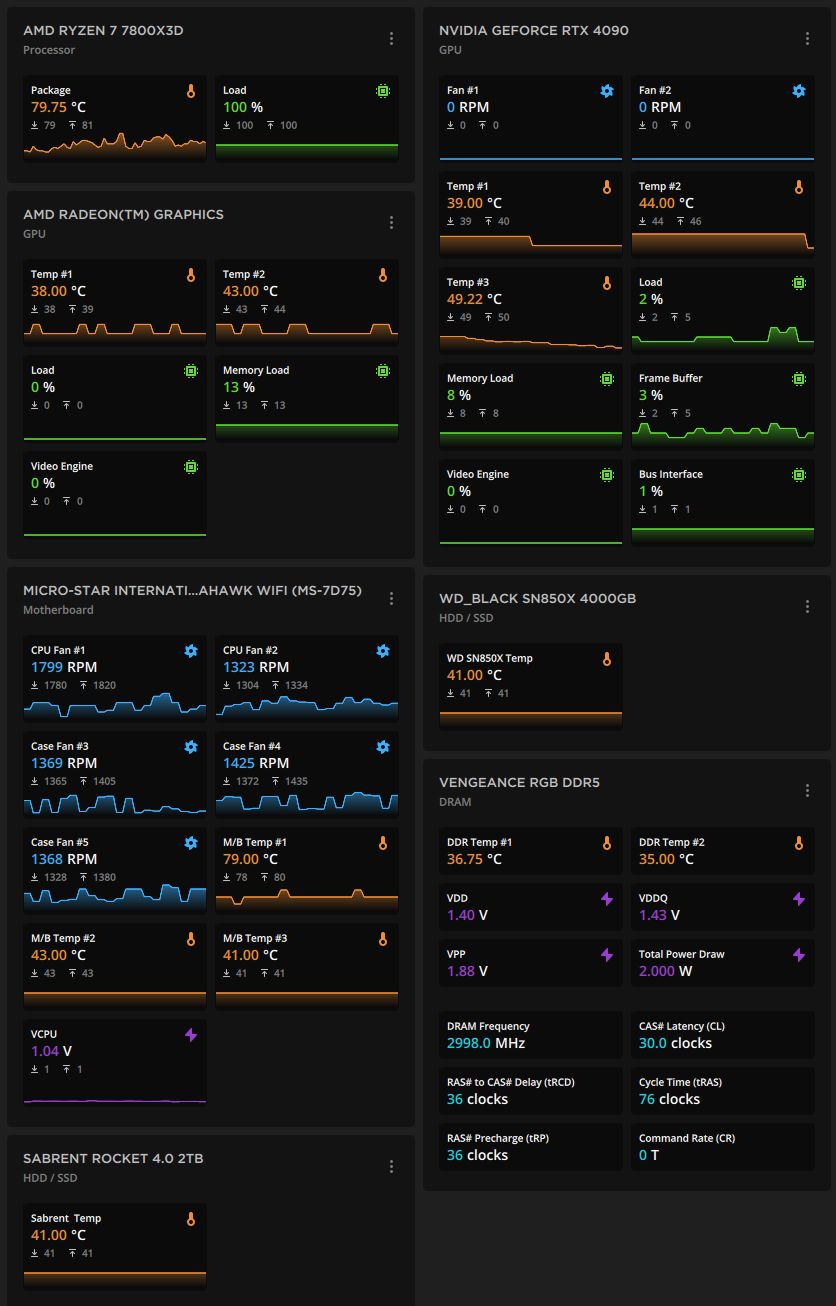
When I ran these benchmarks, the CPU temperature never went over 83°C. That's not bad for air cooling, but water cooling kept the temperatures at about 55°C. Higher-quality air coolers would do even better, but other than in CPU benchmarks, I rarely see temperatures over 60°C.
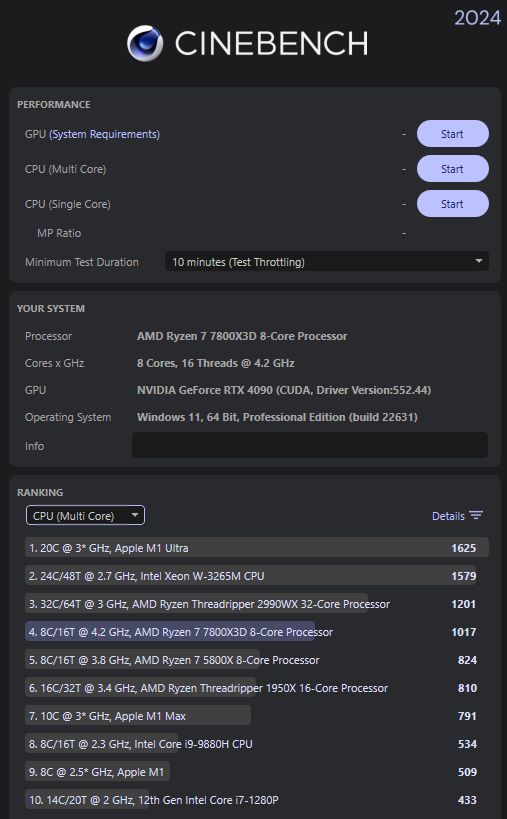
I also ran Cinebench 2024 (CBr24) against this CPU, so I will have numbers to compare with any future systems I build. The results are given in the graphics below. The first is a summary of the tests, followed by the multi-core results, the single-core results, and the temperatures during the multi-core tests. (The temperatures of the single-core tests are about 61°C.)
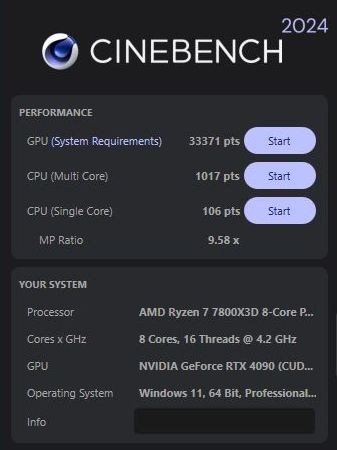

The result for the multi-core test, 1017, is about 100 points lower than other tests I've seen published (which are about 1115), but I didn't try to kill off unnecessary background processes to get the best possible result. Interestingly, the temperatures in Cinebench 2024 are a few degrees lower than I got with Cinebench r20. I have no idea why, but it was consistent.
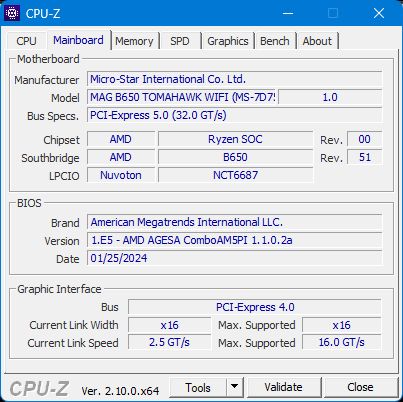
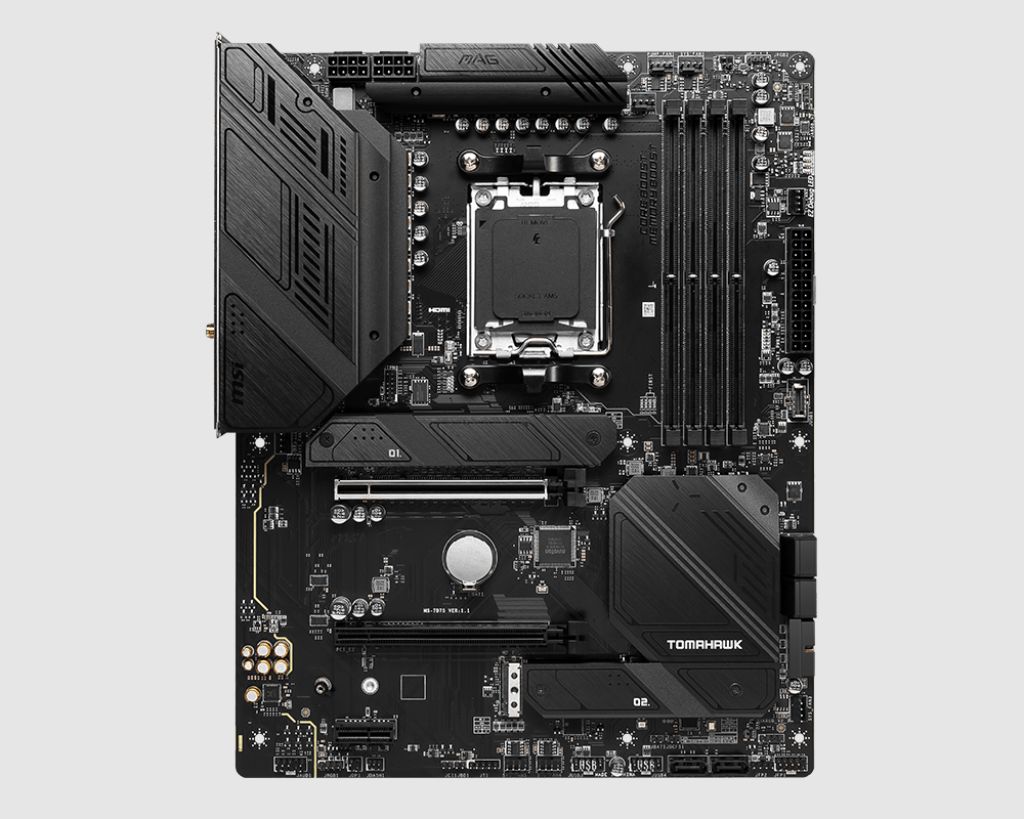
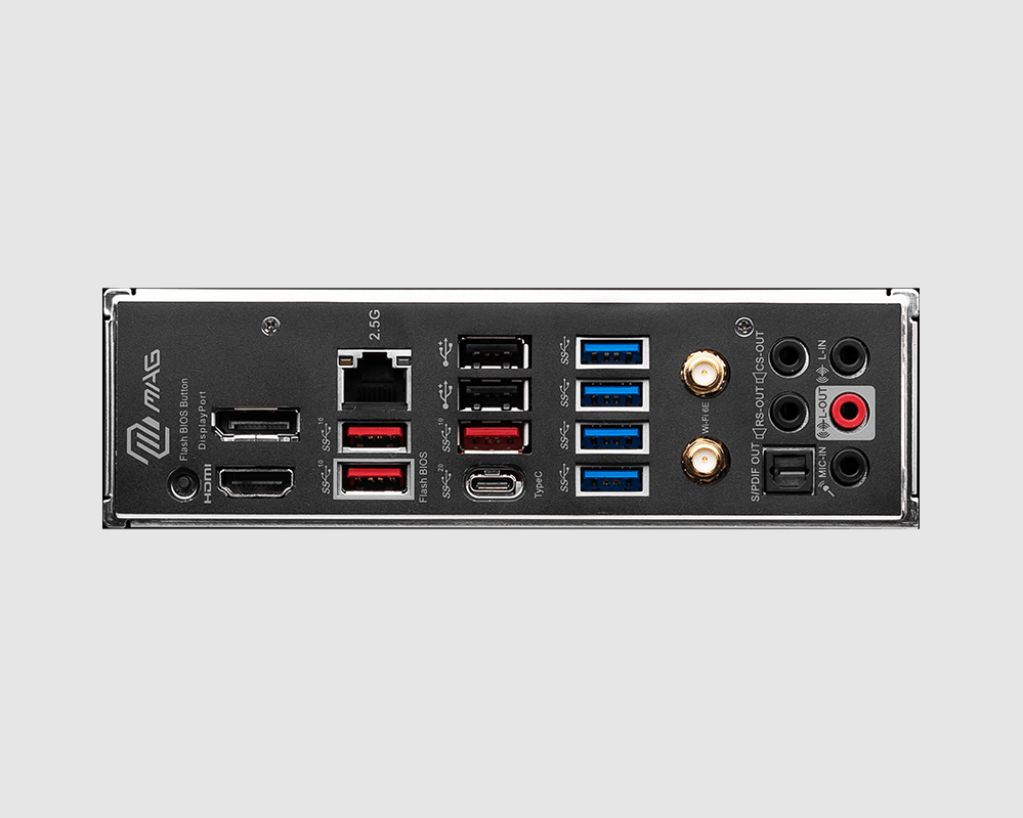
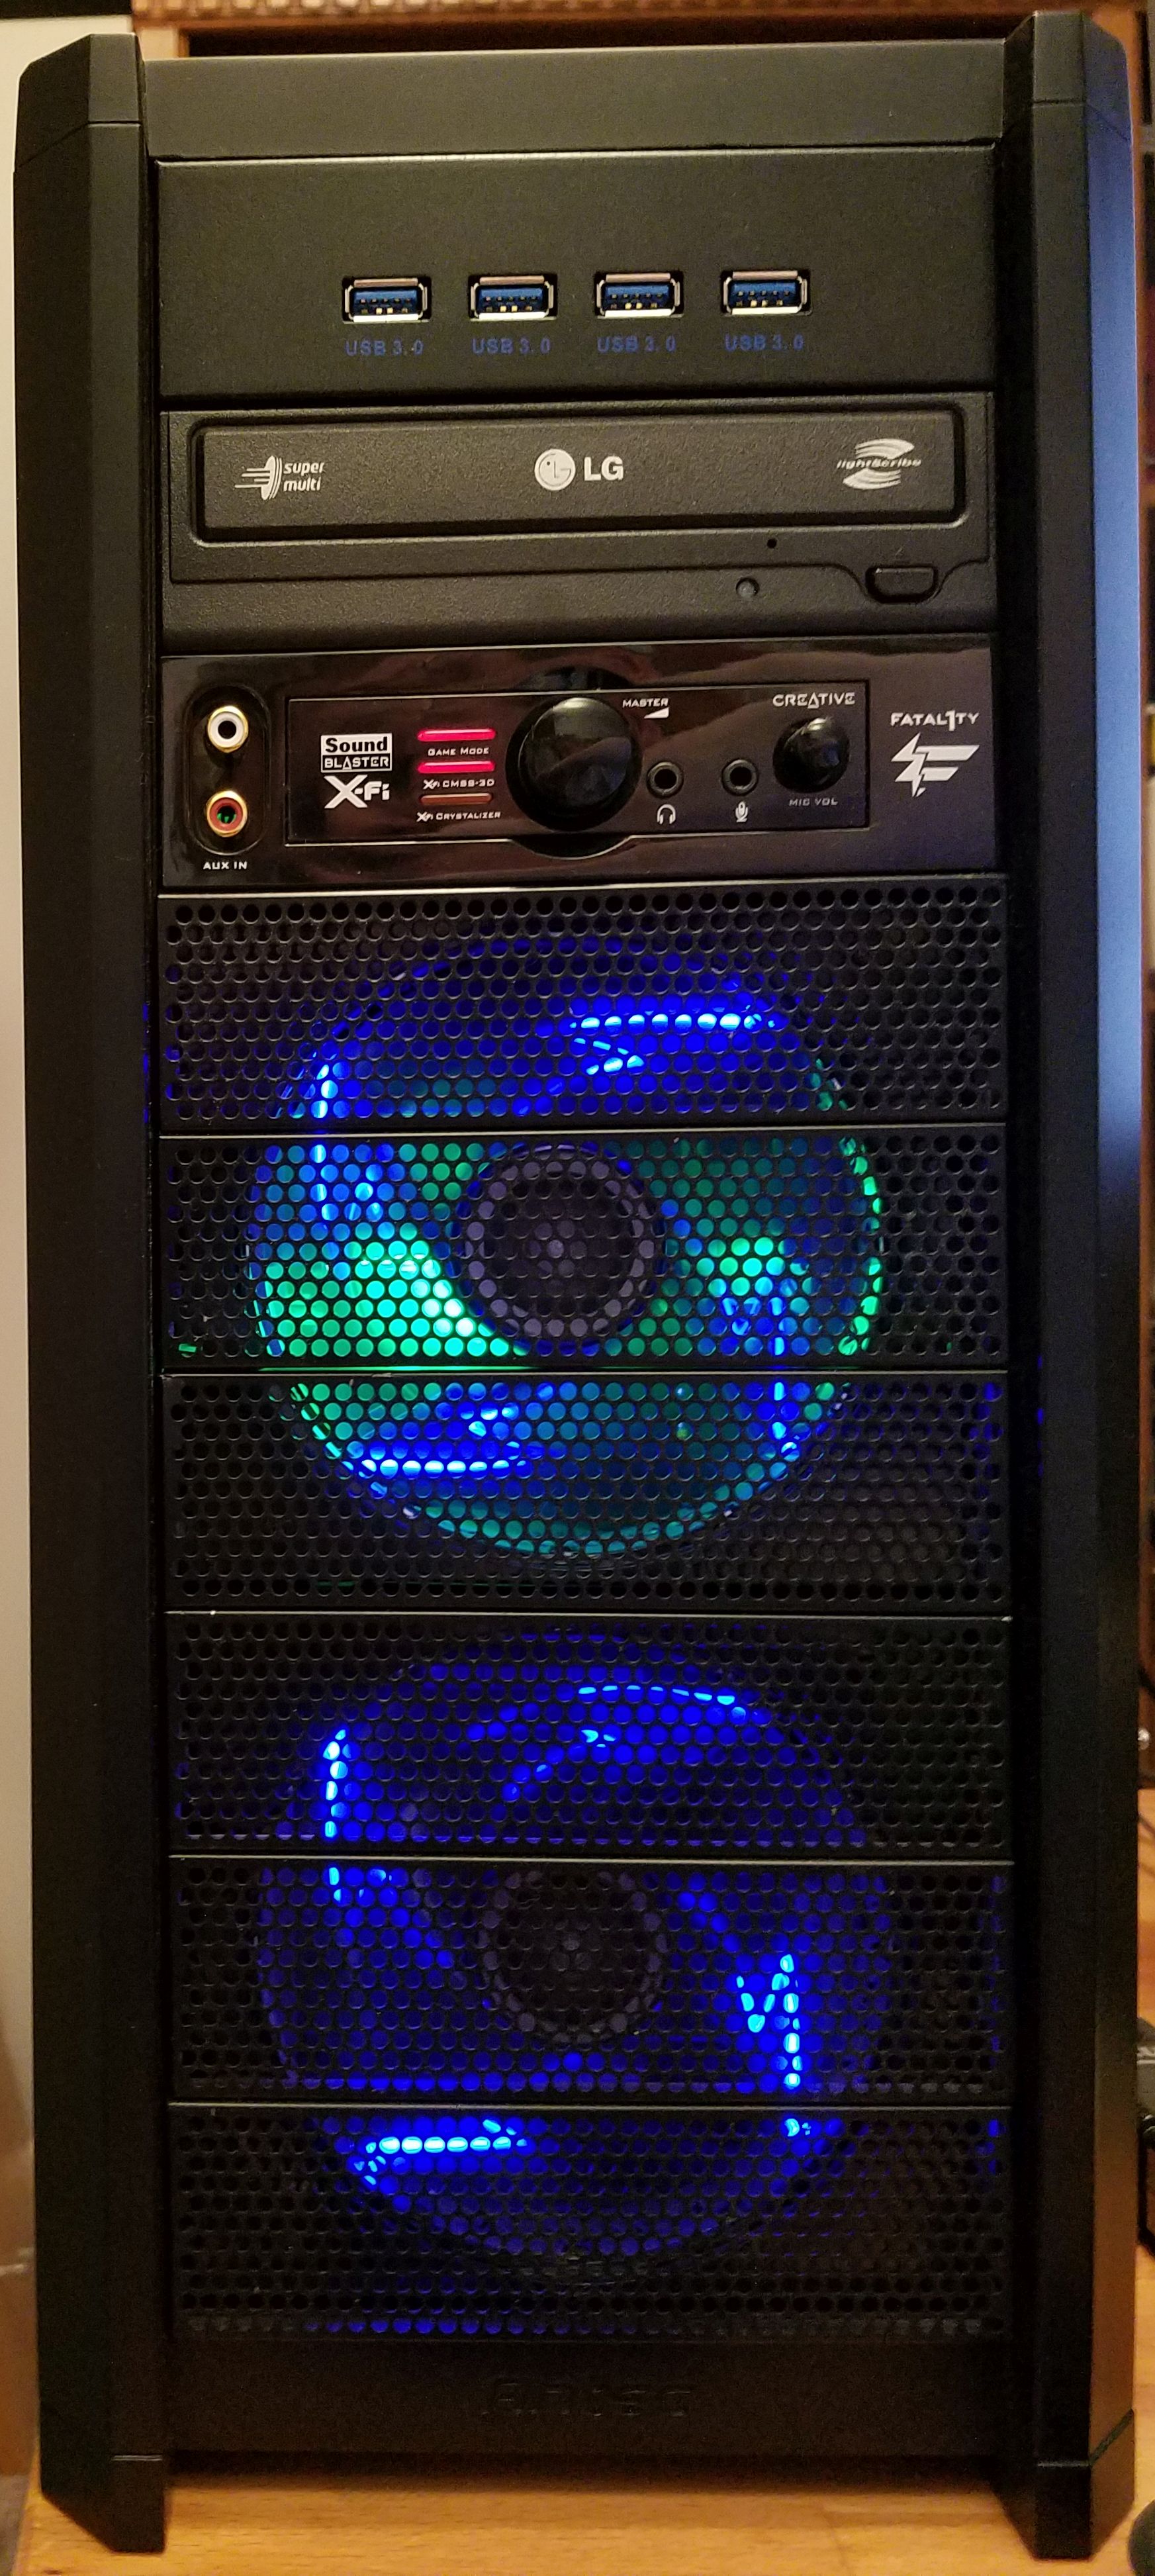
I chose the MSI B650 Tomahawk WiFi motherboard to pair with the AMD 7800X3D. I would have preferred getting a motherboard with the X670 chipset. However, when I bought this from Micro Center (to get their nice bundle discount), they didn't have one with enough USB ports on the back. This motherboard has one USB 3.2 Gen 2x2 (20 Gbps) Type-C port, three USB 3.2 Gen 2 (10 Gbps) Type-A ports, four USB 3.2 Gen 1 (5 Gbps) ports, and two USB 2.0 ports.
For storage, this motherboard has three PCIe Gen4 M.2 slots for NVMe SSDs. I'm using two of them. It also has six SATA 6Gbps ports, but I haven't used a SATA port in my last two or three personal builds and only once in the five or six builds I did in the past year. That one time was only because I was reusing a large pre-existing hard drive. I expect SATA ports to disappear in the future.
As with my previous build, I did not add a separate audio card to this build. Before that, I always used an add-on audio card, which was typically a version of a Creative sound card. However, motherboard audio is good enough since manufacturers isolate the audio traces and power separately from the other noisy components.
This motherboard uses a Realtek ALC4080 Codec, which, specification-wise, is very similar to the Realtek ALC1220 that was in my last motherboard. One interesting difference about the ALC4080 is that it uses an internal USB connection to the chipset to connect to the system rather than directly to the CPU. I can't tell any difference in the sound quality, and it uses the same Realtek Audio Console control panel. Igor's lab has a good post reviewing the Realtek ALC4080 Codec.
My main reason for upgrading was to get a better graphics card. I game at 1440p at 144 Hz, which is nothing outrageous. When I first got the EVGA 2080 Super in 2019, it handled most games at the highest settings without an issue. Even with ray tracing enabled, games were pretty playable (and stunning). However, a "GPU lifetime" later (i.e., four years), I had a couple of games that repeatedly ran out of video RAM (and crashed) and several that required me to turn down the settings to get good framerates. She was a good card, but it was time.
When I was looking, getting more than 8GB of VRAM in an Nvidia card meant the 4080 with 16GB or the 4090 with 24GB. I procrastinated upgrading long enough that both prices had come down to around their MSRP of ~$1000 for the 4080 and ~1700 for the 4090. My justification for the 4090 was that the system would be set for years. I would probably be OK with a 4080, too, but I was less confident. I wanted to upgrade to a larger 4K monitor sometime in the future, as those prices have been coming down, and the 4090 is a better card for that.
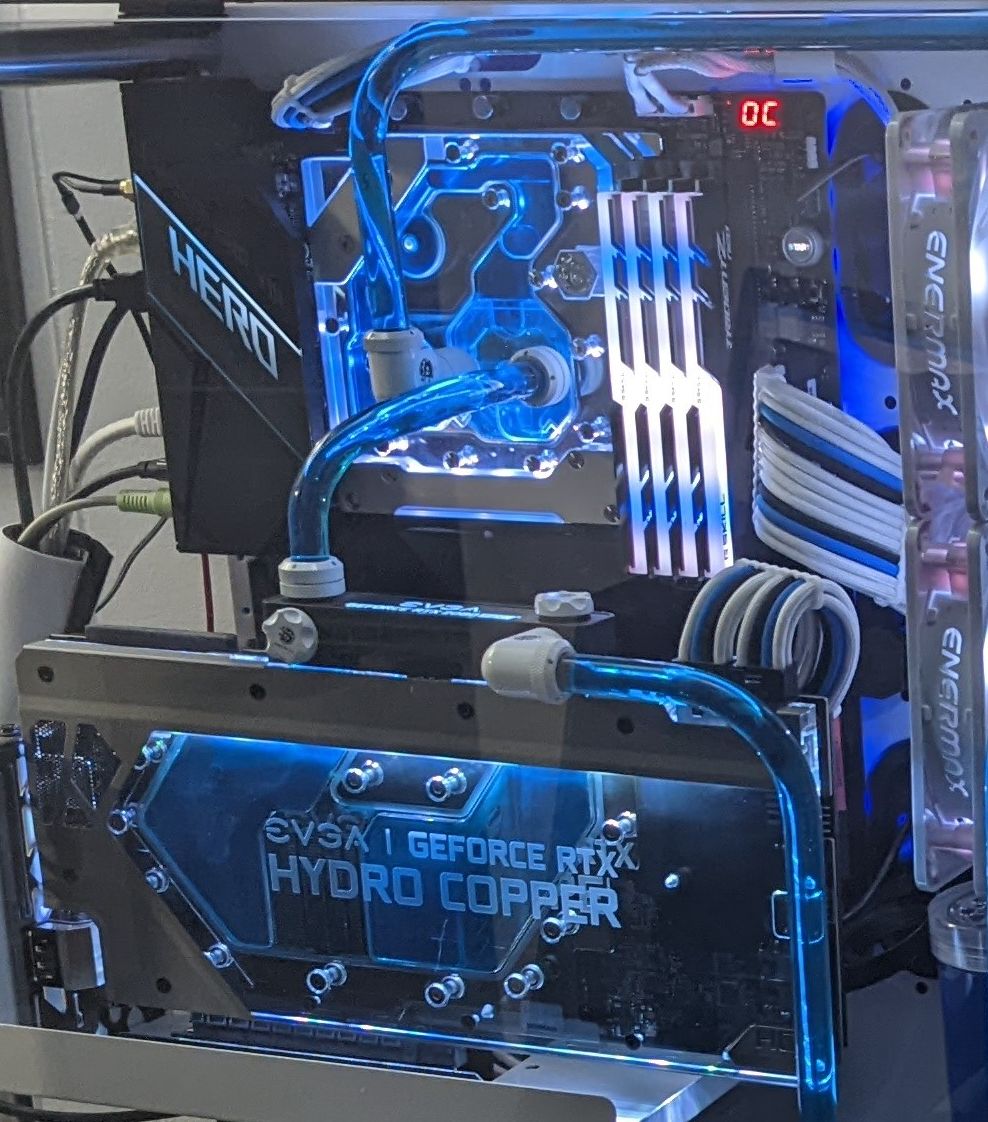
Since EVGA no longer makes graphics cards, the next decision was which manufacturer to go with. I want to say I did exhaustive research on each card and went with the best one I discovered. The truth is that I went with one that had good reviews, was not outrageously marked up, and was actually in stock at Micro Center. That turned out to be the Gigabyte RTX 4090 Gaming Overclocked. I've had it for a while, and it's been rock solid for me. Those games that crashed before are now stable.
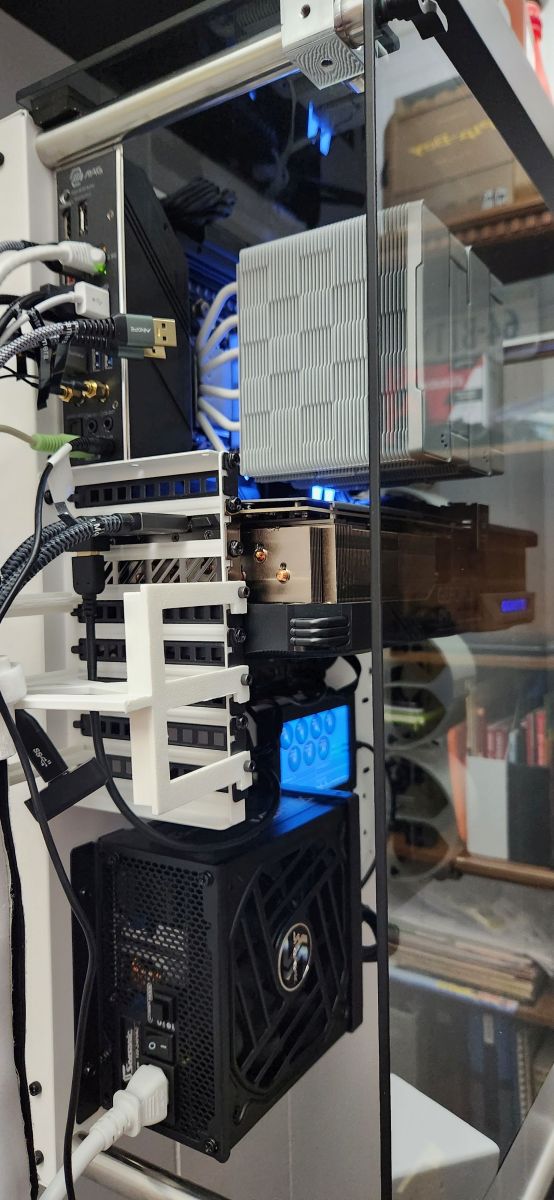
The card is a beast physically—enormous and heavy. It includes an anti-sag bracket, which it needs. (Unfortunately, the bracket is only compatible with ATX motherboards. Smaller motherboards won't work with it.) Luckily, my case is a big, open-air model. There are many cases where this card won't fit.
The term "overclocked" regarding this card (and all 4090s I've looked at) should be in air quotes. This card's core (over)clock is 2535 MHz, whereas the reference card's is 2520 MHz. That whopping 0.6% overclock isn't going to be noticeable. Apparently, there isn't any headroom in these chips to squeak out.

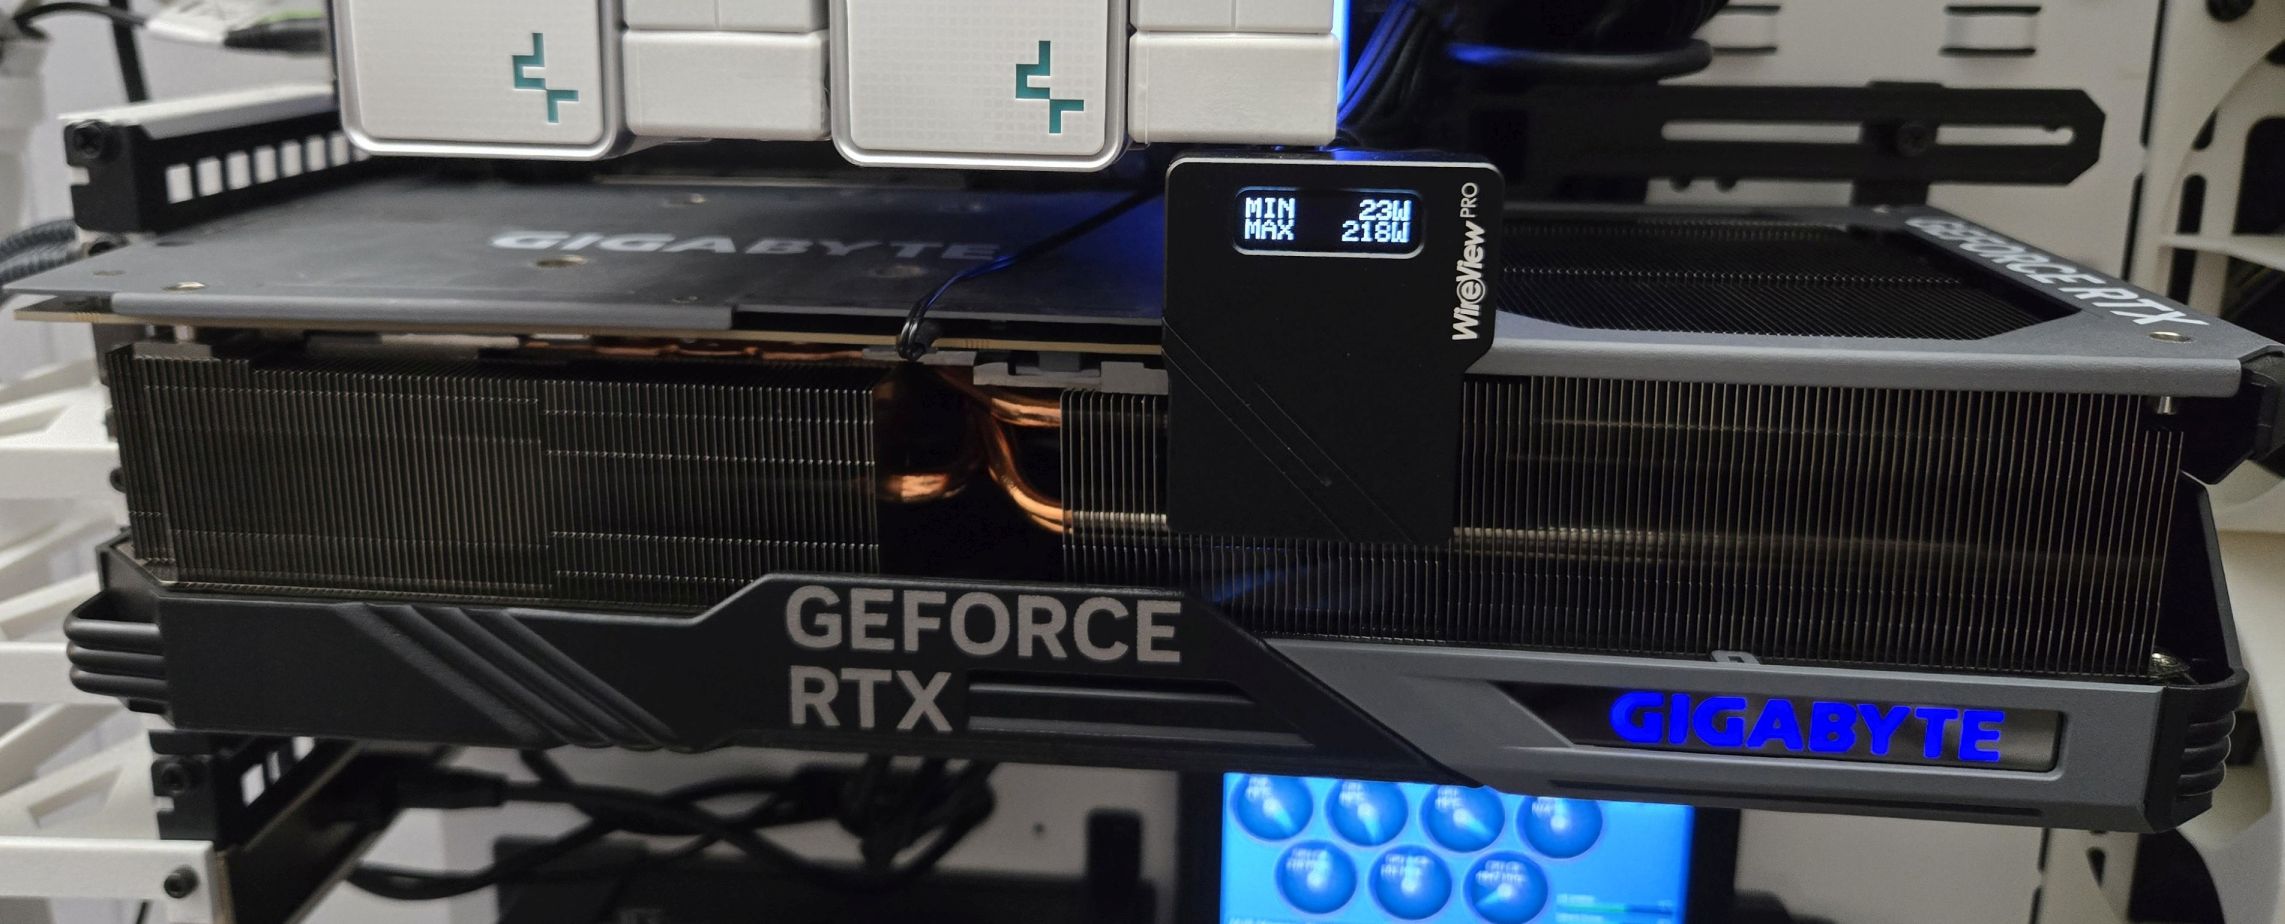
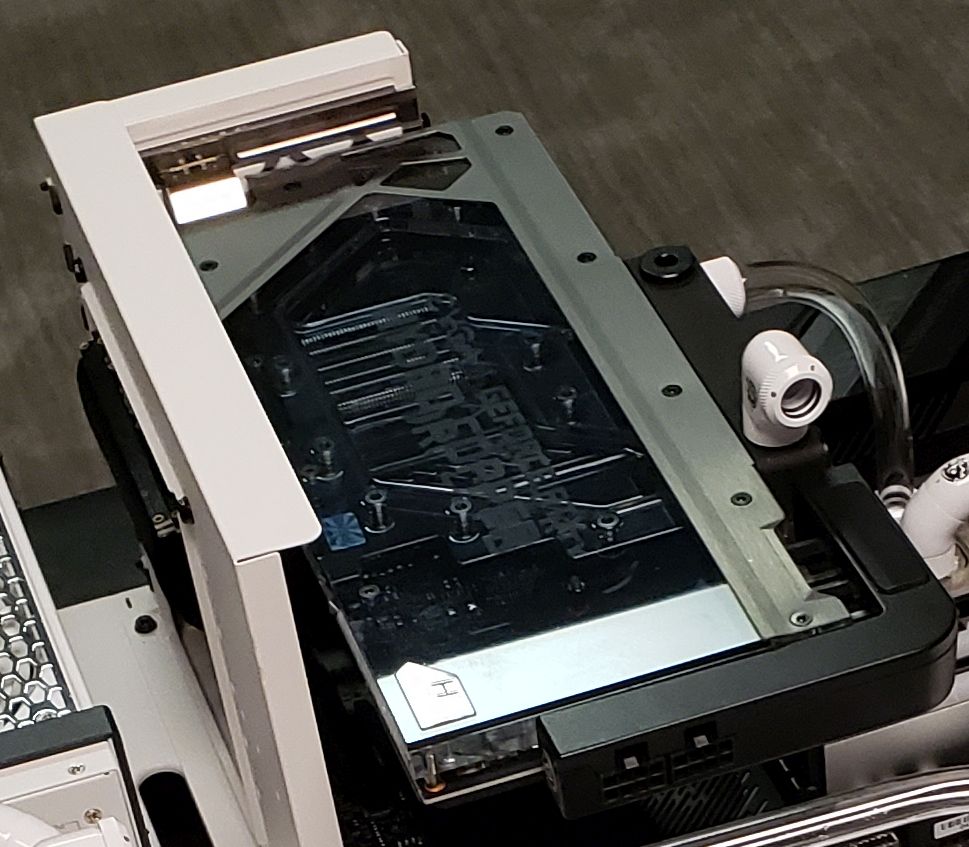
The power connections on these cards have been a concern because of melting and shorting issues. For power, I am using the 12VHPWR (16-pin) cable that came with the Seasonic Vertex GX 1000W PSU, coupled with a Thermal Grizzly WireView Pro. Even though my case is big and wide, I was concerned about bending the power cable against the side glass. The U-shaped connector of the WireView Pro solves that issue and helps hide the cable as well. I was still concerned about overheating, though. (If anyone reading this decides to get one of these, there are two models. The correct one depends on how the 12VHPWR connector is mounted on the GPU's PCB.)
The Gigabyte RTX 4090 Gaming OC has three cooling fans on the shroud. From the Corsair iCUE dashboard, I can see that they don't start spinning until the card reaches ~50°C. I could change the fan's temperature curve, but it's not necessary. When doing productivity work, the fans rarely spin. When gaming, the fans spin but are never audible over the game. The temps usually stay at 60°C - 65°C. I occasionally see the mid-70s running 3DMark benchmarks.
I won't delve into every 3DMark benchmark, but below are some results from Time Spy Extreme, a 4K gaming benchmark. Graphics test 1 averaged 121.74 FPS, and Graphics test 2 averaged 113.42 FPS. The GPU temperatures range from about 62°C to 73°C, depending on where the temperatures were measured. The final score with the Gigabyte GeForce RTX 4090 and AMD Ryzen 7 7800X3D was 14,267 for the test shown. (Graphics Score: 19,250 and CPU Score: 5,784)
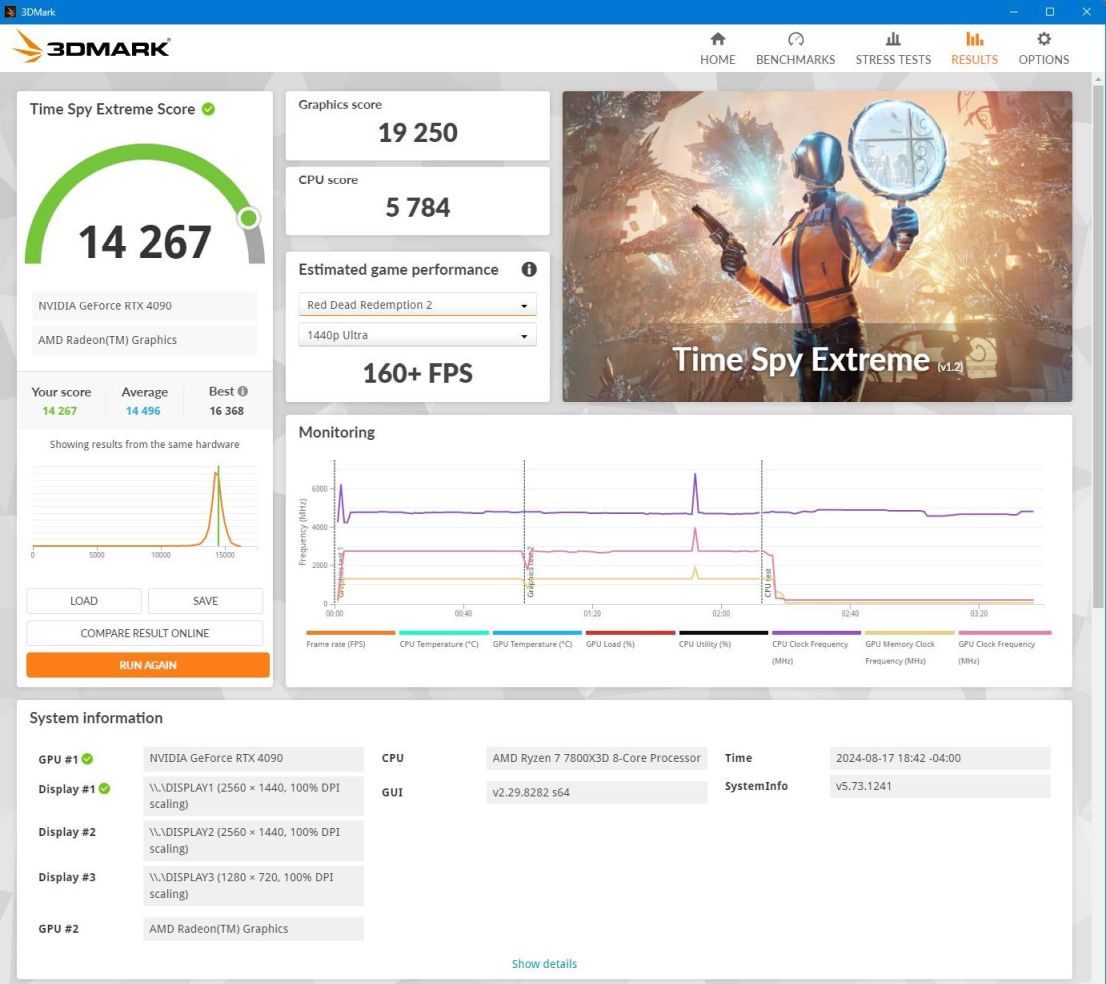
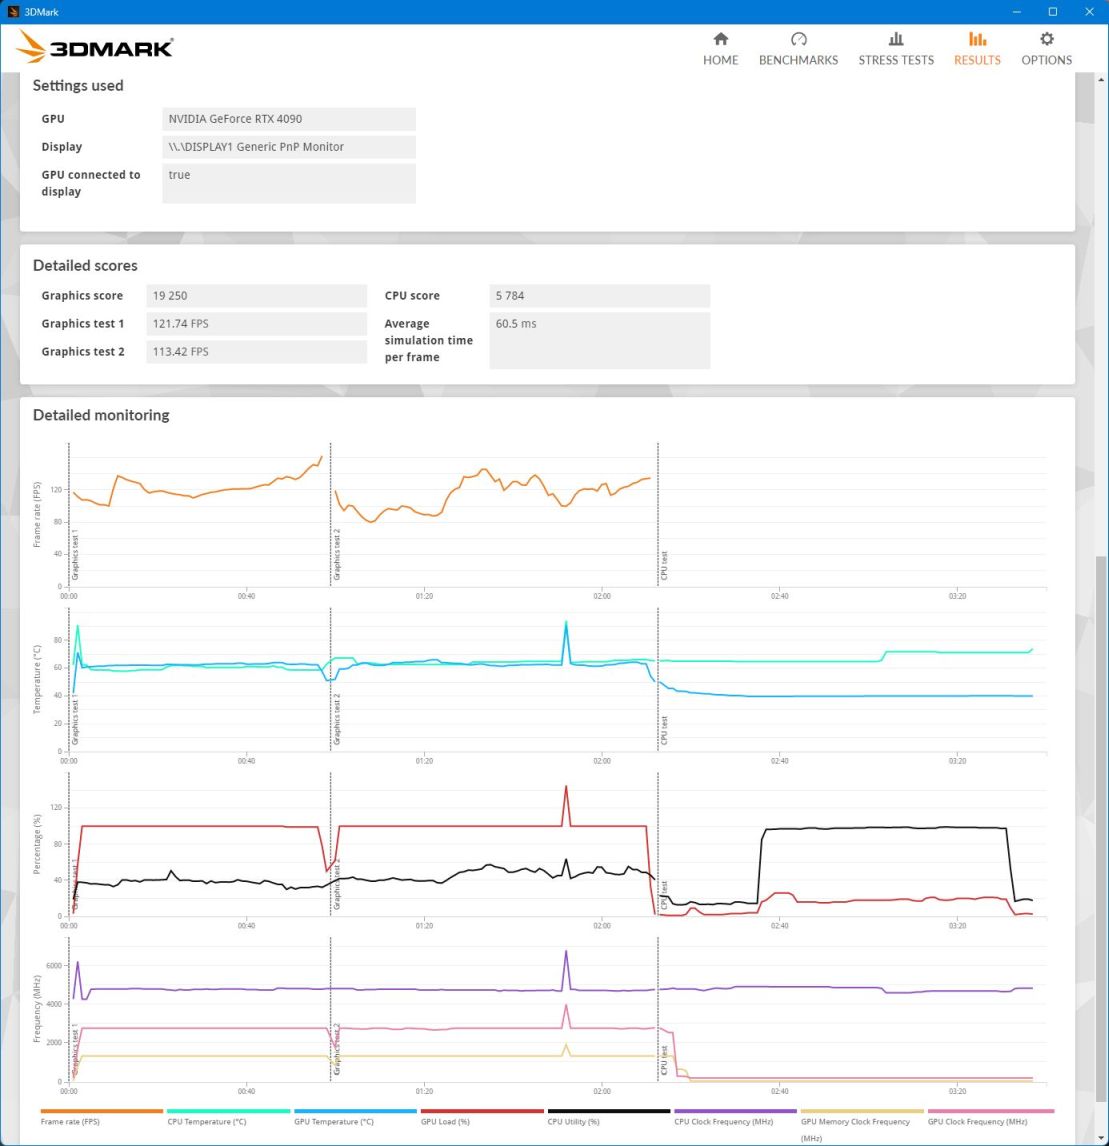
With the Gigabyte GeForce RTX 4090 and AMD Ryzen 9 3900X, I got a higher score of 14,897 (Graphics Score 19,238 and CPU Score 6,538). While the graphics score was nearly the same, the CPU score of the 3900X was higher because of its additional cores. I wish 3DMark had a way to score only the graphics tests.
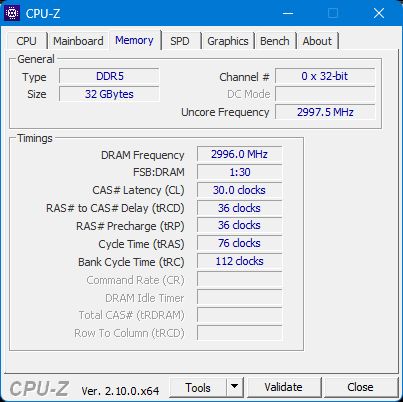
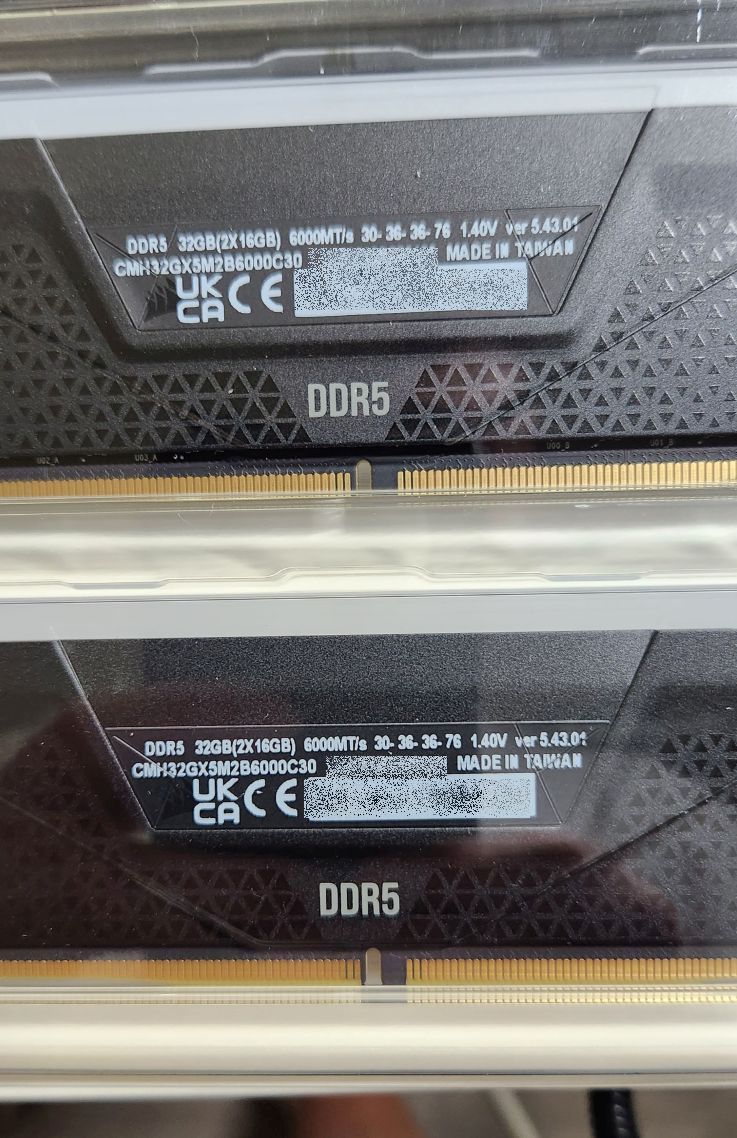
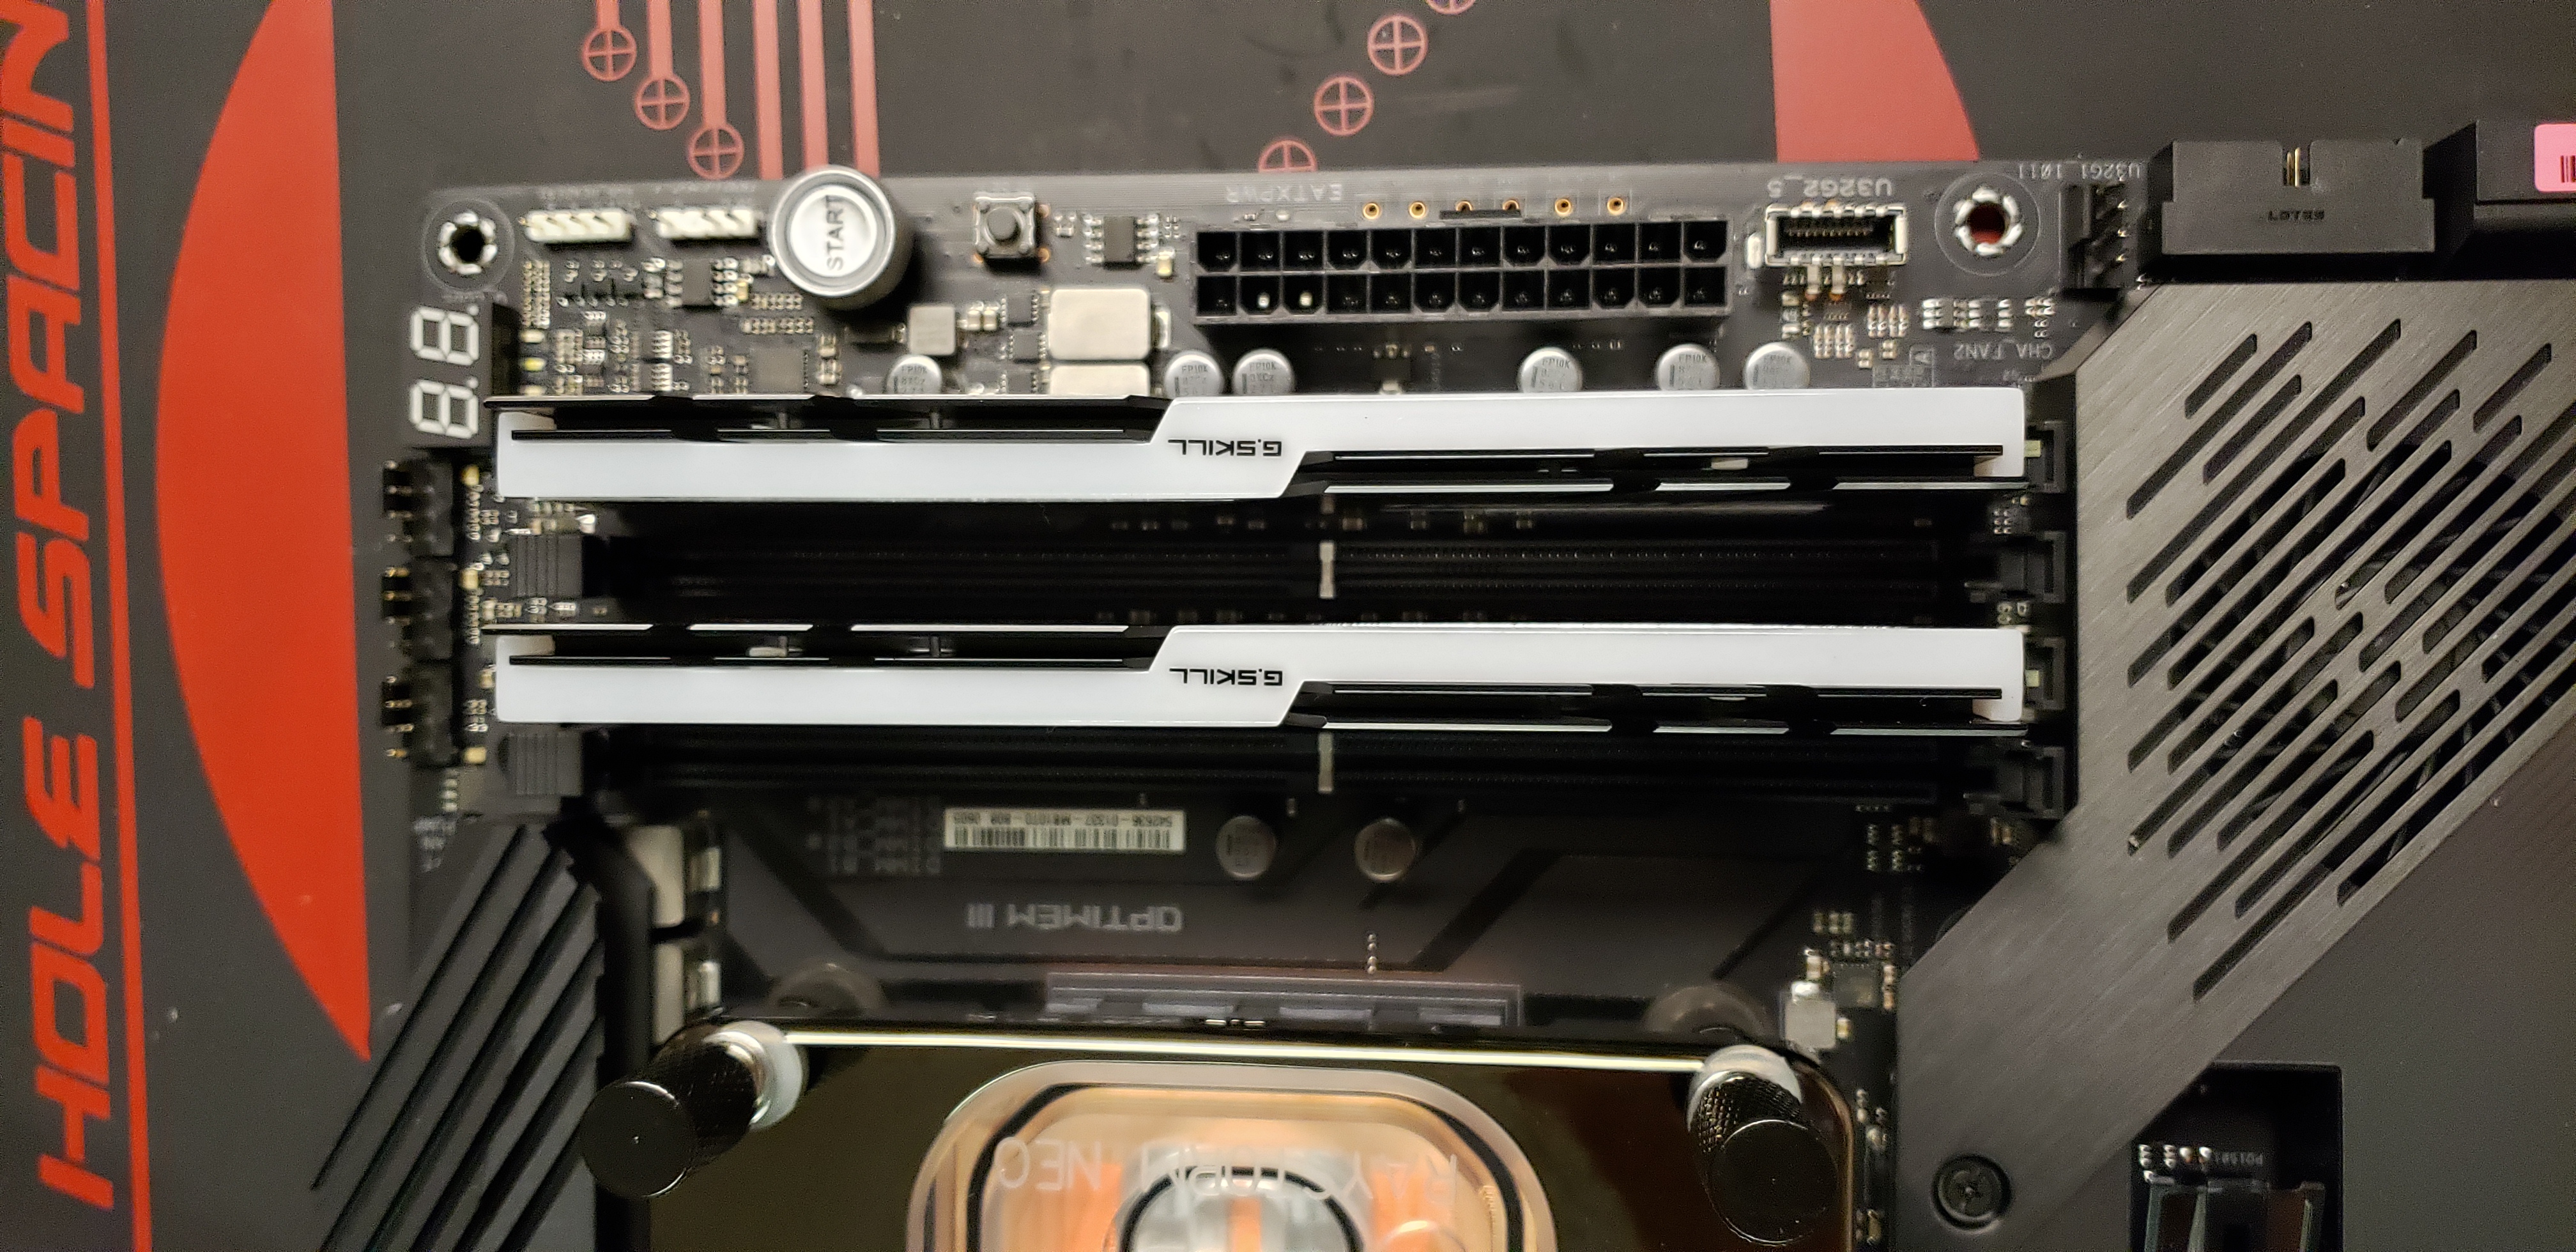
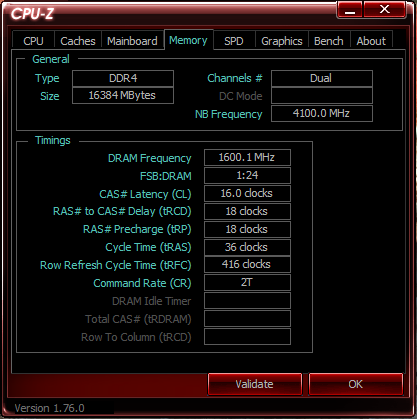
I used 32 GB of RAM in this build, just like my last one. While 16 GB seems to get filled up (or nearly so), 32 GB seems to be still fine. I used a Corsair Vengeance RGB 32GB DDR5-6000 CL30 Kit (CMH32GX5M2B6000C30). With my previous system, I found out that AMD CPUs (or AMD motherboards—I'm not sure which) don't seem to like four sticks of RAM. I recommend sticking with two regardless of whether 32 or 64 GB of RAM is installed. This does mean that having four DIMM slots is relatively meaningless, though. If I need to upgrade to 64 GB of RAM, I will likely replace the two 16 GB sticks with a pair of 32 GB ones.
I'm still not a big fan of RGB. My previous water-cooled system was flashy without any extra RGB, so this memory's RGB is a nice touch, but I didn't go overboard with RGB in this system. If a component came with it, I used it but didn't go out of my way. I set the RGB to a light, solid blue, and that was it.
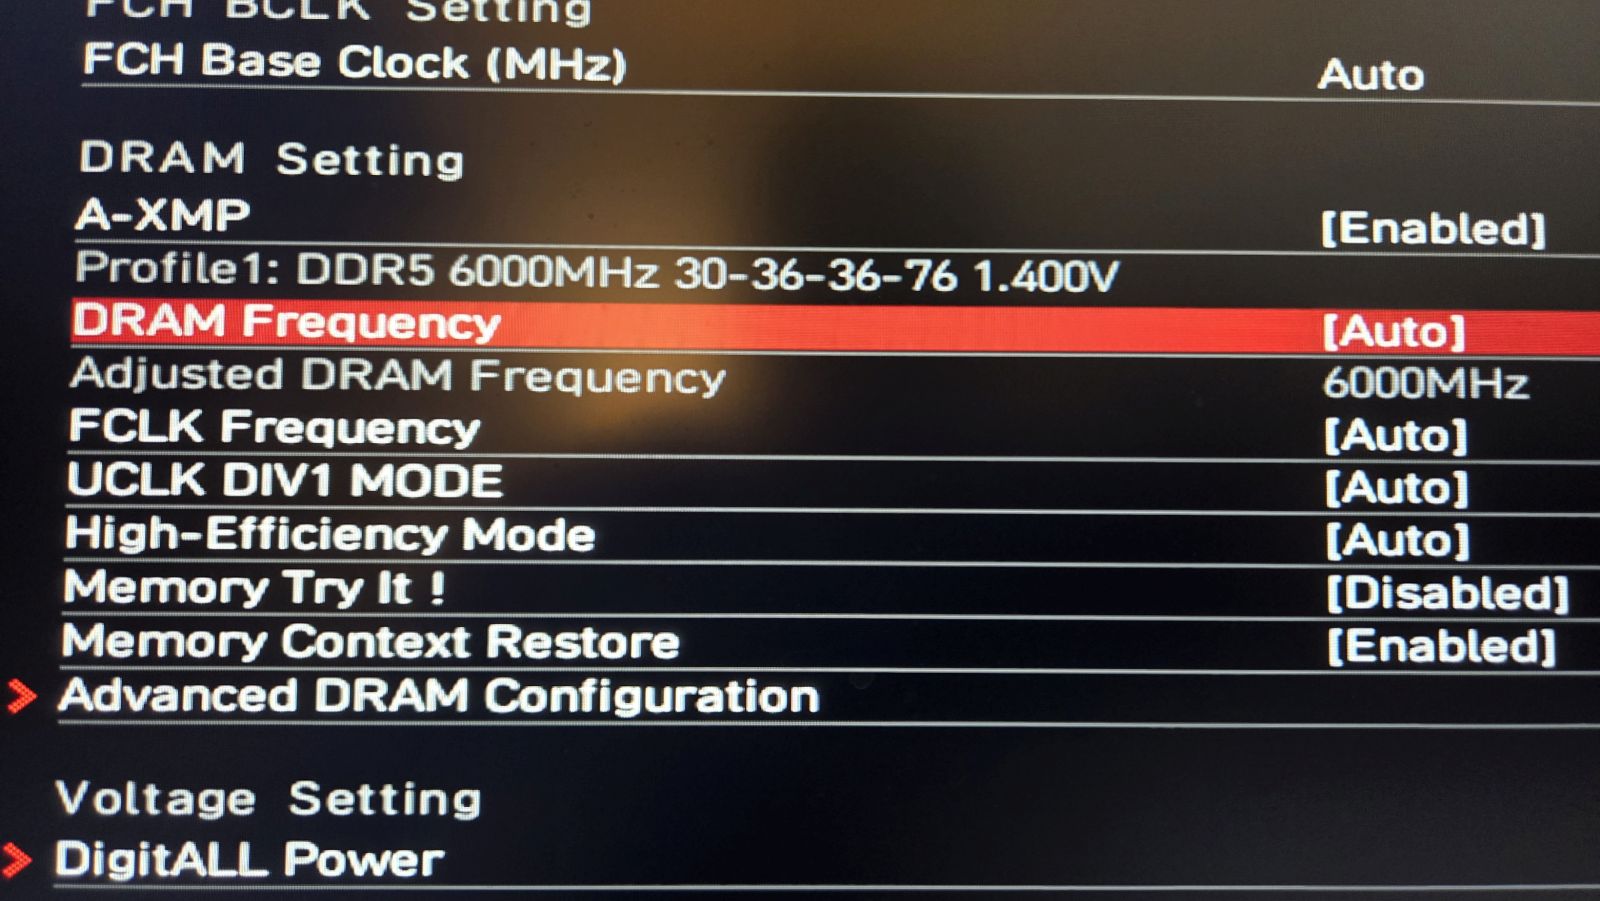
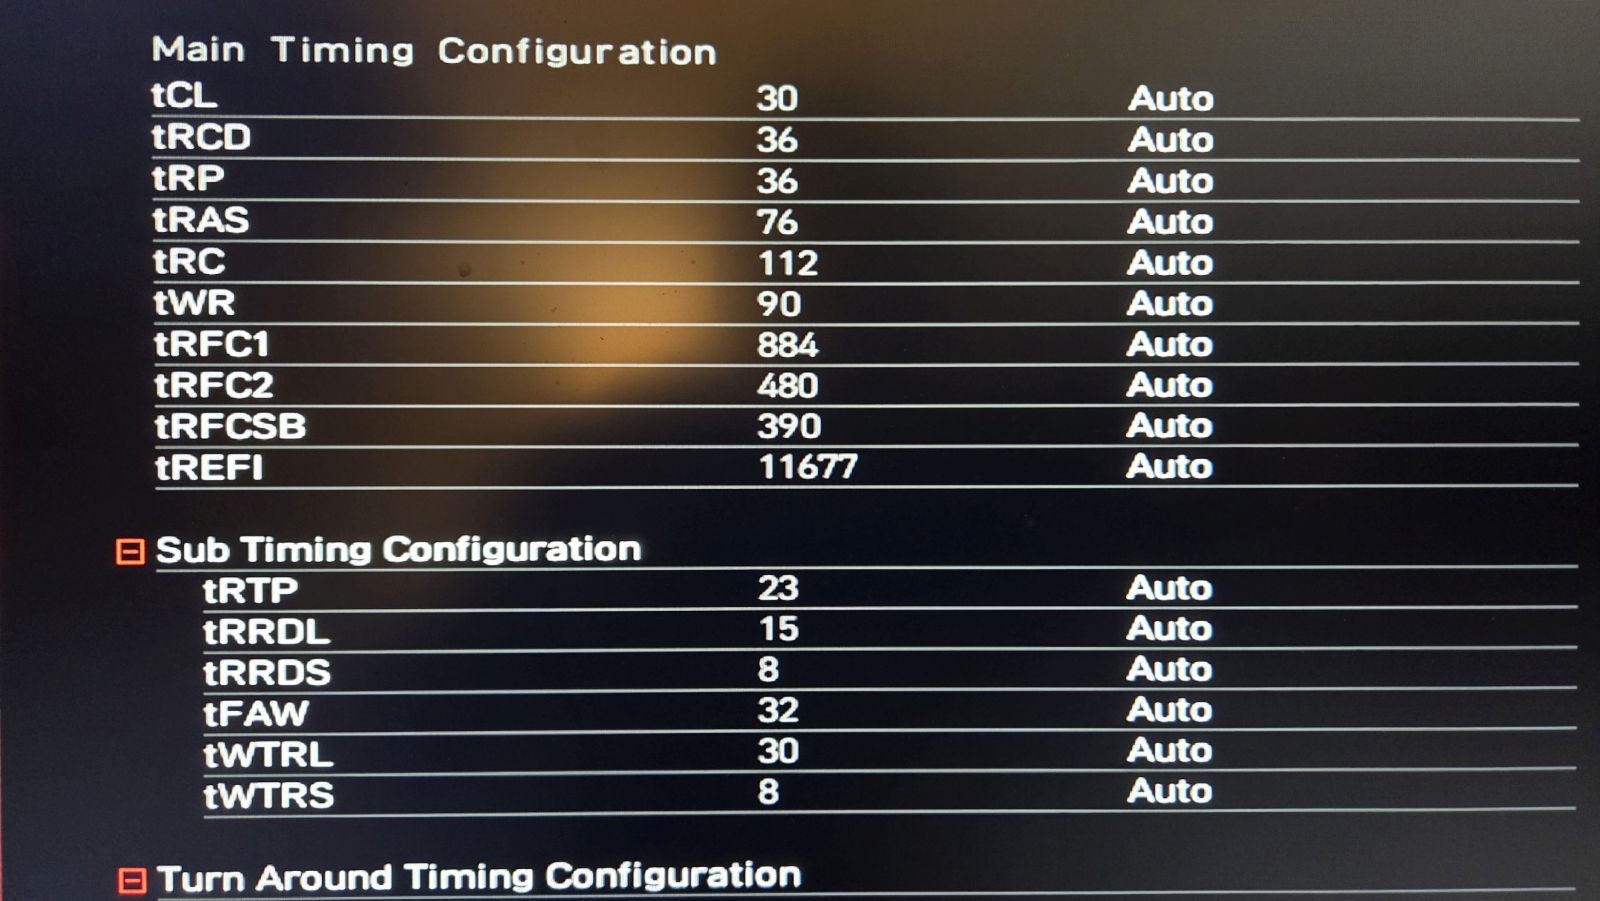
I didn't realize until I built the system that I accidentally bought RAM optimized for Intel CPUs. The MSI B650 Tomahawk WiFi (AM5) motherboard recognized the RAM's Intel XMP-6000 profile and kept the timings of 30-36-36-76 at 1.4V and a frequency of 3,000 MHz. I'm happy it works, and the motherboard's BIOS shows that the correct timings have been picked up as an A-XMP profile.
I noticed that the boot time on this motherboard was much longer than I expected. The issue is that it was retraining memory every time. One of the BIOS updates added the Memory Context Restore option. When enabled, the motherboard avoids retraining memory whenever possible. If you buy an AM5 motherboard and this option is available on the motherboard, you should enable it.
I want to mention the Corsair iCue software. Functionally, I used it to set the memory's color and nothing else. But what I really like is the Dashboard tab, which shows temperature and fan speeds for the motherboard, CPU, GPU, and (of course) memory.
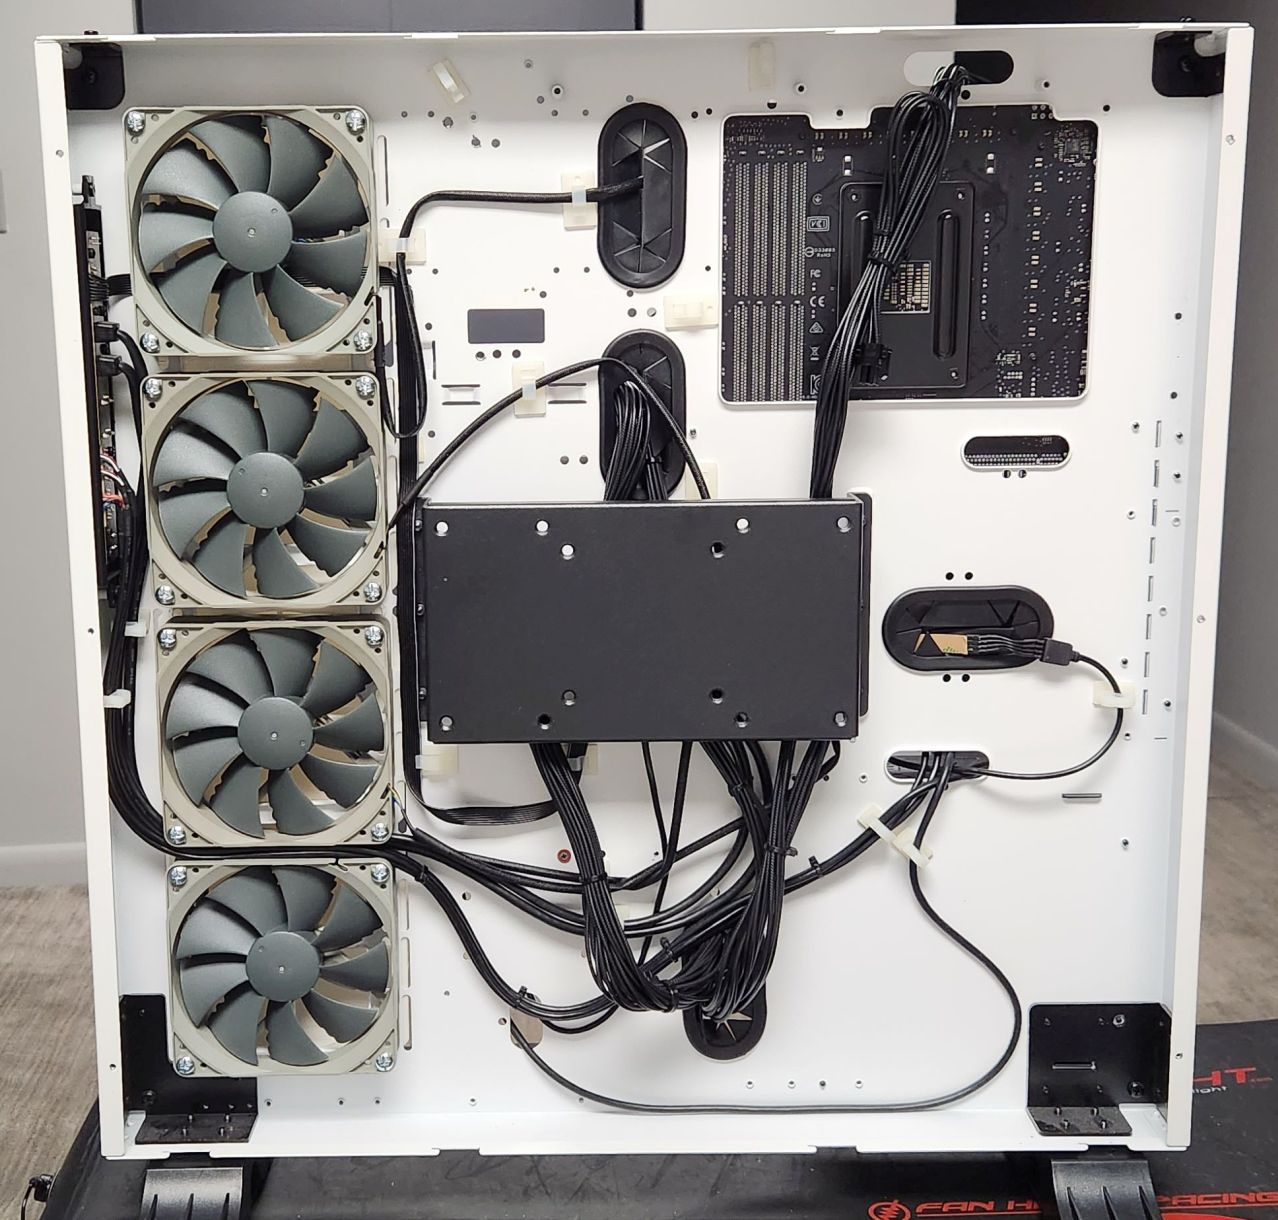
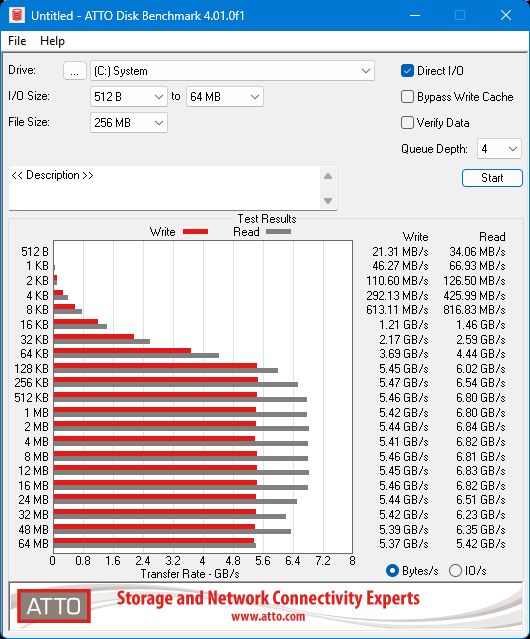
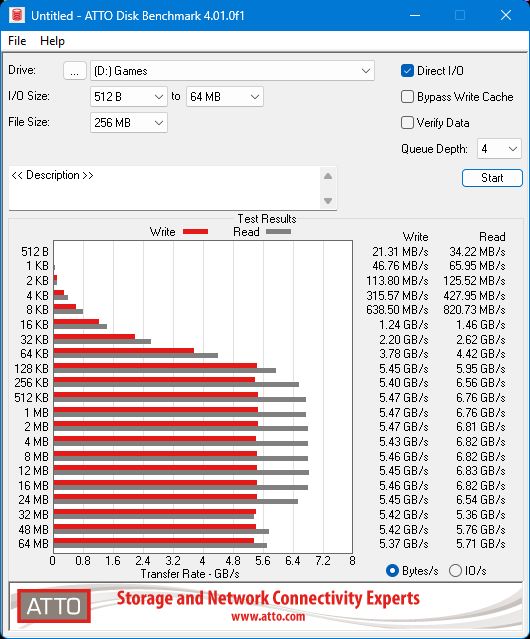
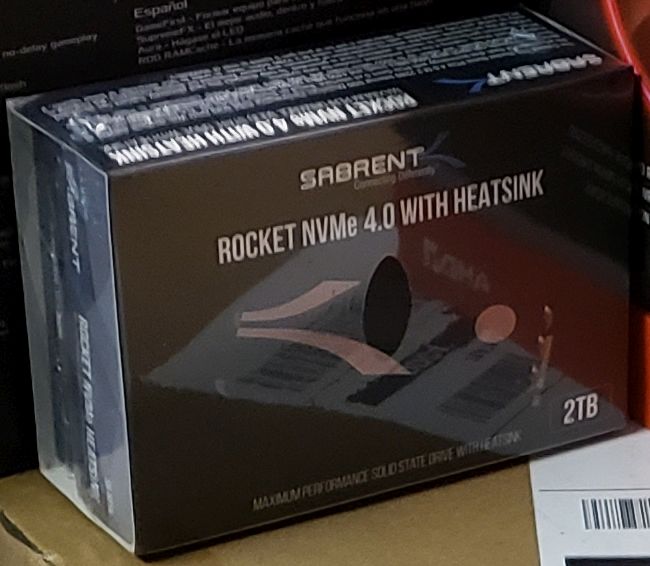
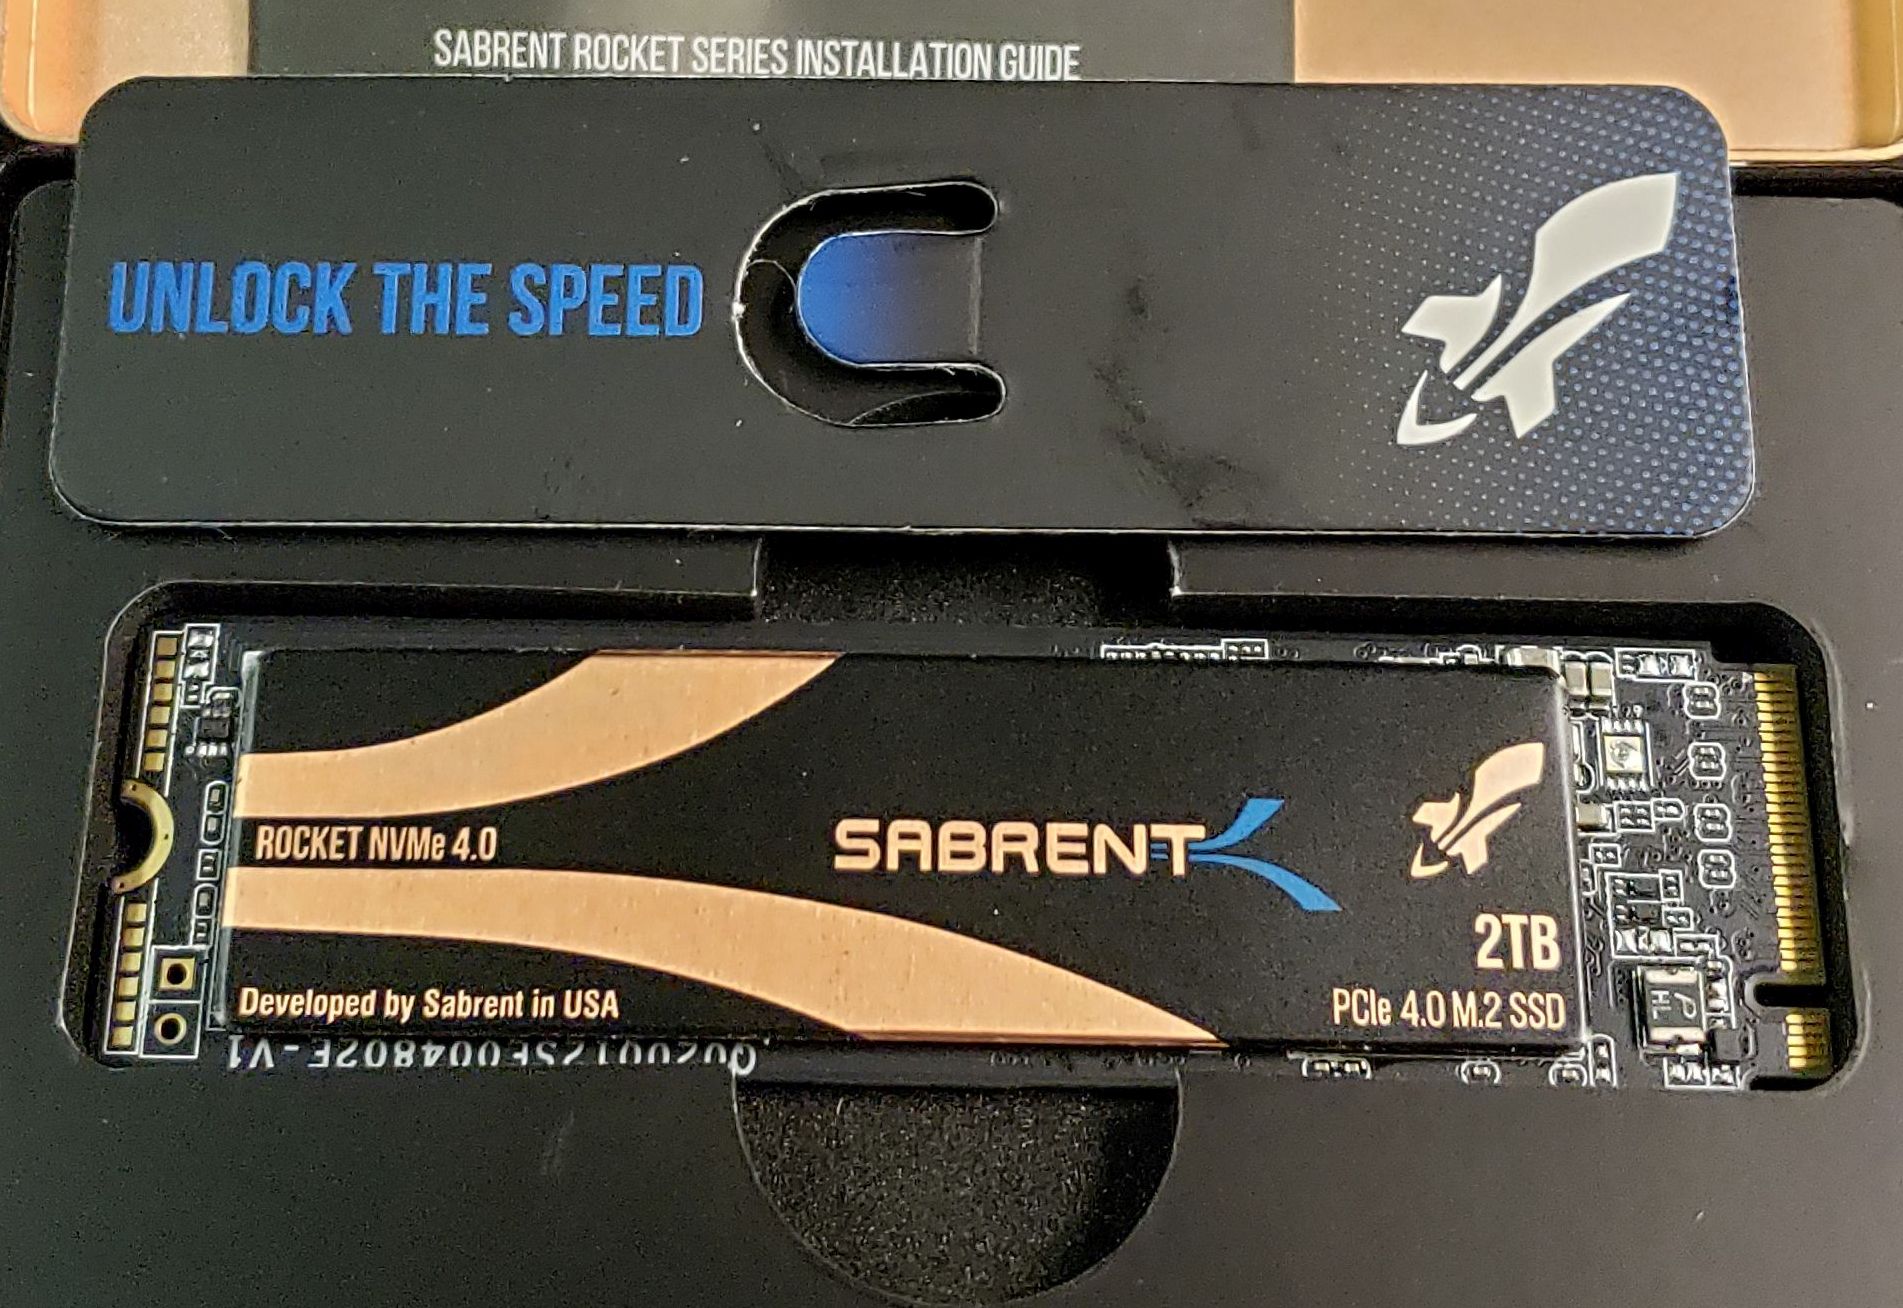
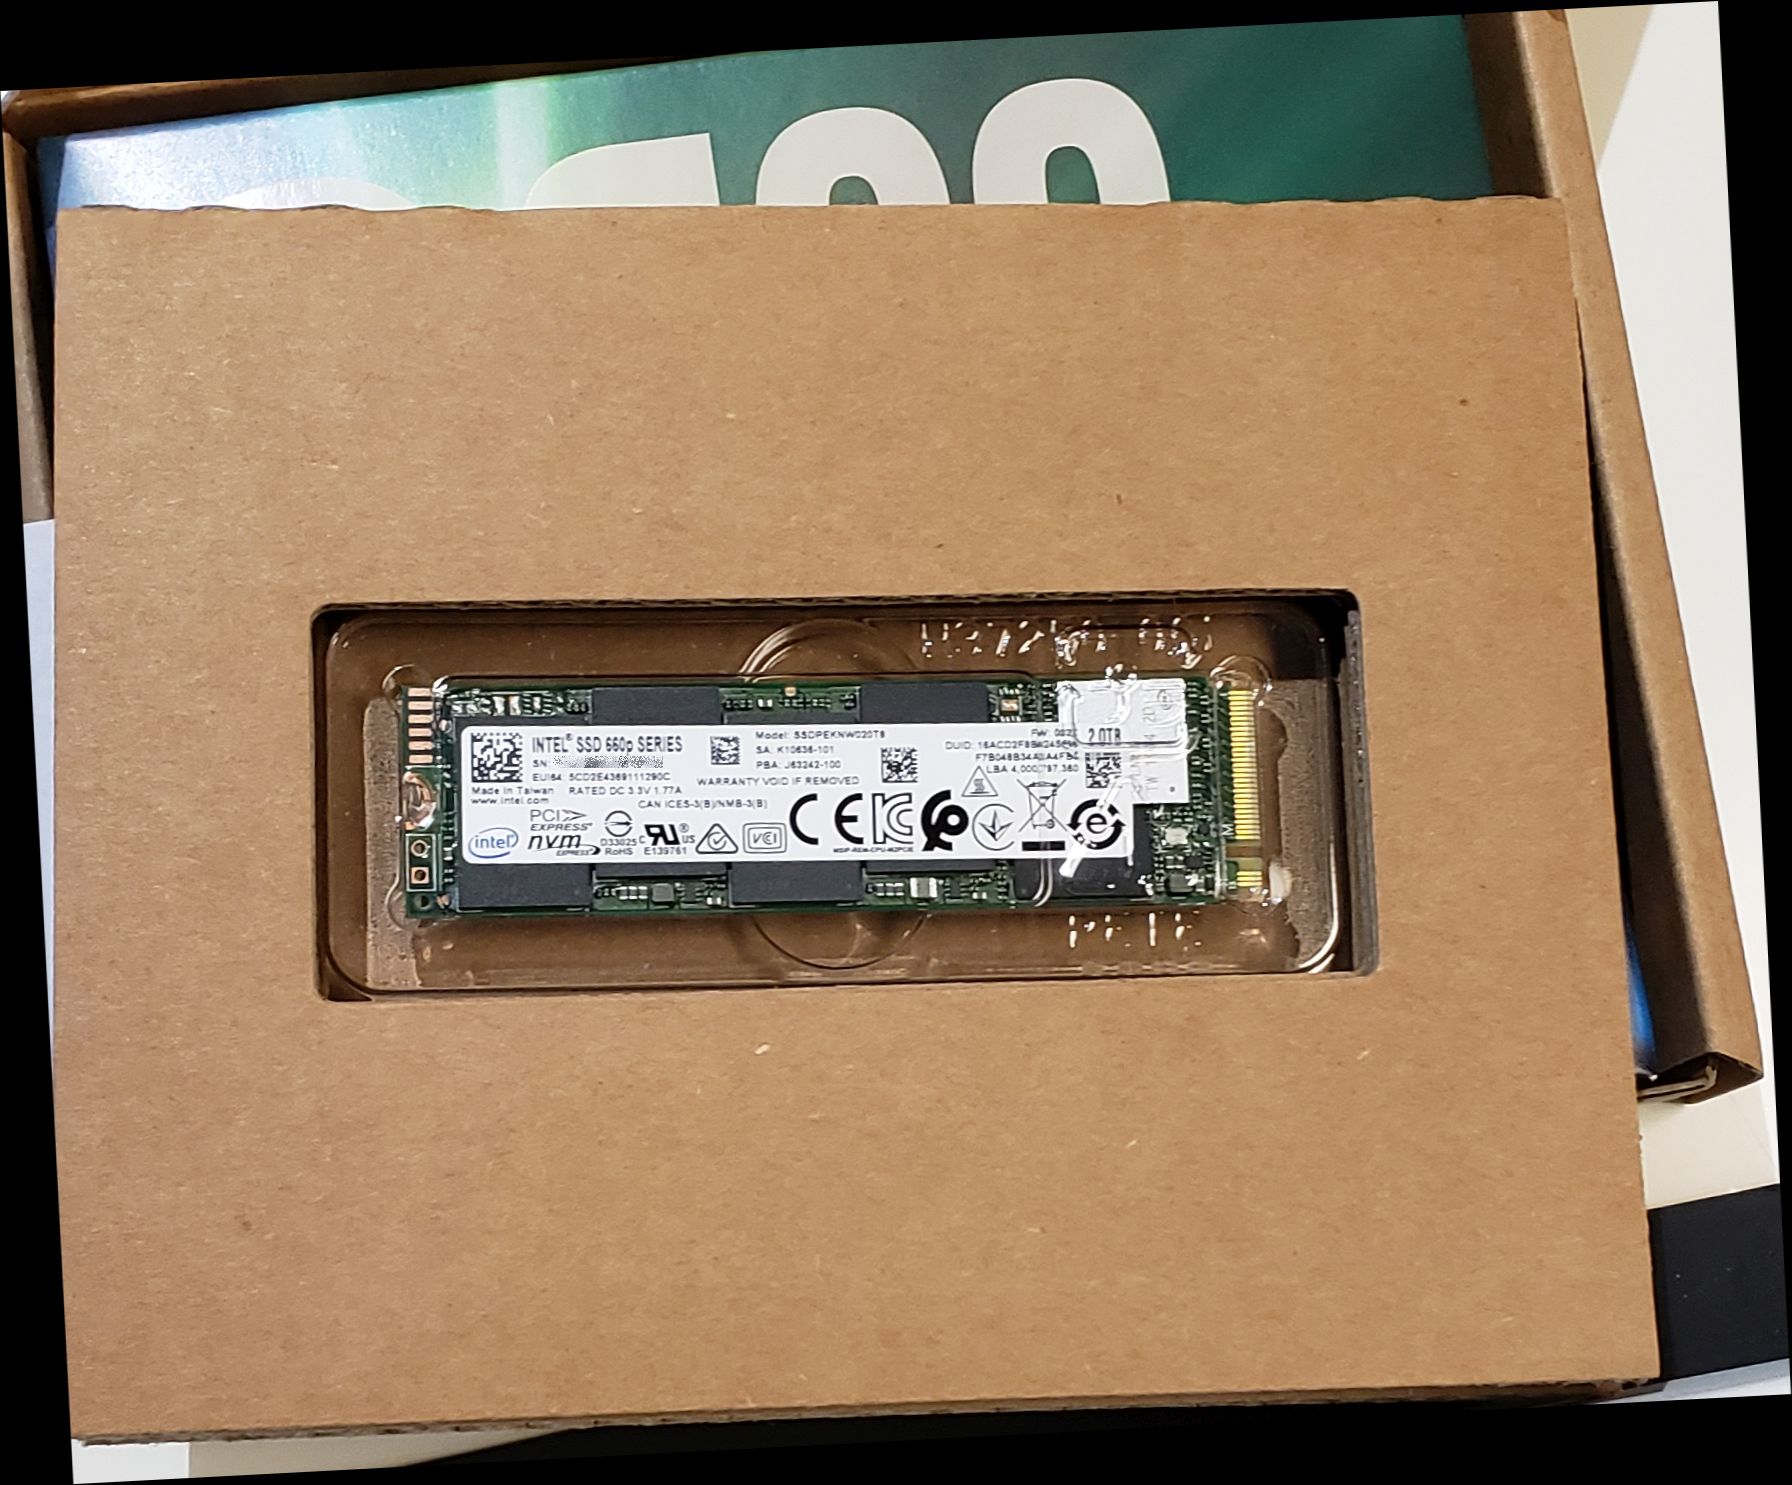
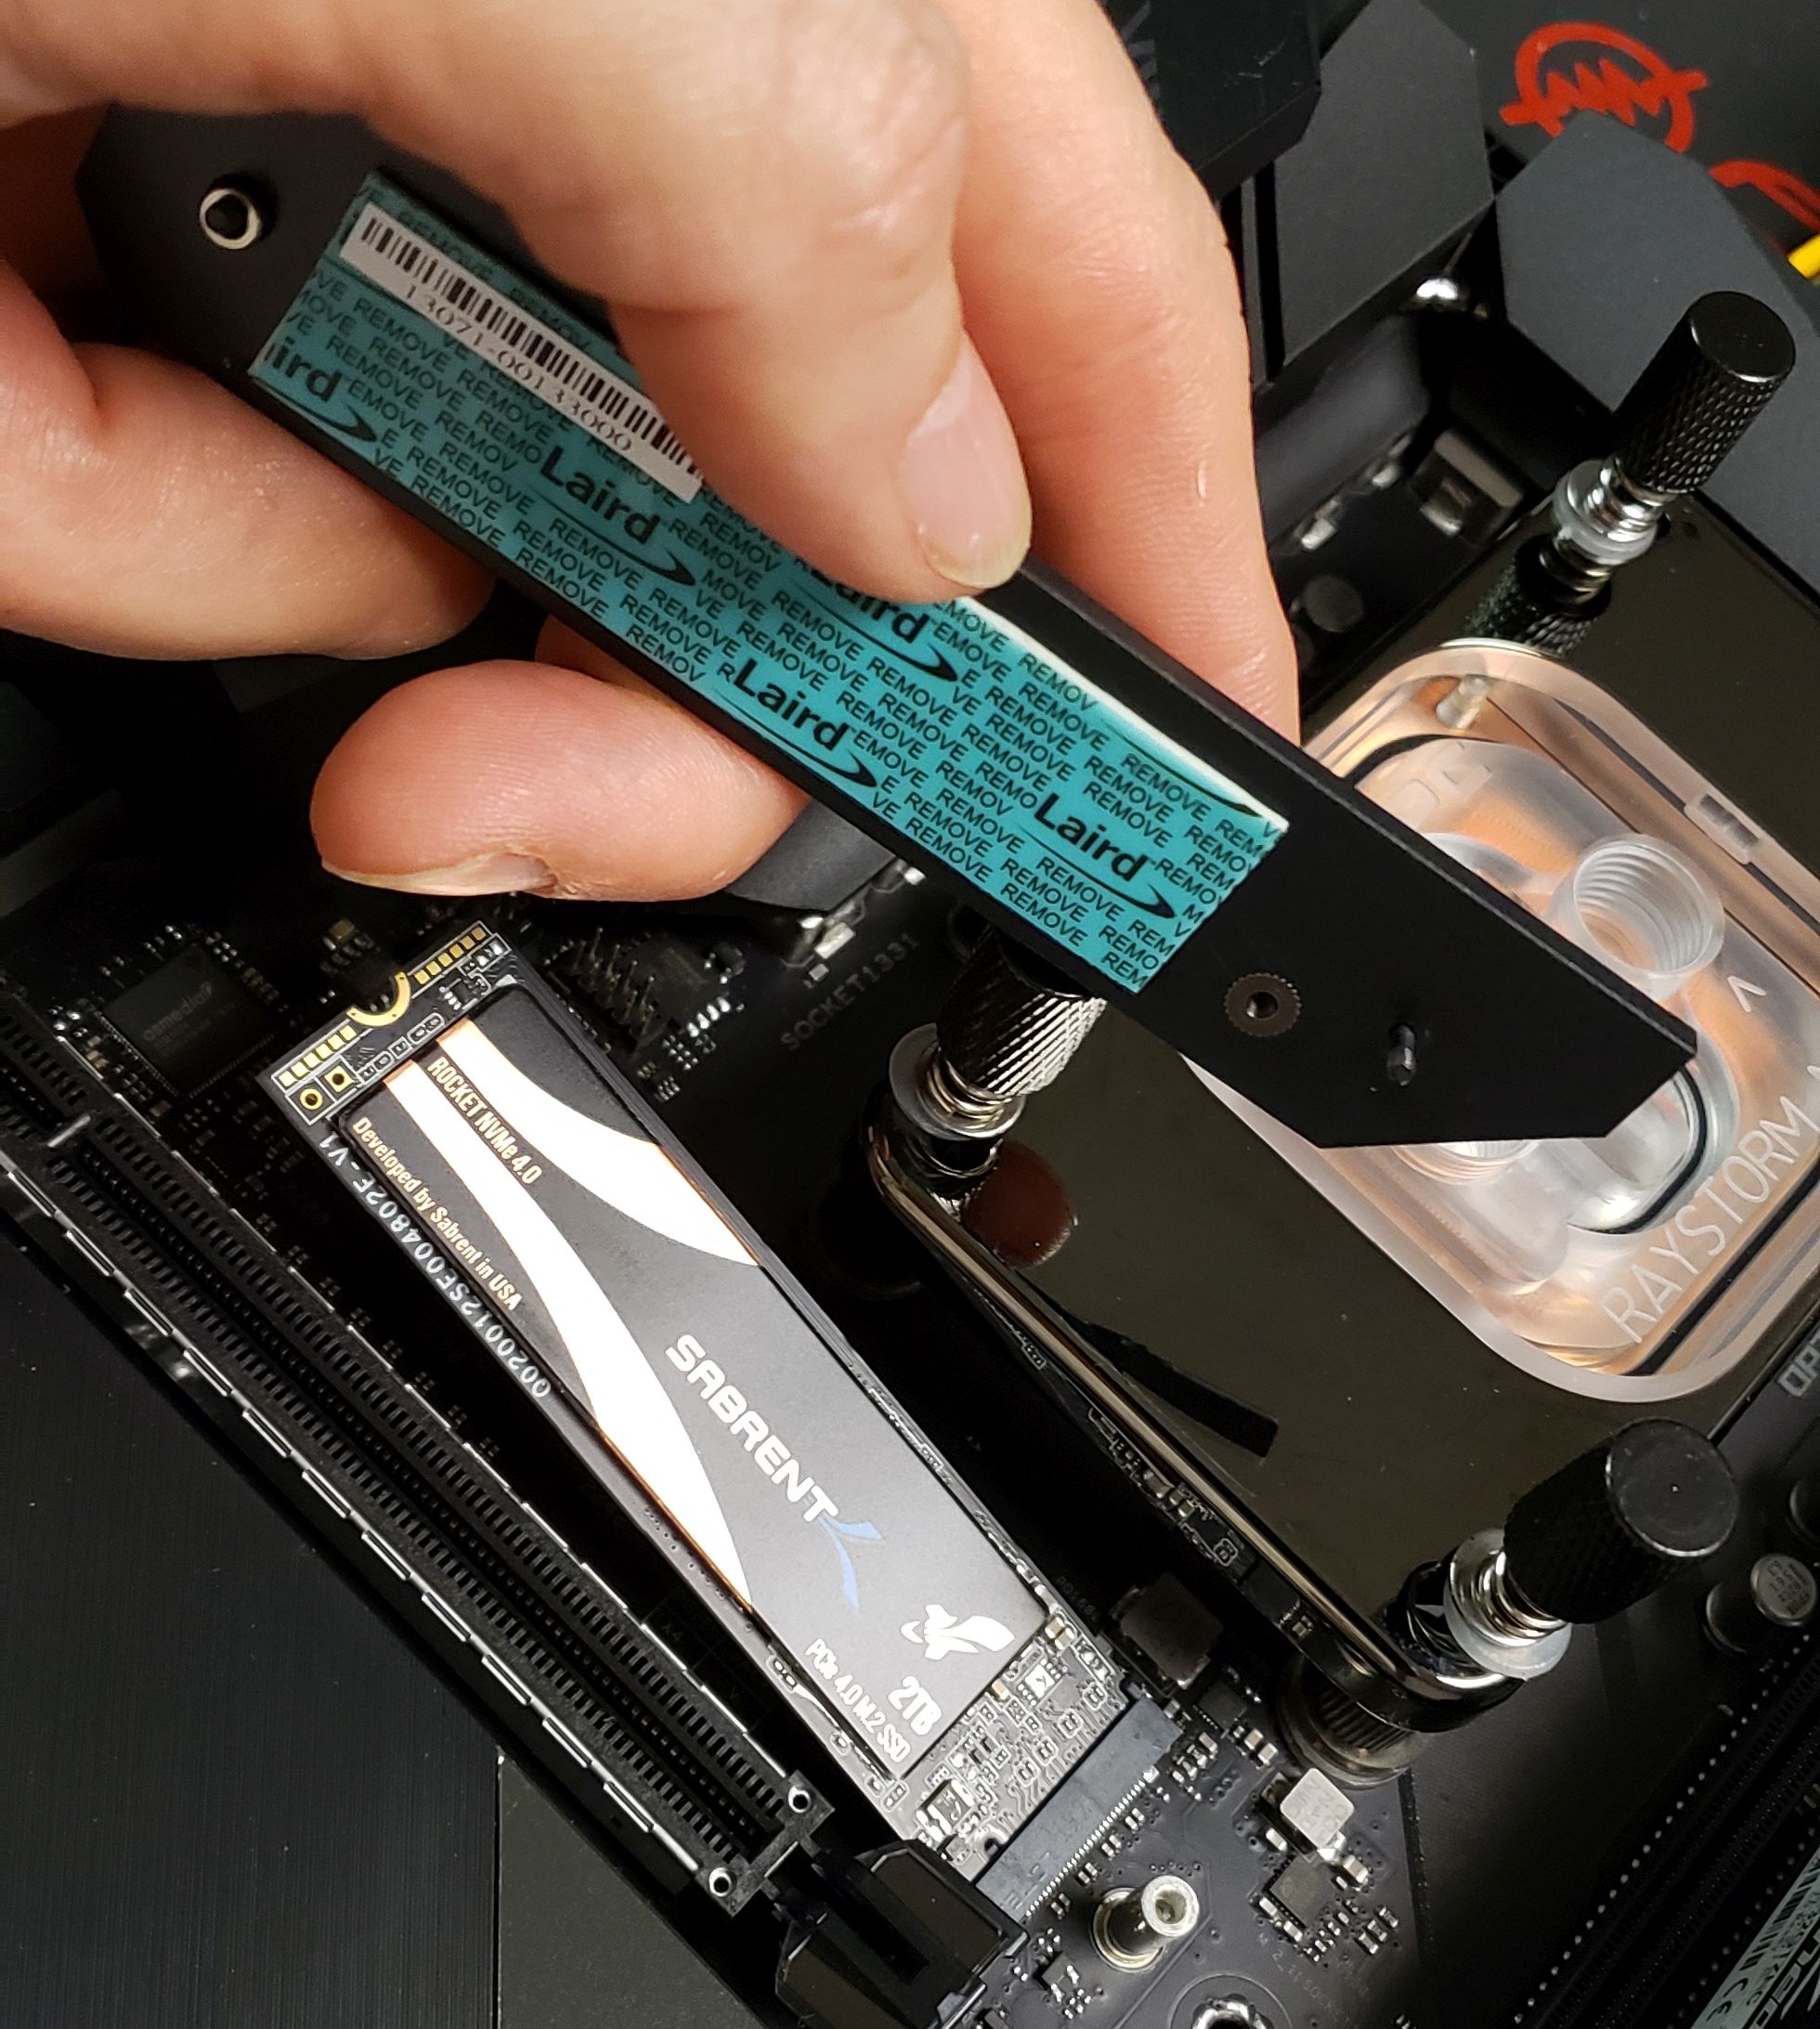
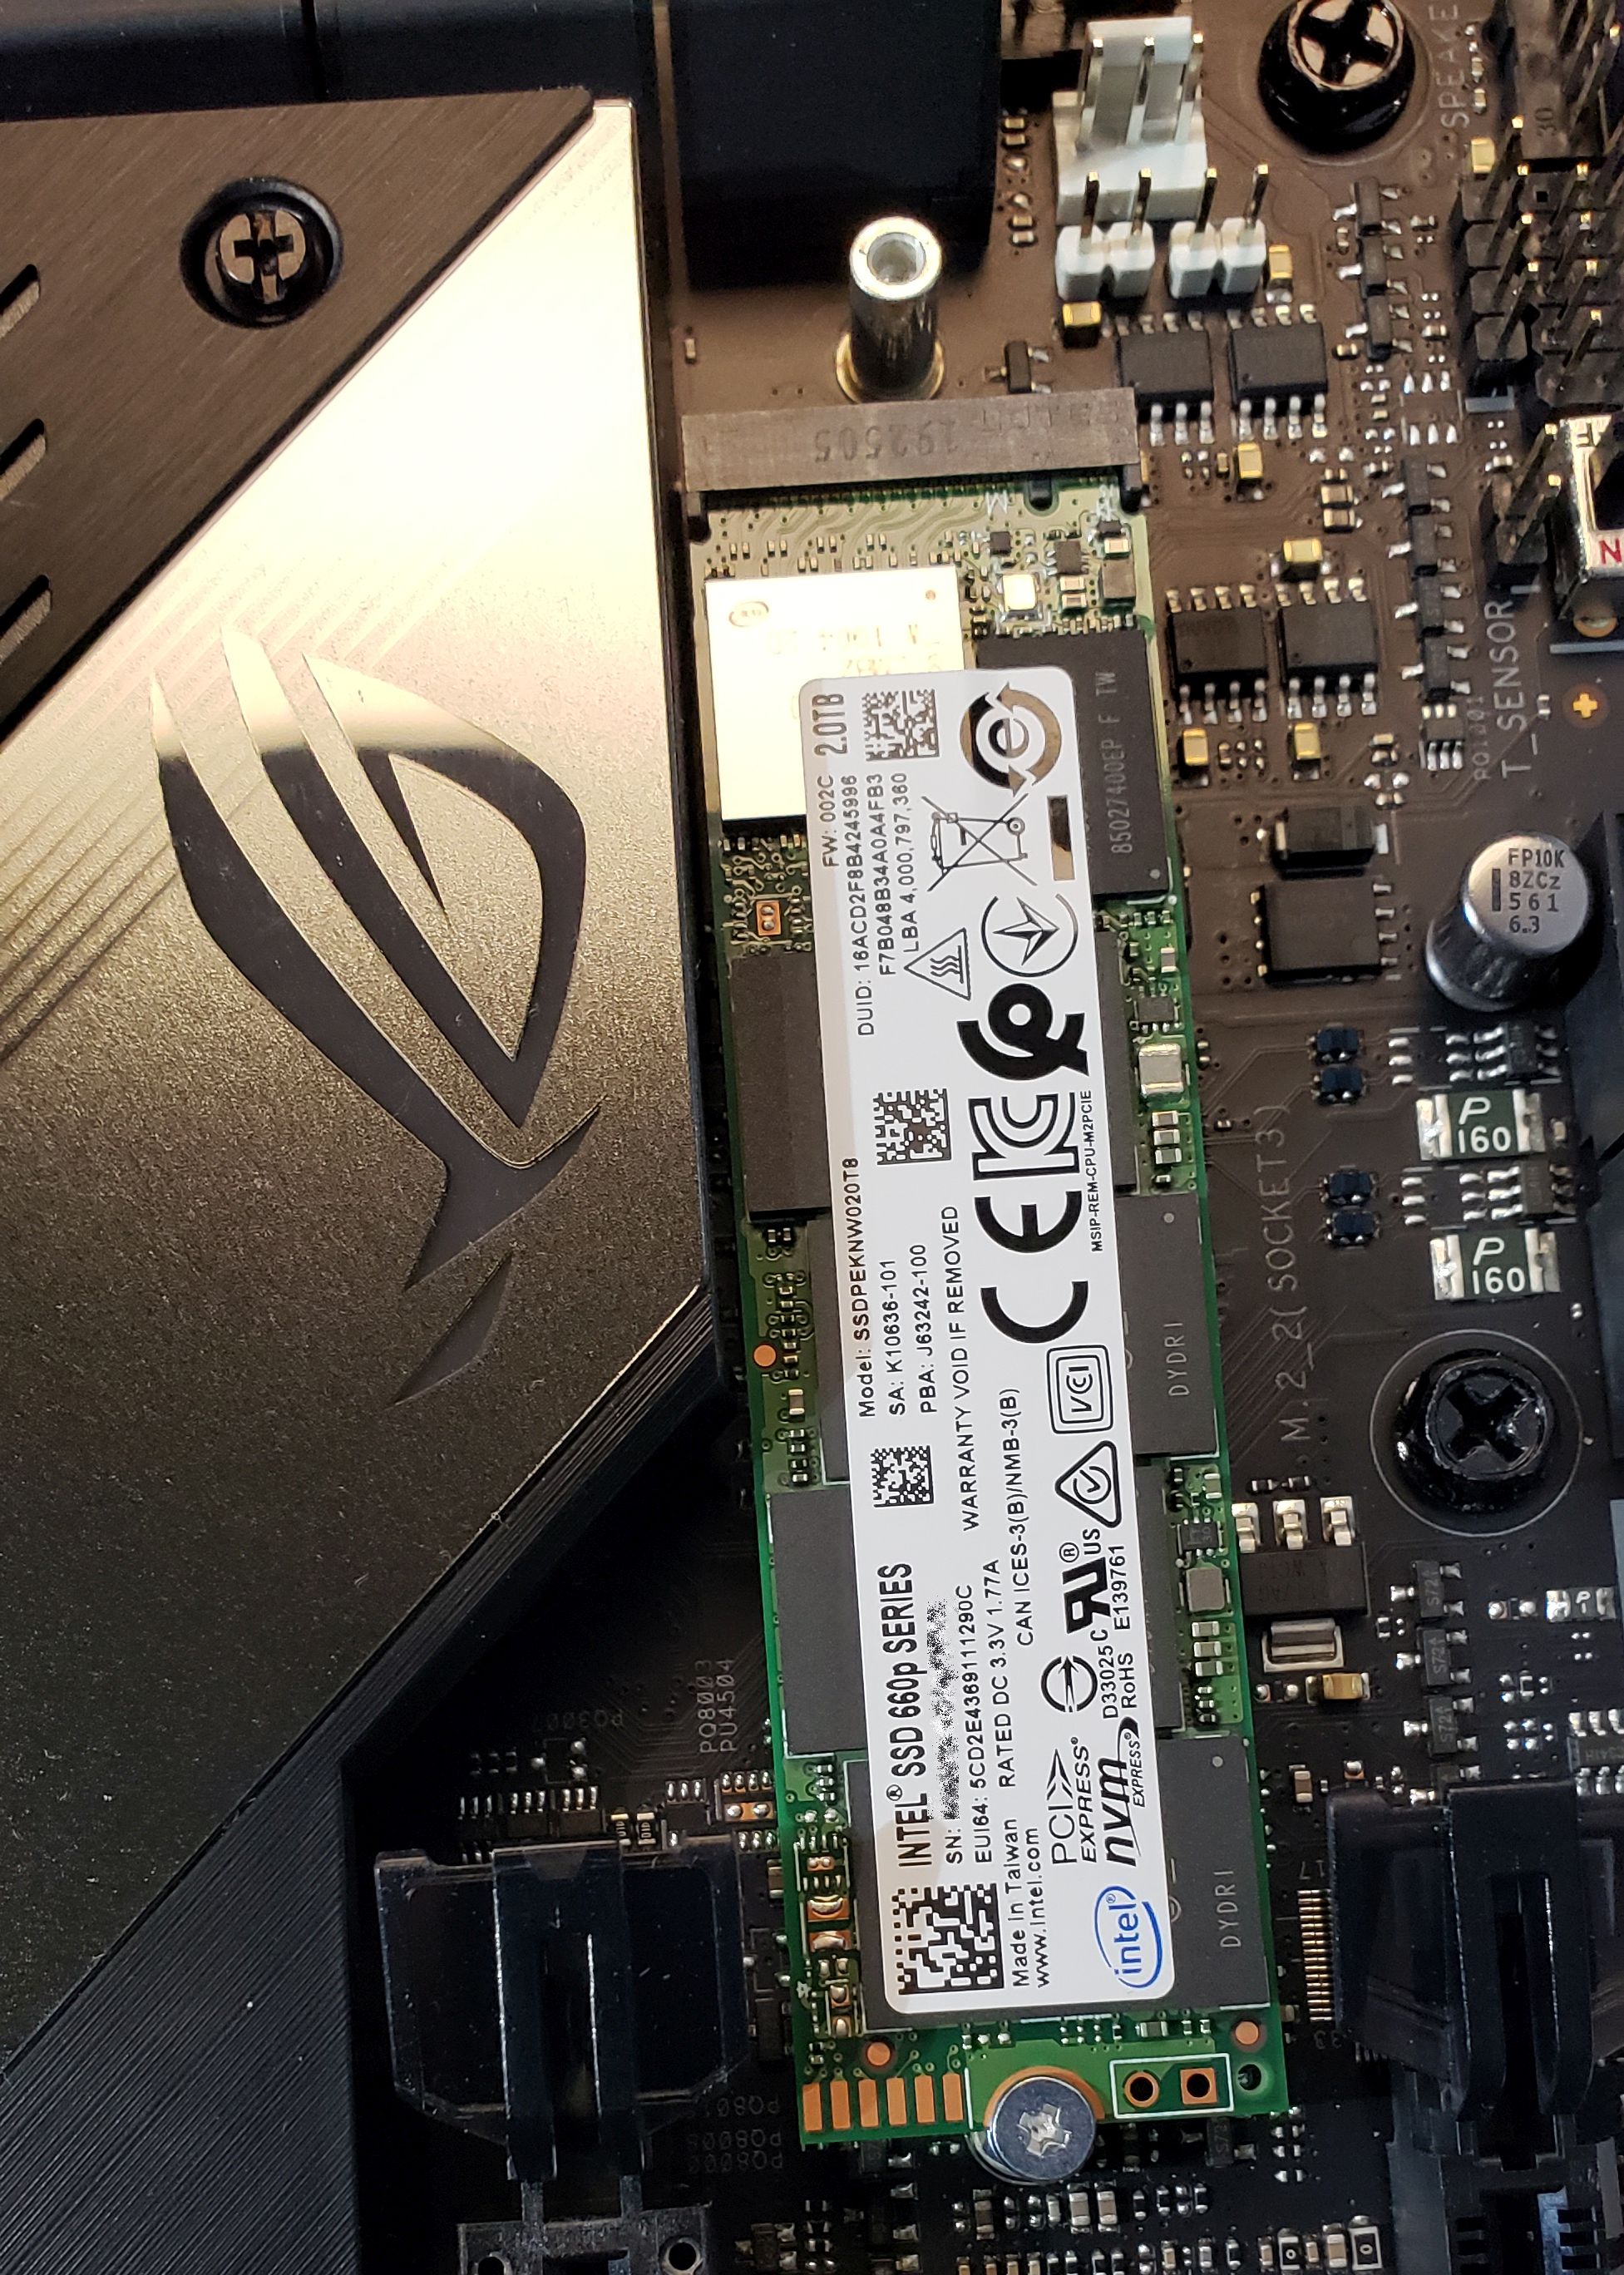
Whenever possible, I recommend building new systems with only M.2 SSDs. I have been doing so for the last several personal and other builds I have done. The builds come out so clean without the SATA SSD (or SATA HDD) power and data cables. The MSI B650 Tomahawk motherboard has three M.2 slots with PCIe Gen 4.0 support. I reused both drives from my last system: a Western Digital Black SN850X 4TB drive as my main drive and a Sabrent Rocket NVMe 4.0 2TB drive as my secondary drive. I upgraded my previous system from the Sabrent Rocket NVMe 4.0 as my primary (boot) drive to the Western Digital Black SN850X 4TB in June 2023. I bought it through a very short-term special offer from Western Digital. Unfortunately, their website doesn't track orders back that far, so I'm unsure exactly what I paid, but I believe it was about $270.
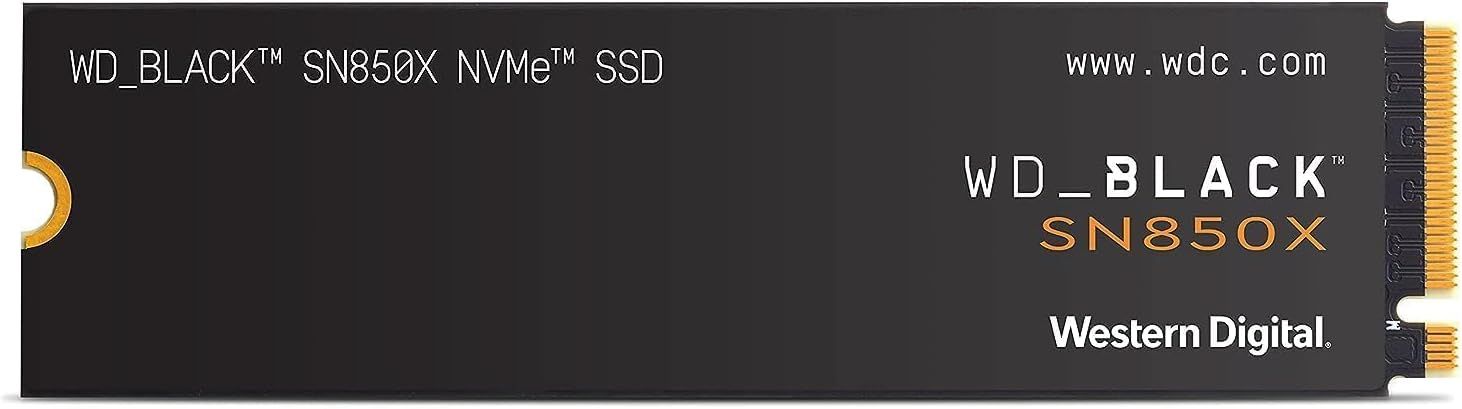
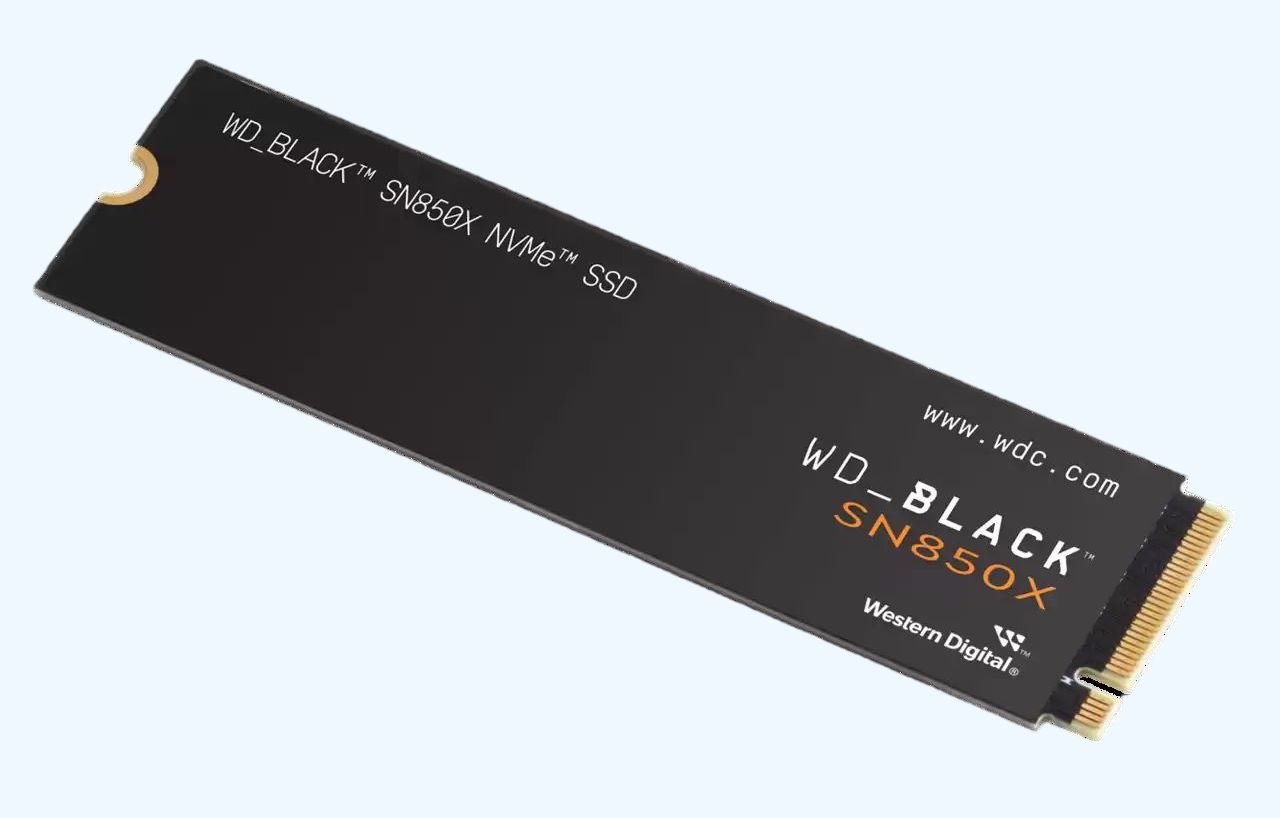

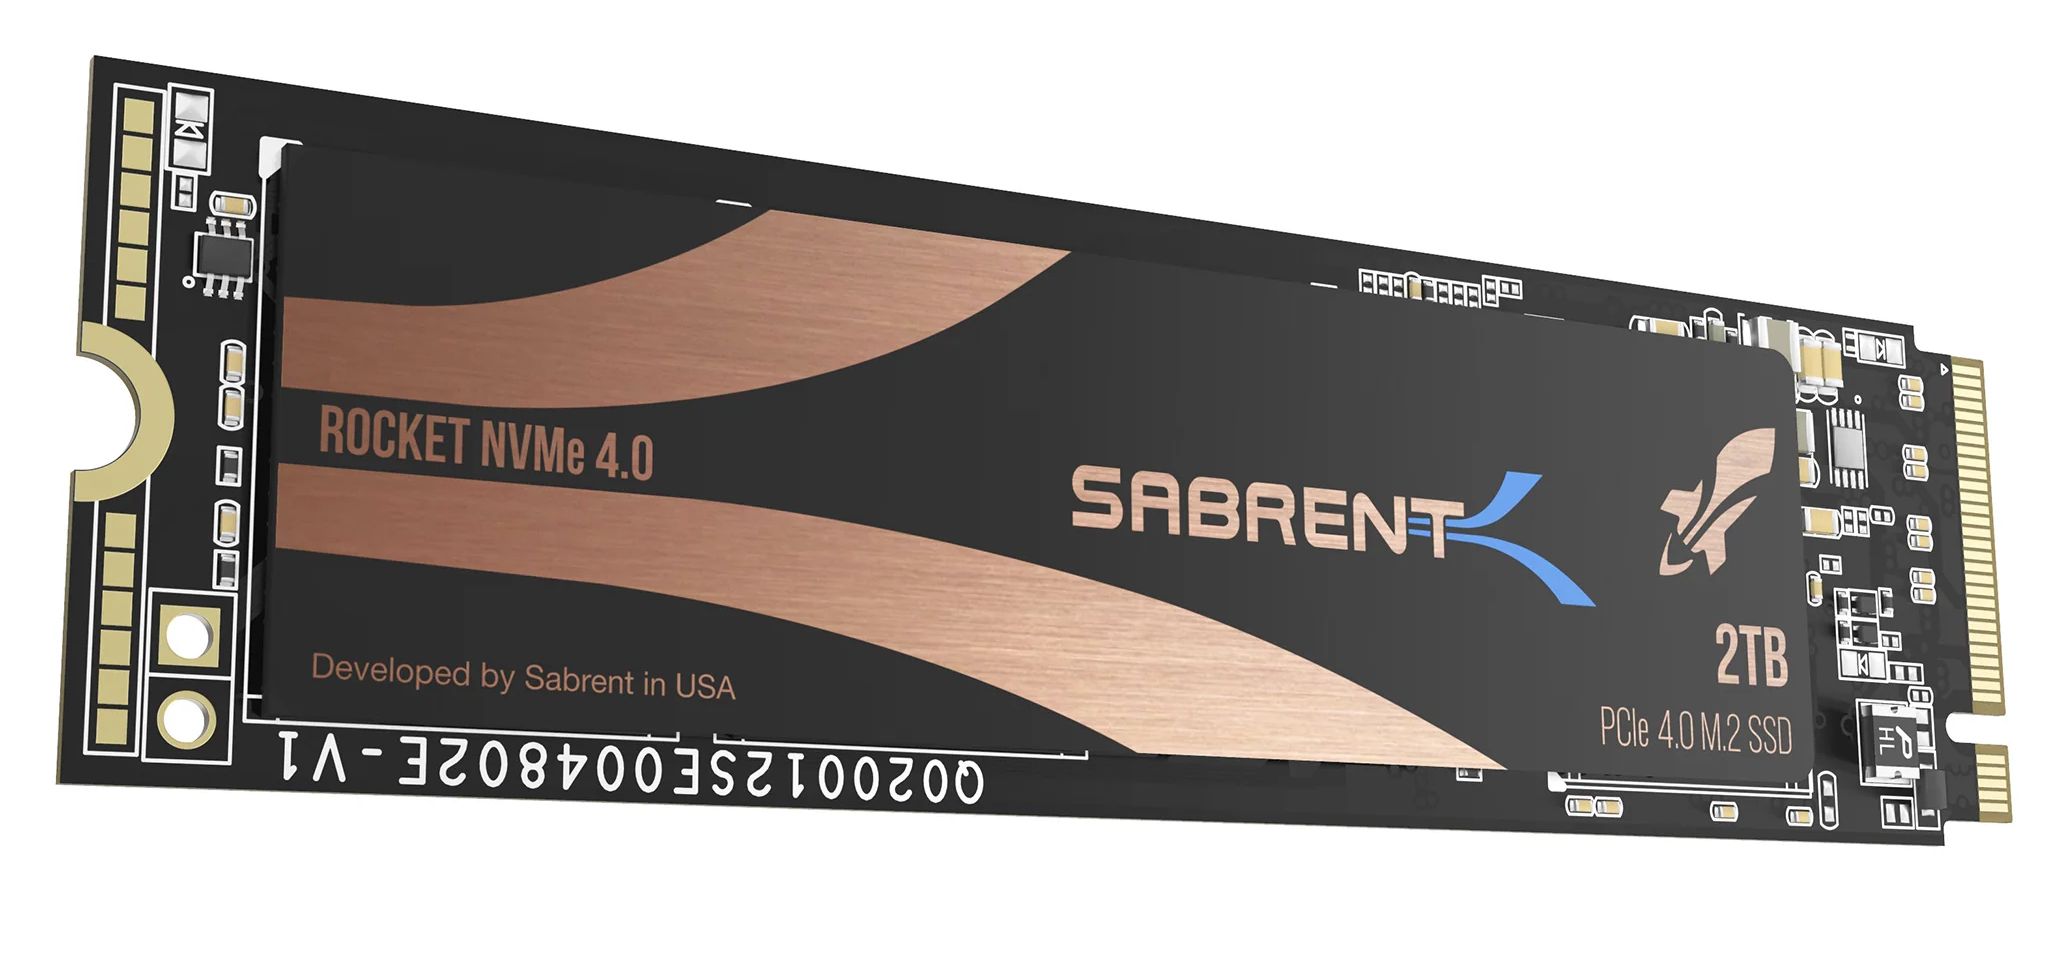
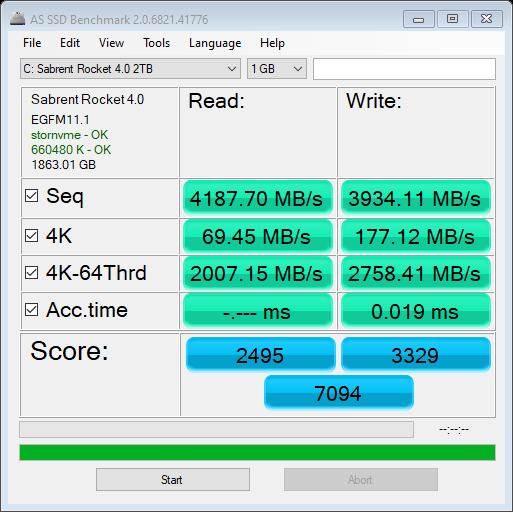
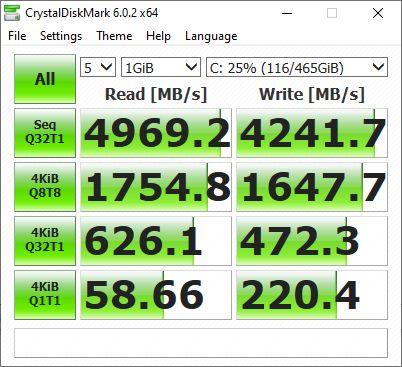
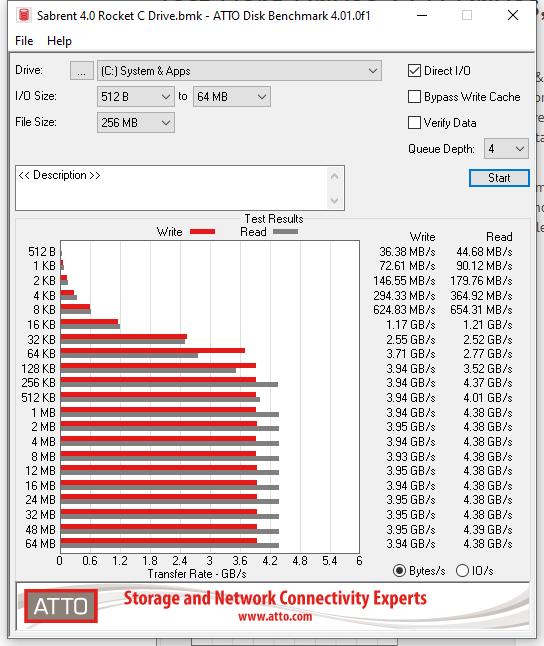
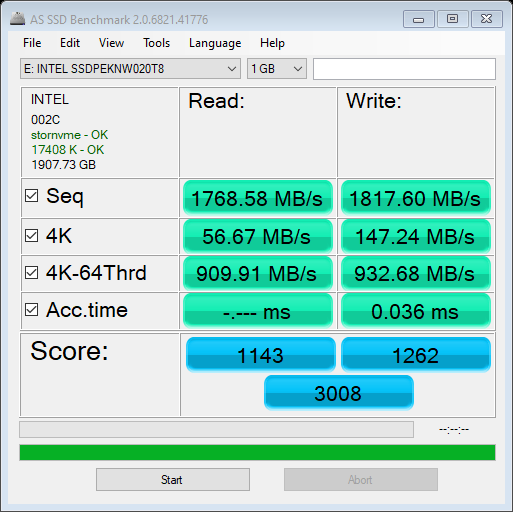
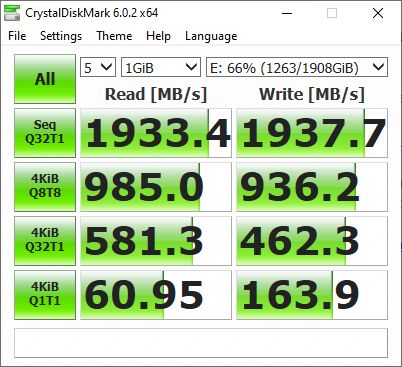
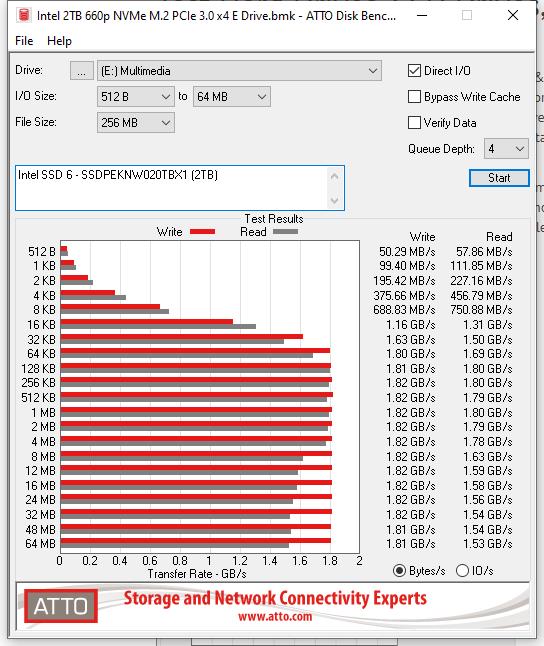
I ran three disk benchmarks: AS SSD Benchmark 2.0.7316, CrystalDiskMark 8.0.5, and ATTO Disk Benchmark 4.01.0f1, and the results are shown below. I have the Western Digital SN850X 4TB partitioned into the C: drive and D: drive. I ran the benchmarks against both partitions. The Sabrent Rocket 4.0 2TB has one large partition. During testing, the Western Digital SN850X 4TB temperature rose from 44°C to a peak of 67°C (in CrystalDiskMark NVMe benchmarking). The Sabrent Rocket 4.0 2TB temperature rose from 42°C to 68°C (also in CrystalDiskMark NVMe benchmarking).
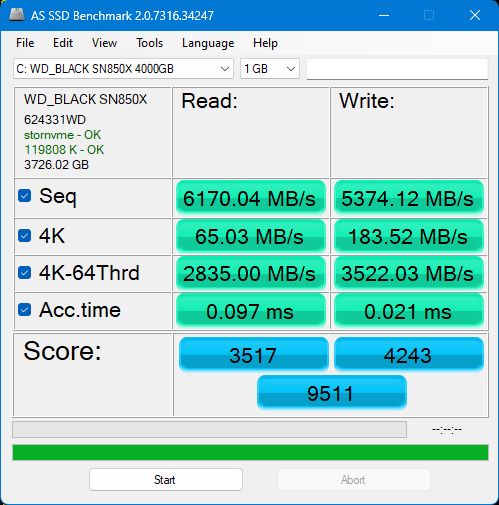
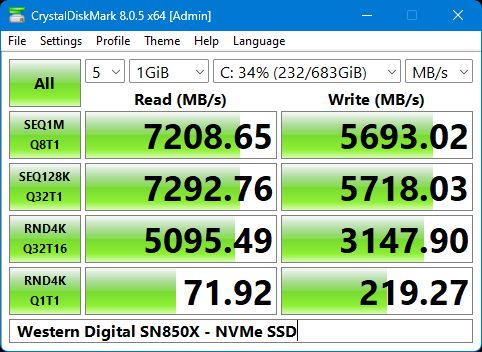
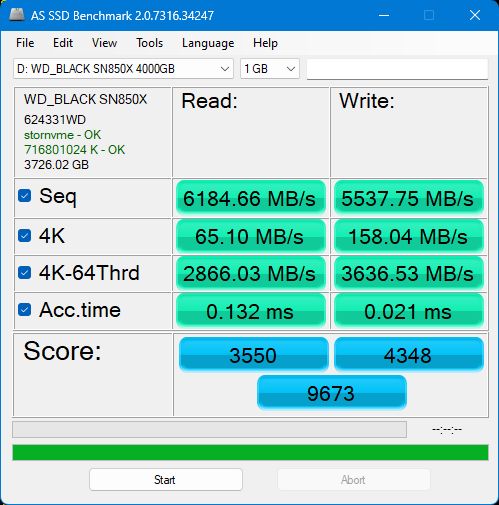
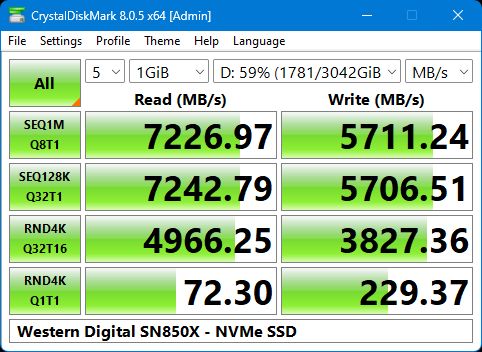
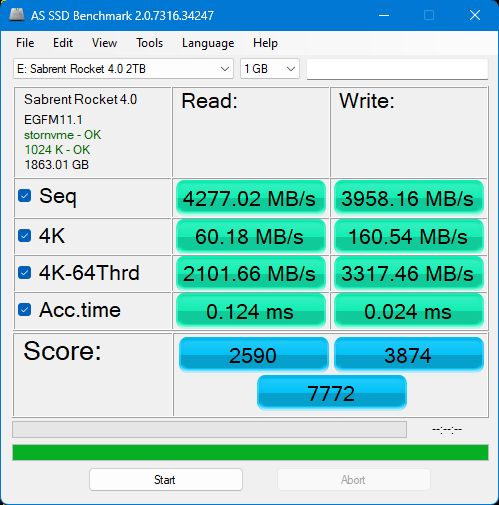
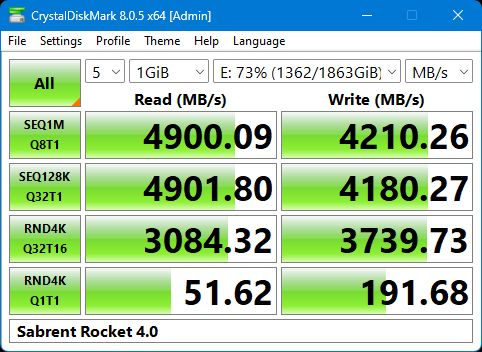

When I got the Sabrent Rocket 4.0 2TB NVMe SSD in 2019, I was blown away by its (PCIe Gen 4) speed. The speed has only gotten better since then. Depending on the test, the improvement from the Western Digital SN850X NVMe SSD is 20-50%. That said, the "feel" isn't that noticeable. The 2019 system booted fast. This system boots fast, too. Perhaps more impressive is that I paid about 50% of the Sabrent Rocket's cost for the Western Digital SN850X while getting twice the space (2TB for the Sabrent versus 4TB for the SN850X).
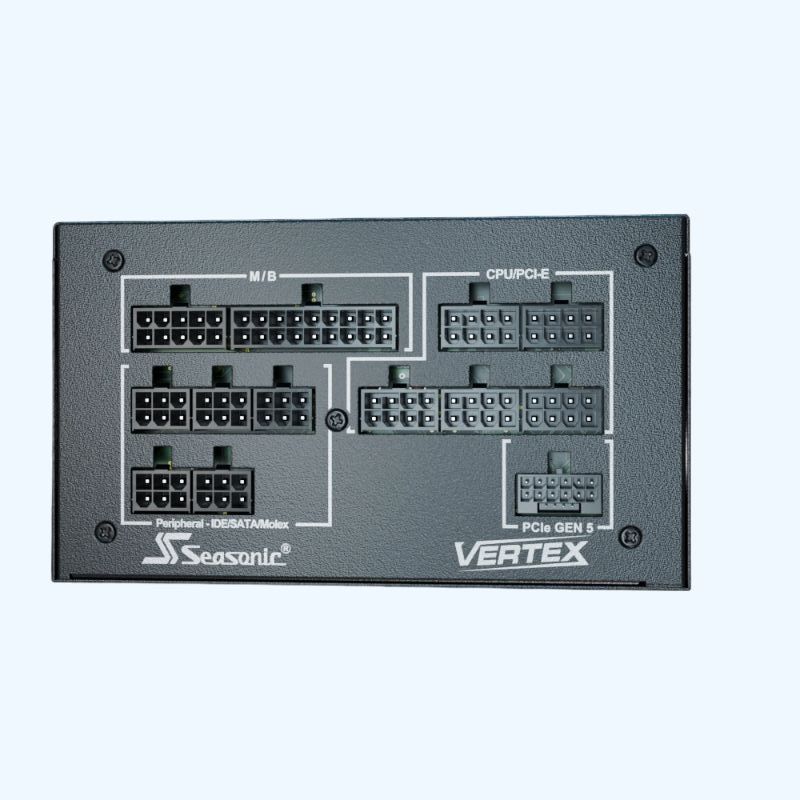
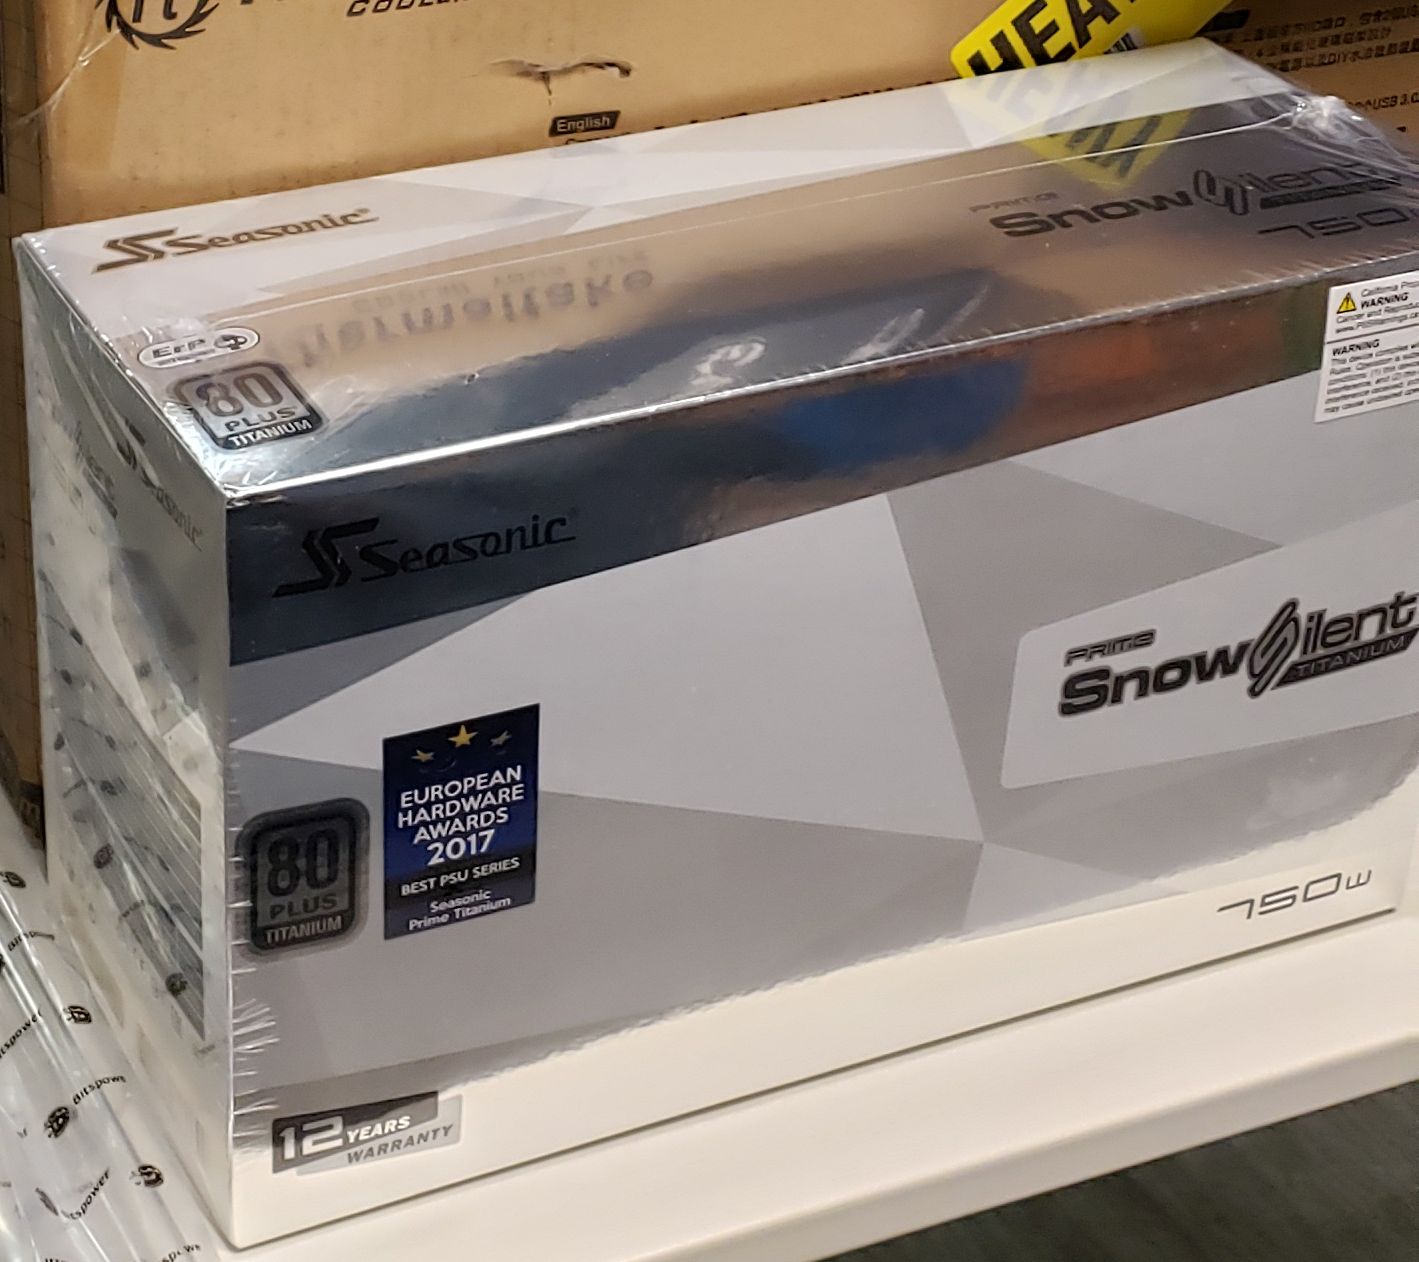
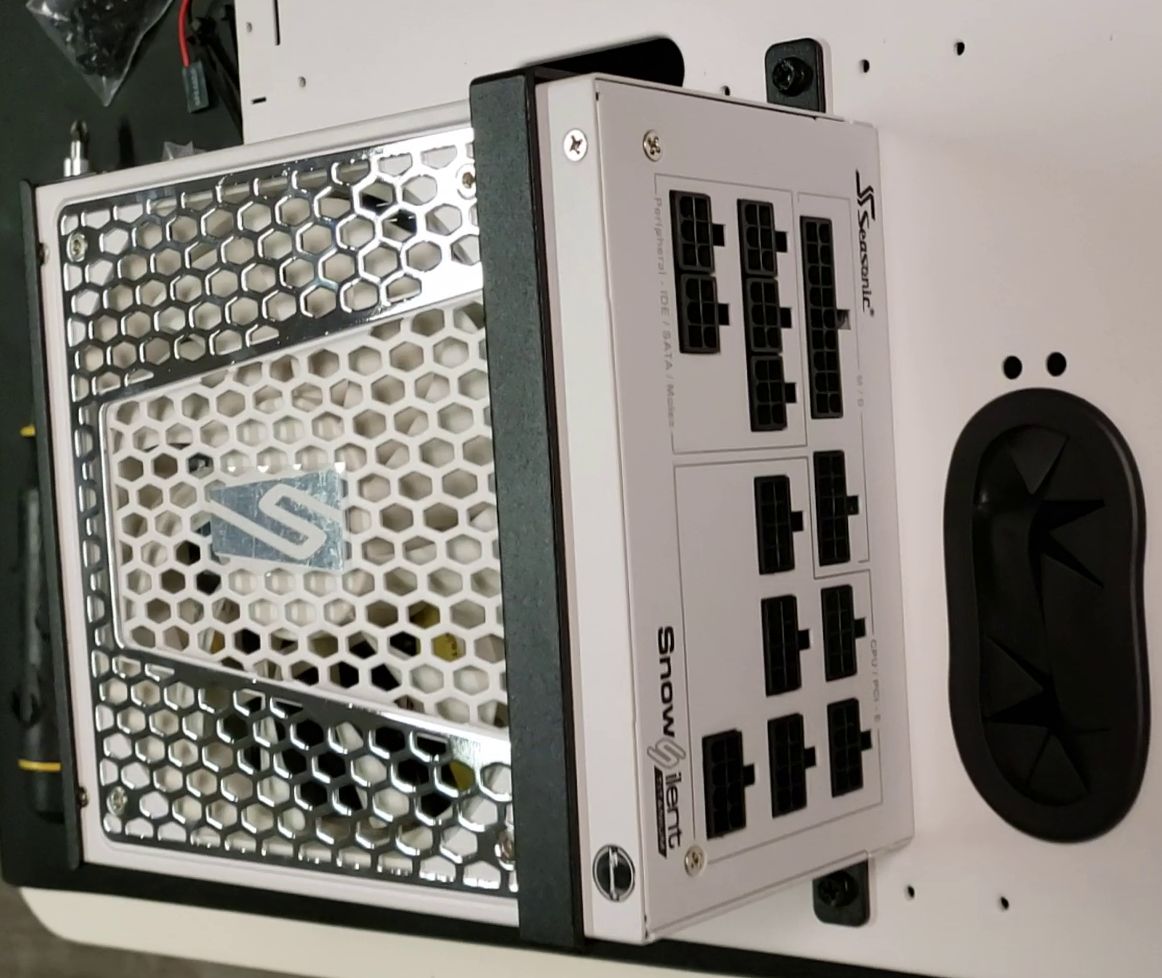
My previous power supply was a Seasonic Prime SnowSilent 750W Titanium, which I liked, but with an RTX 4090, the recommended PSU wattage is 1000W. Instead of going with a white PSU (with black cables), I went with a black Seasonic Vertex GX-1000 (with black cables). I also used the cables that came with the PSU rather than getting custom ones made. One of the reasons that I picked this PSU is that it an ATX 3.0 PSU and has the 12VHPWR connector (and cable) that the Gigabyte RTX 4090 requires. There was (and still is) a lot of controversy about these cables overheating and melting in the GPU power, so I wanted to use the Seasonic OEM cables.
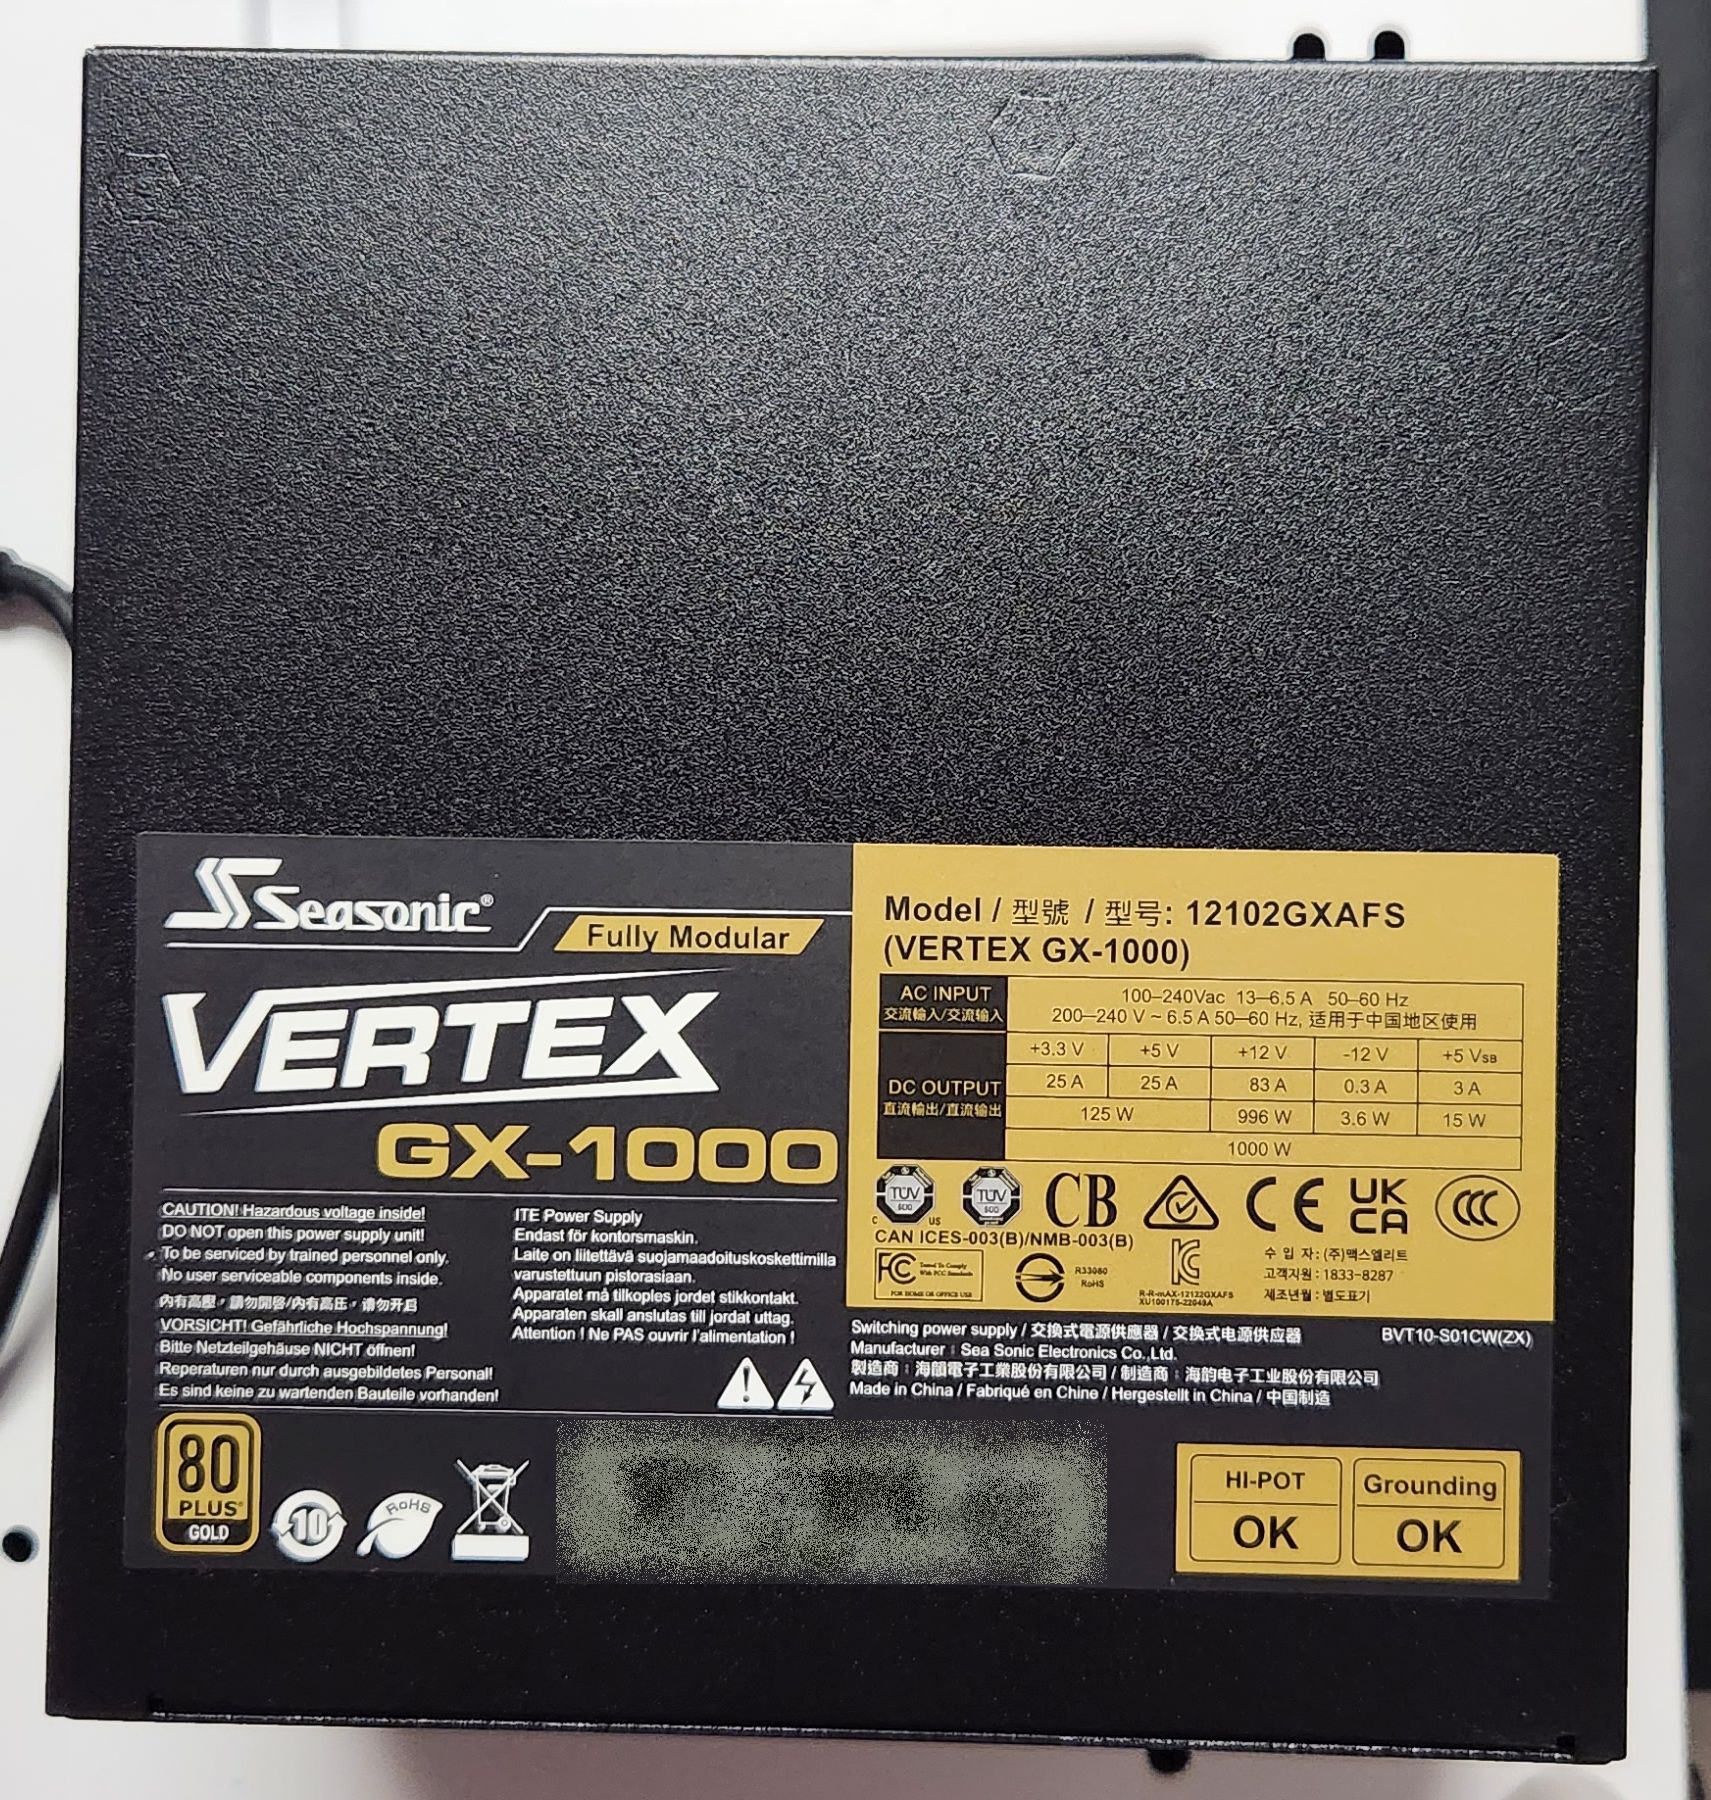
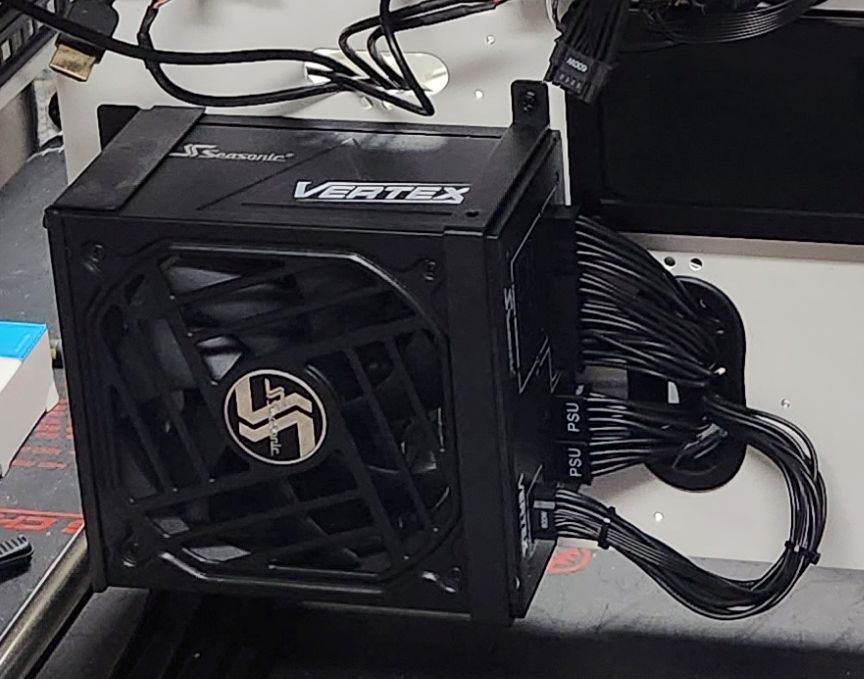
The Seasonic manual had explicit requirements for how much the 12VHPWR cable could be bent. My case - though it's pretty wide - didn't have enough clearance with the tempered glass panel installed. Therefore, I used a U-shaped power adapter, as mentioned and shown in the Graphics section above. I was concerned with the quality of that connector, but under heavy load, I have found it merely warm to the touch.
This gold-rated PSU comes with a 12-year warranty. It also has a feature that shuts the internal fan off when the PSU is lightly loaded. Except when playing some games, the fan is almost always off. I've heard that this feature has caused some problems for Seasonic in that people have returned the units because they have a "broken fan."
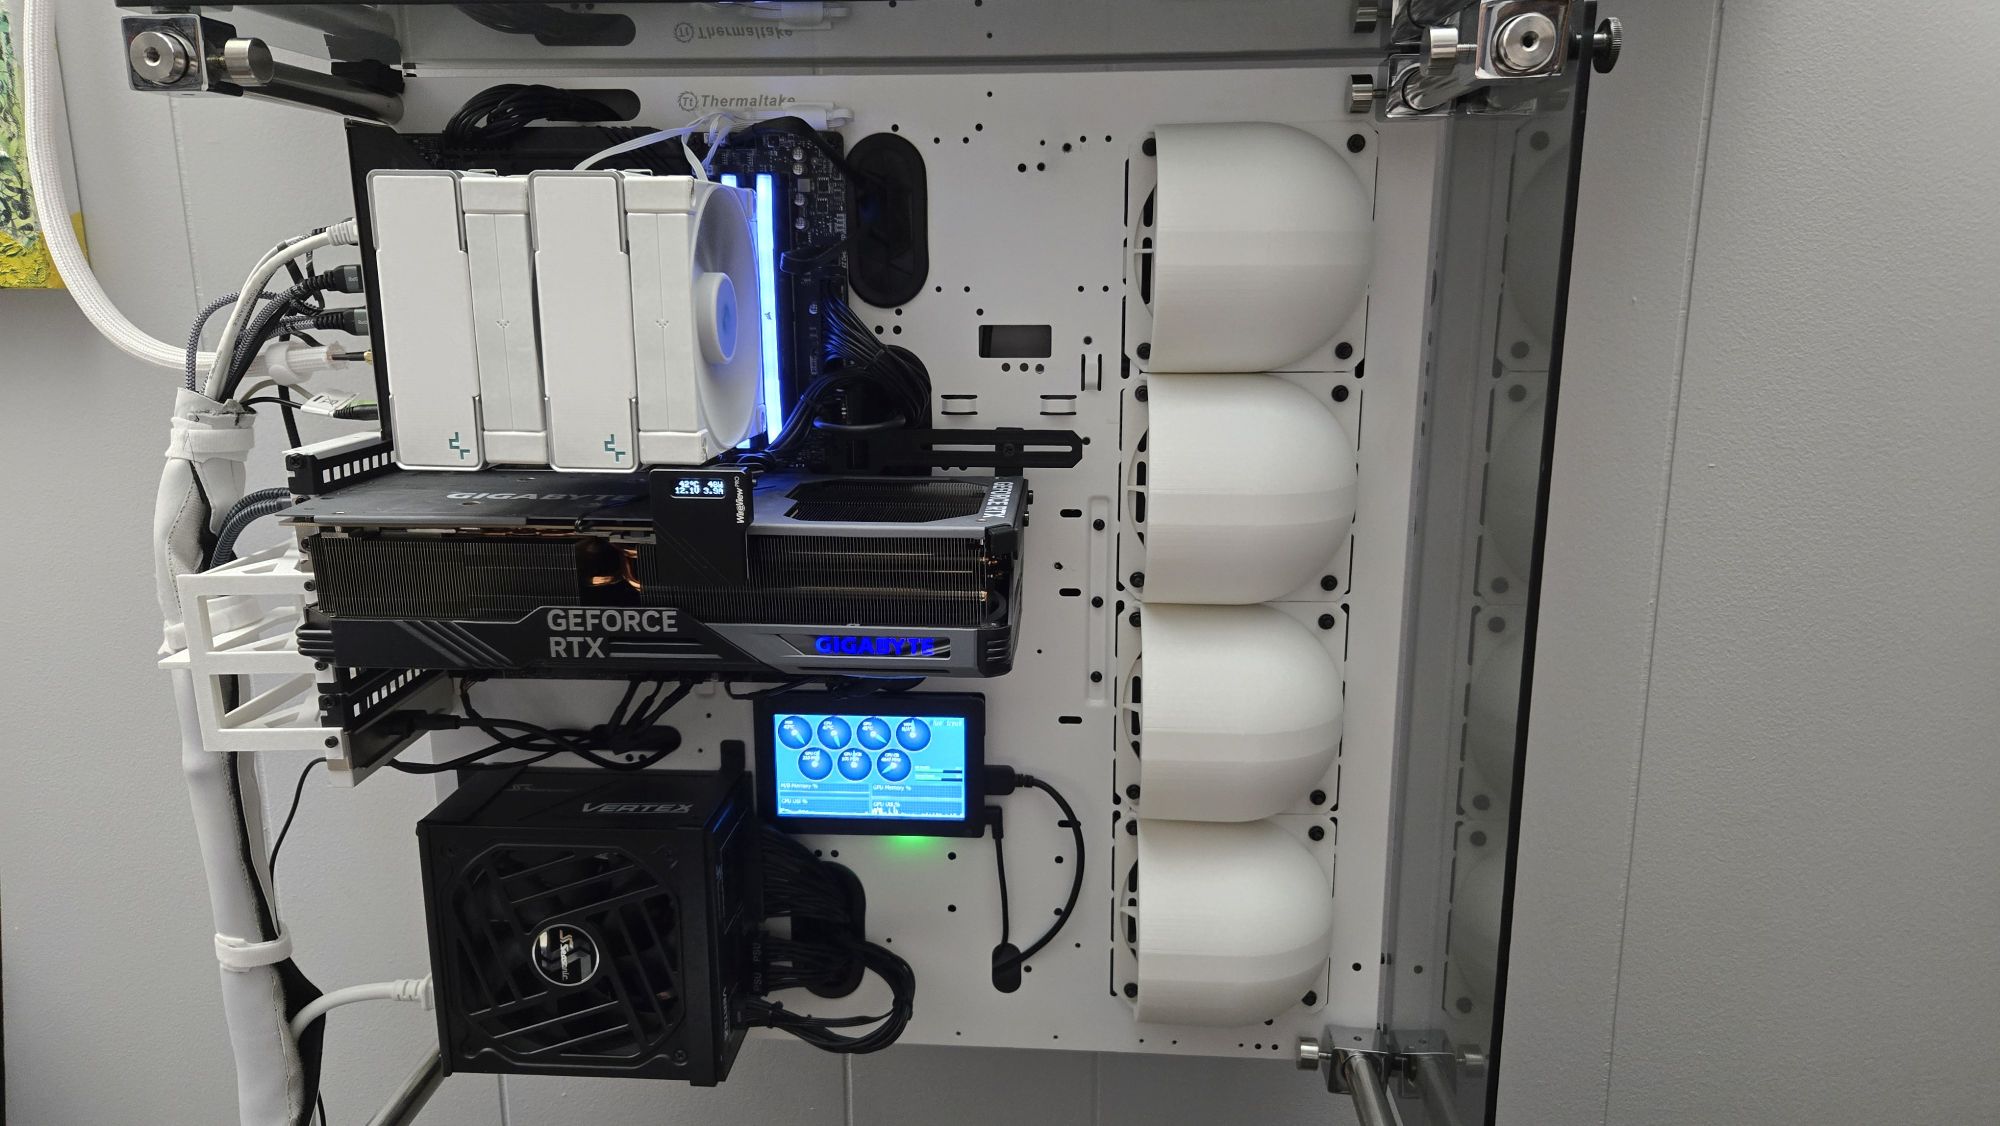
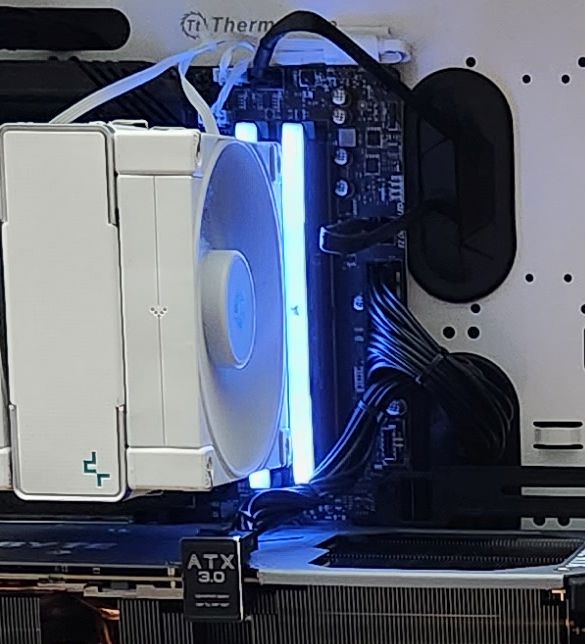
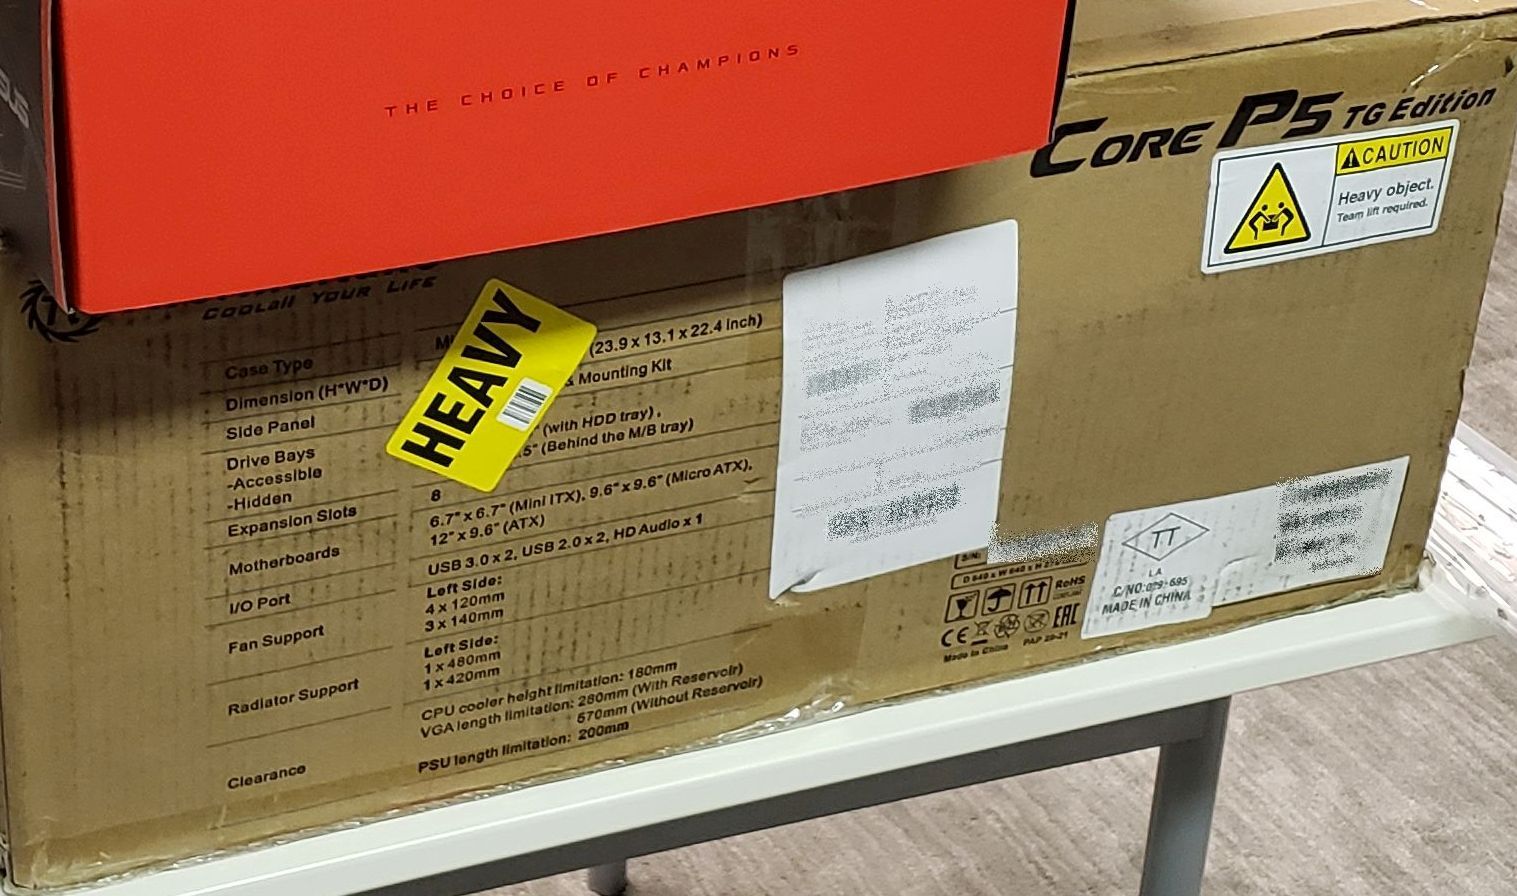
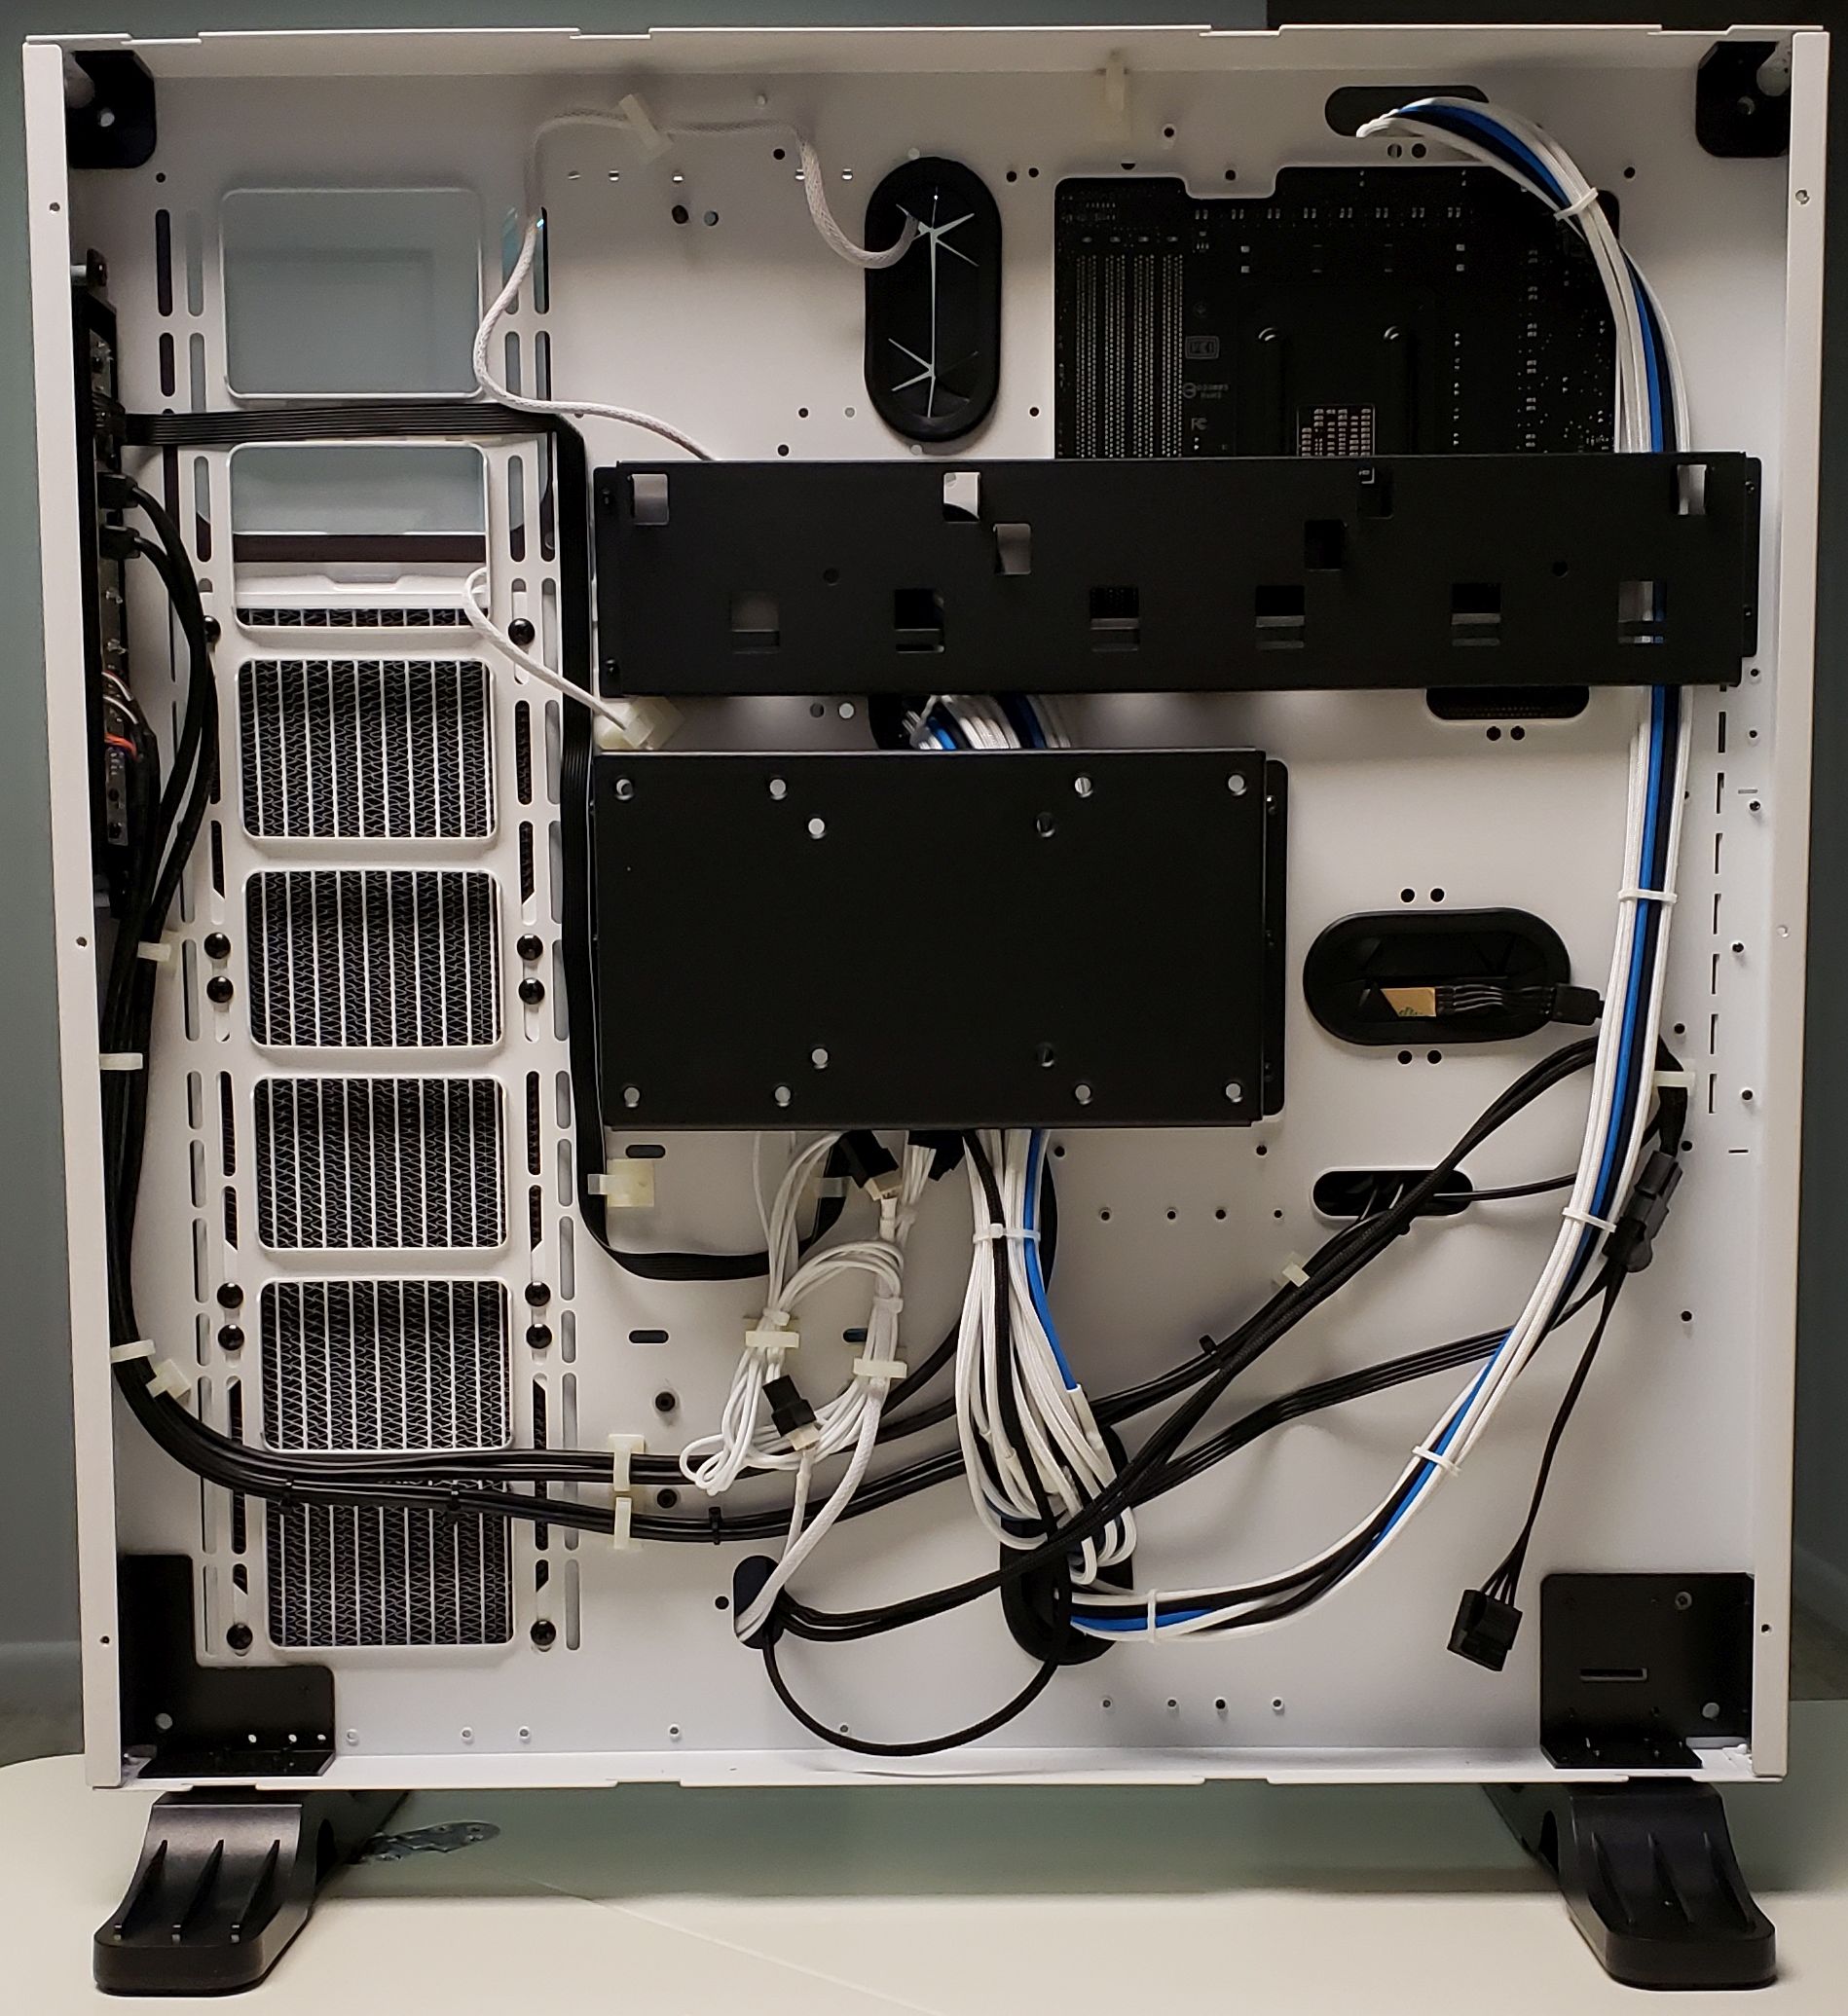
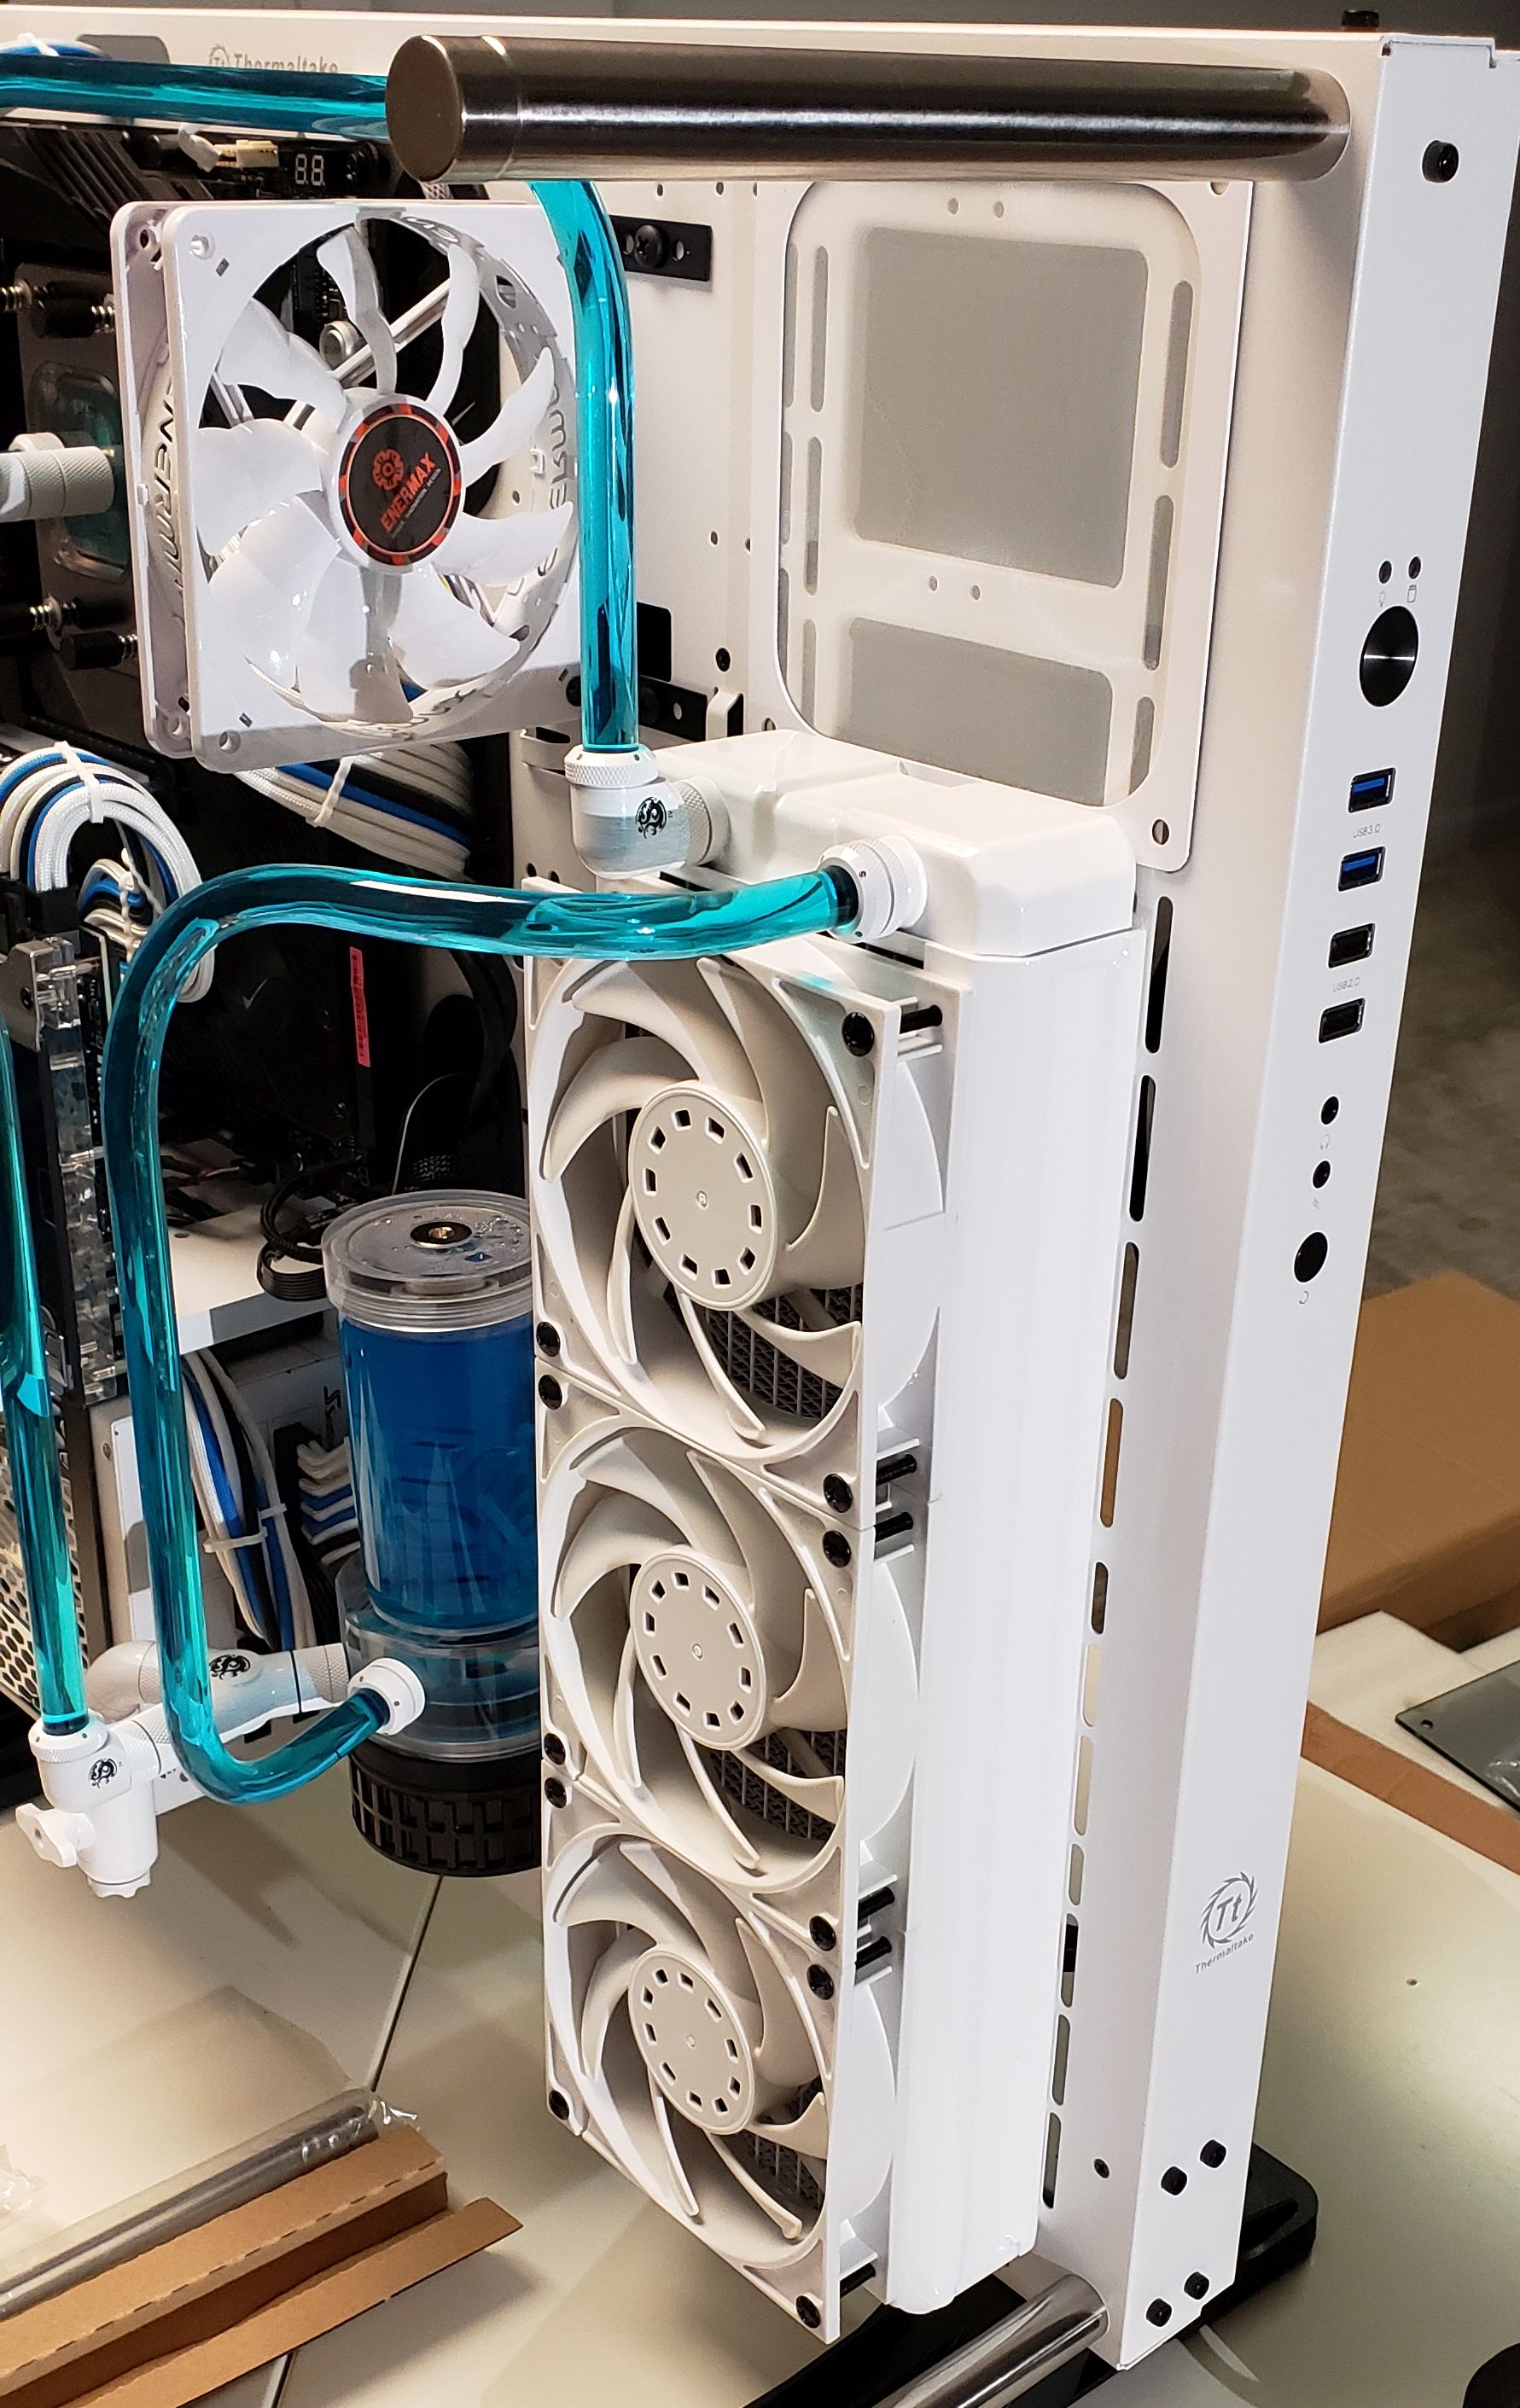
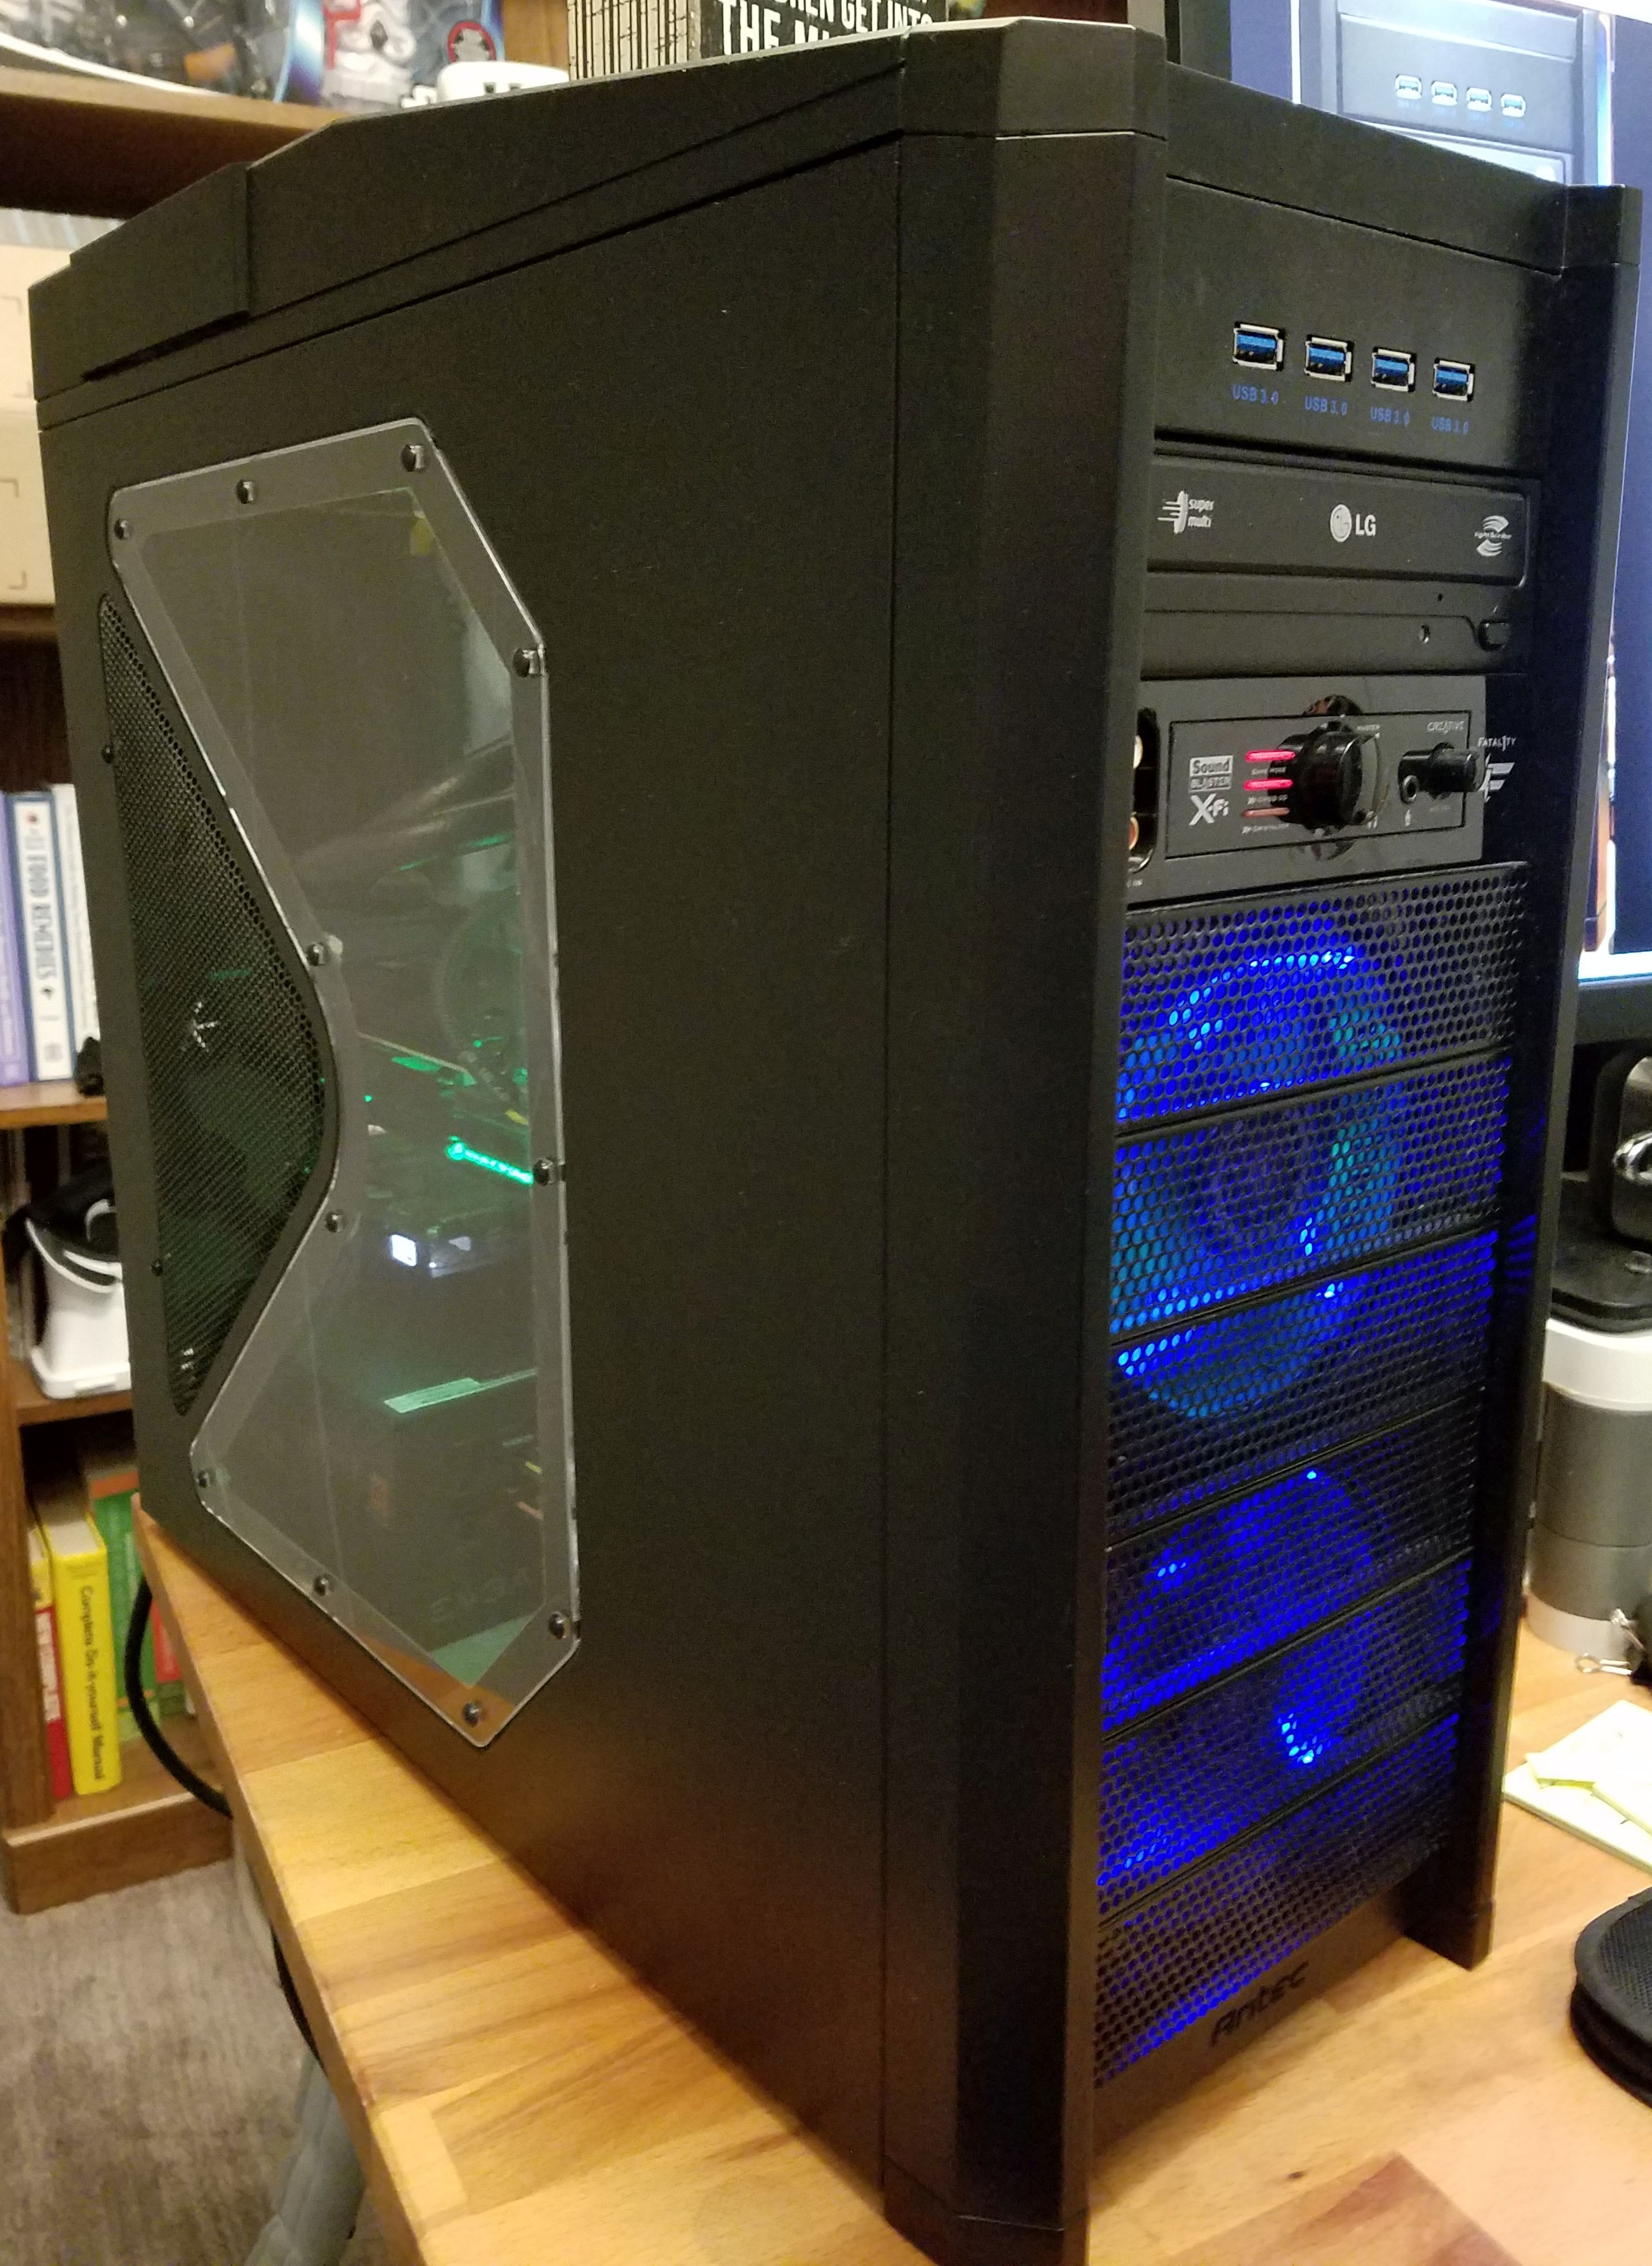
I reused the Core P5 Tempered Glass Snow Edition I bought for my previous build. This case is exceptional to build into, but it is (still) heavy. It weighs 40 lbs fresh from the box and doesn't get lighter once the components are mounted. Thankfully, the air-cooled system weighs quite a few pounds less than my water-cooled one, which is good since it is still wall-mounted.


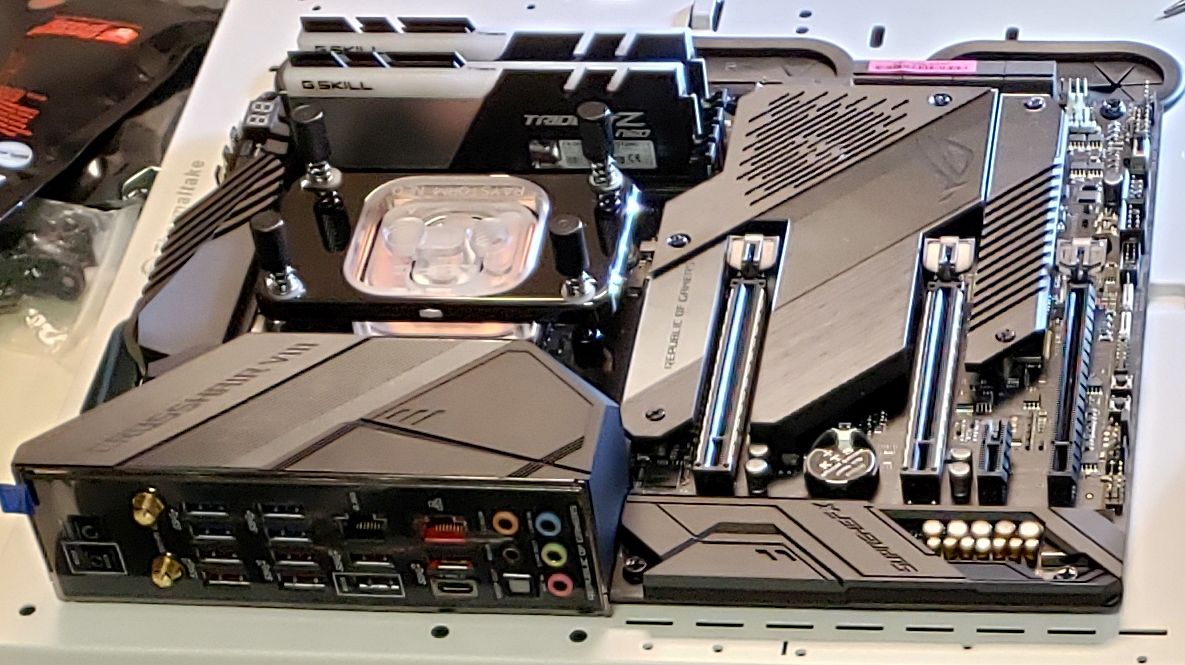
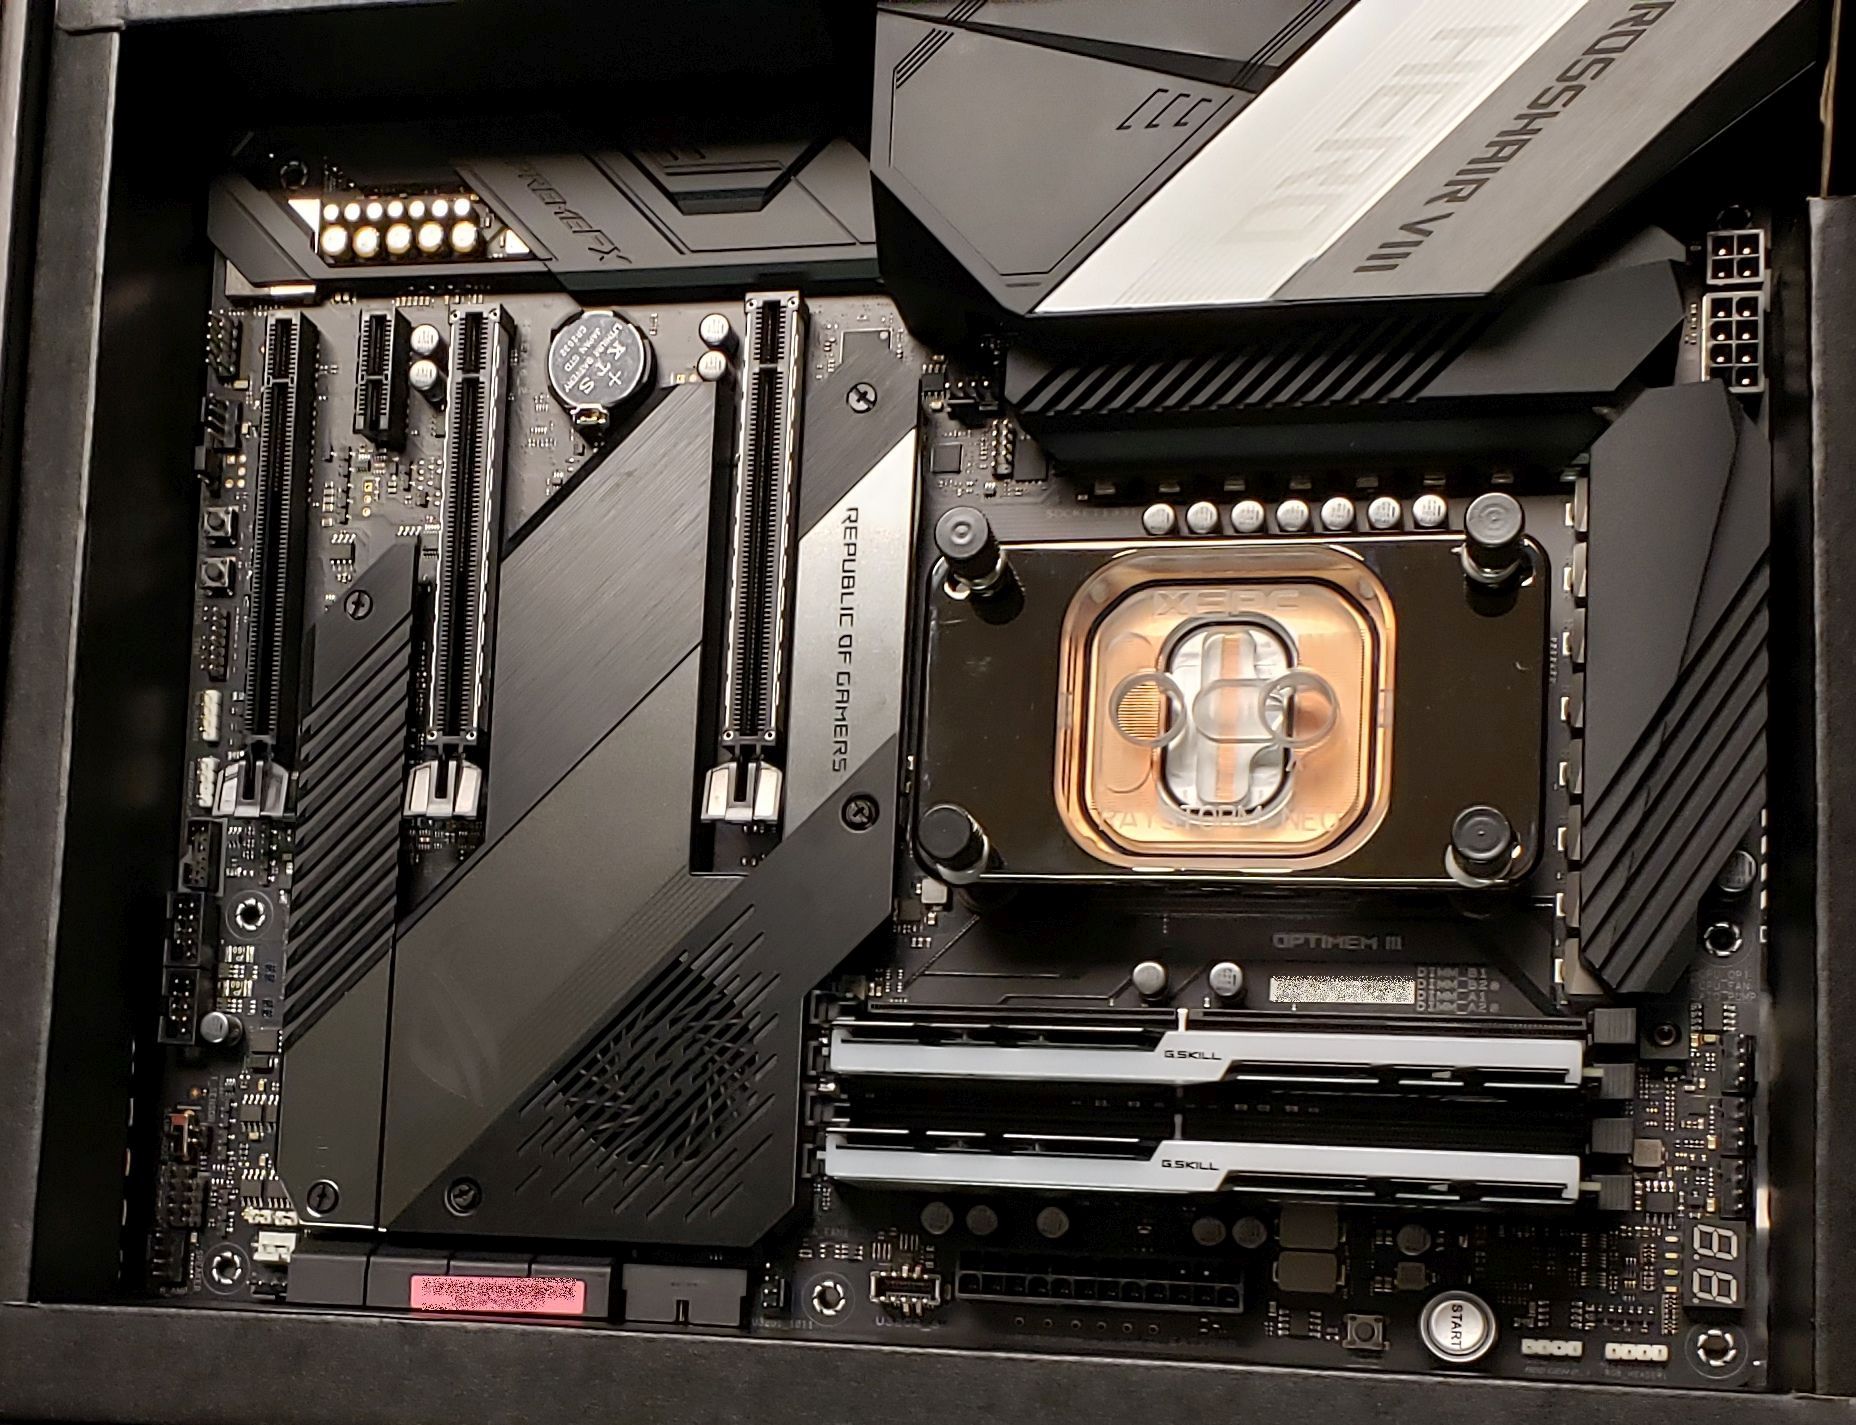
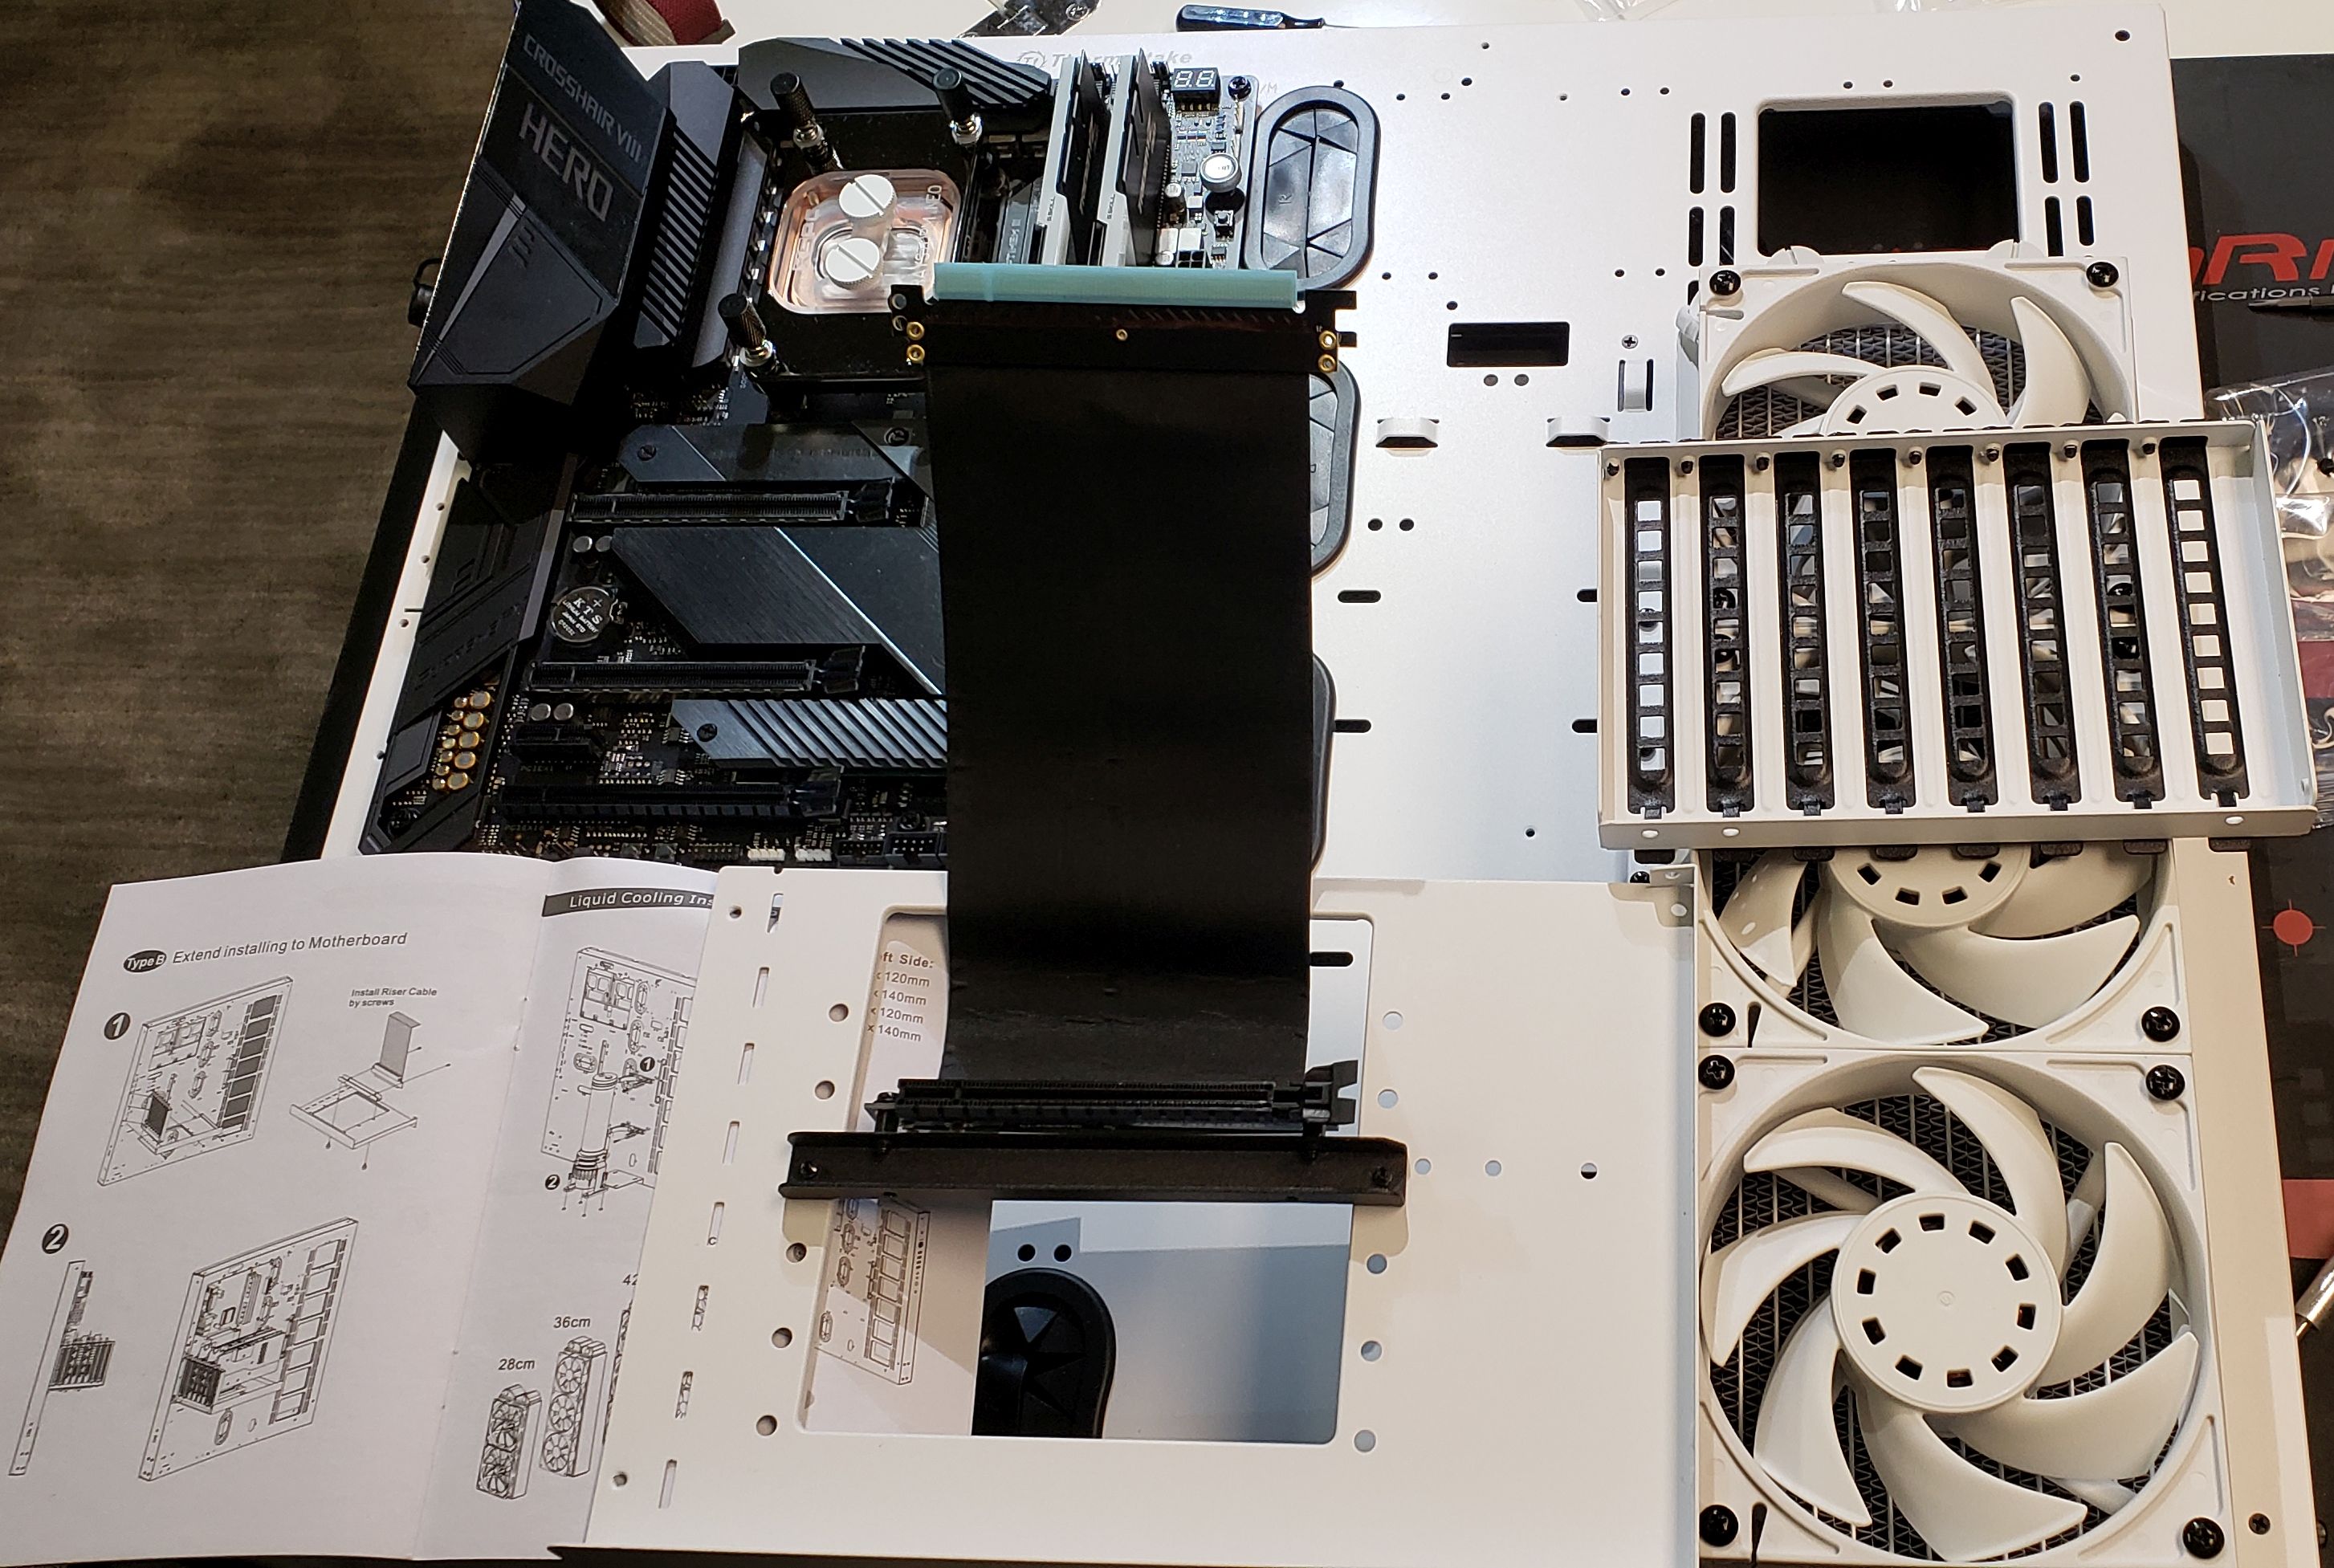
As a part of moving to an air-cooled system, I removed the radiator, water pump, and tubing. Initially, I converted the Asus Crosshair Hero VIII (X570) motherboard and AMD 3900X back to air-cooled by reinstalling the VRM heatsinks on the motherboard and adding an air cooler for the AMD 3900X. Luckily, when I swapped out the motherboard and CPU, I could reuse the air cooler with the AMD 7800X3D with a change of the (included) mounting kit.
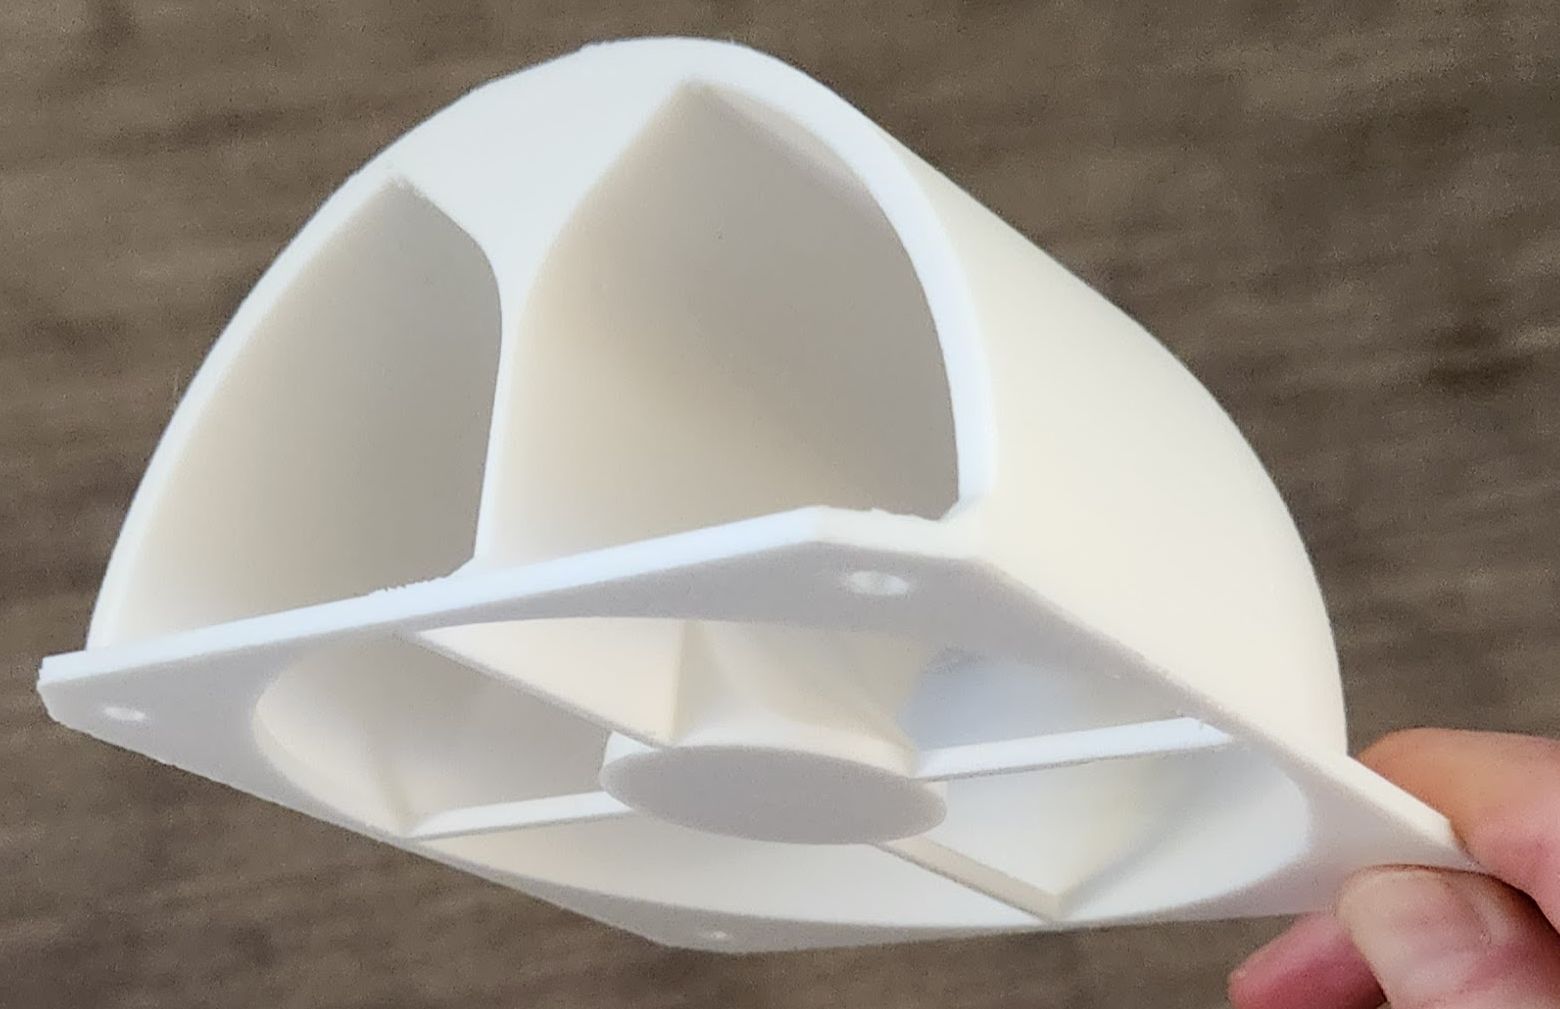
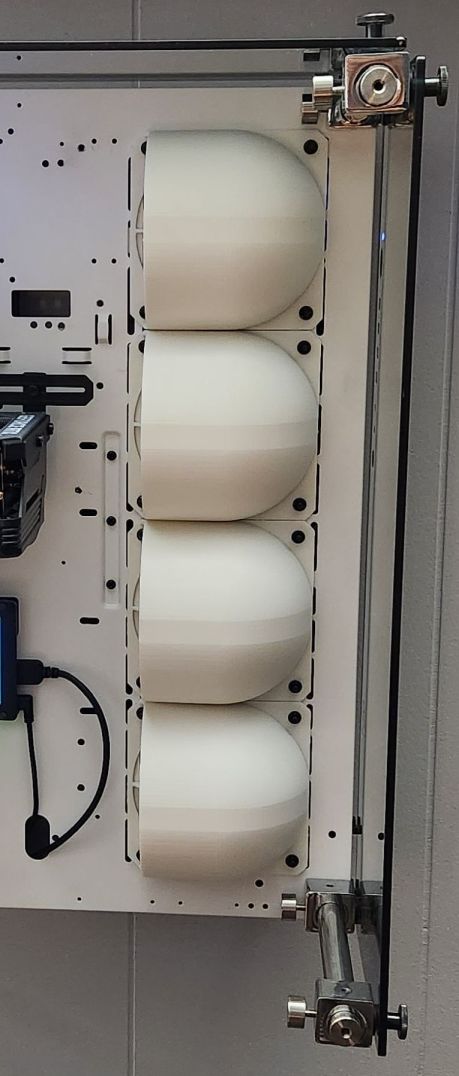
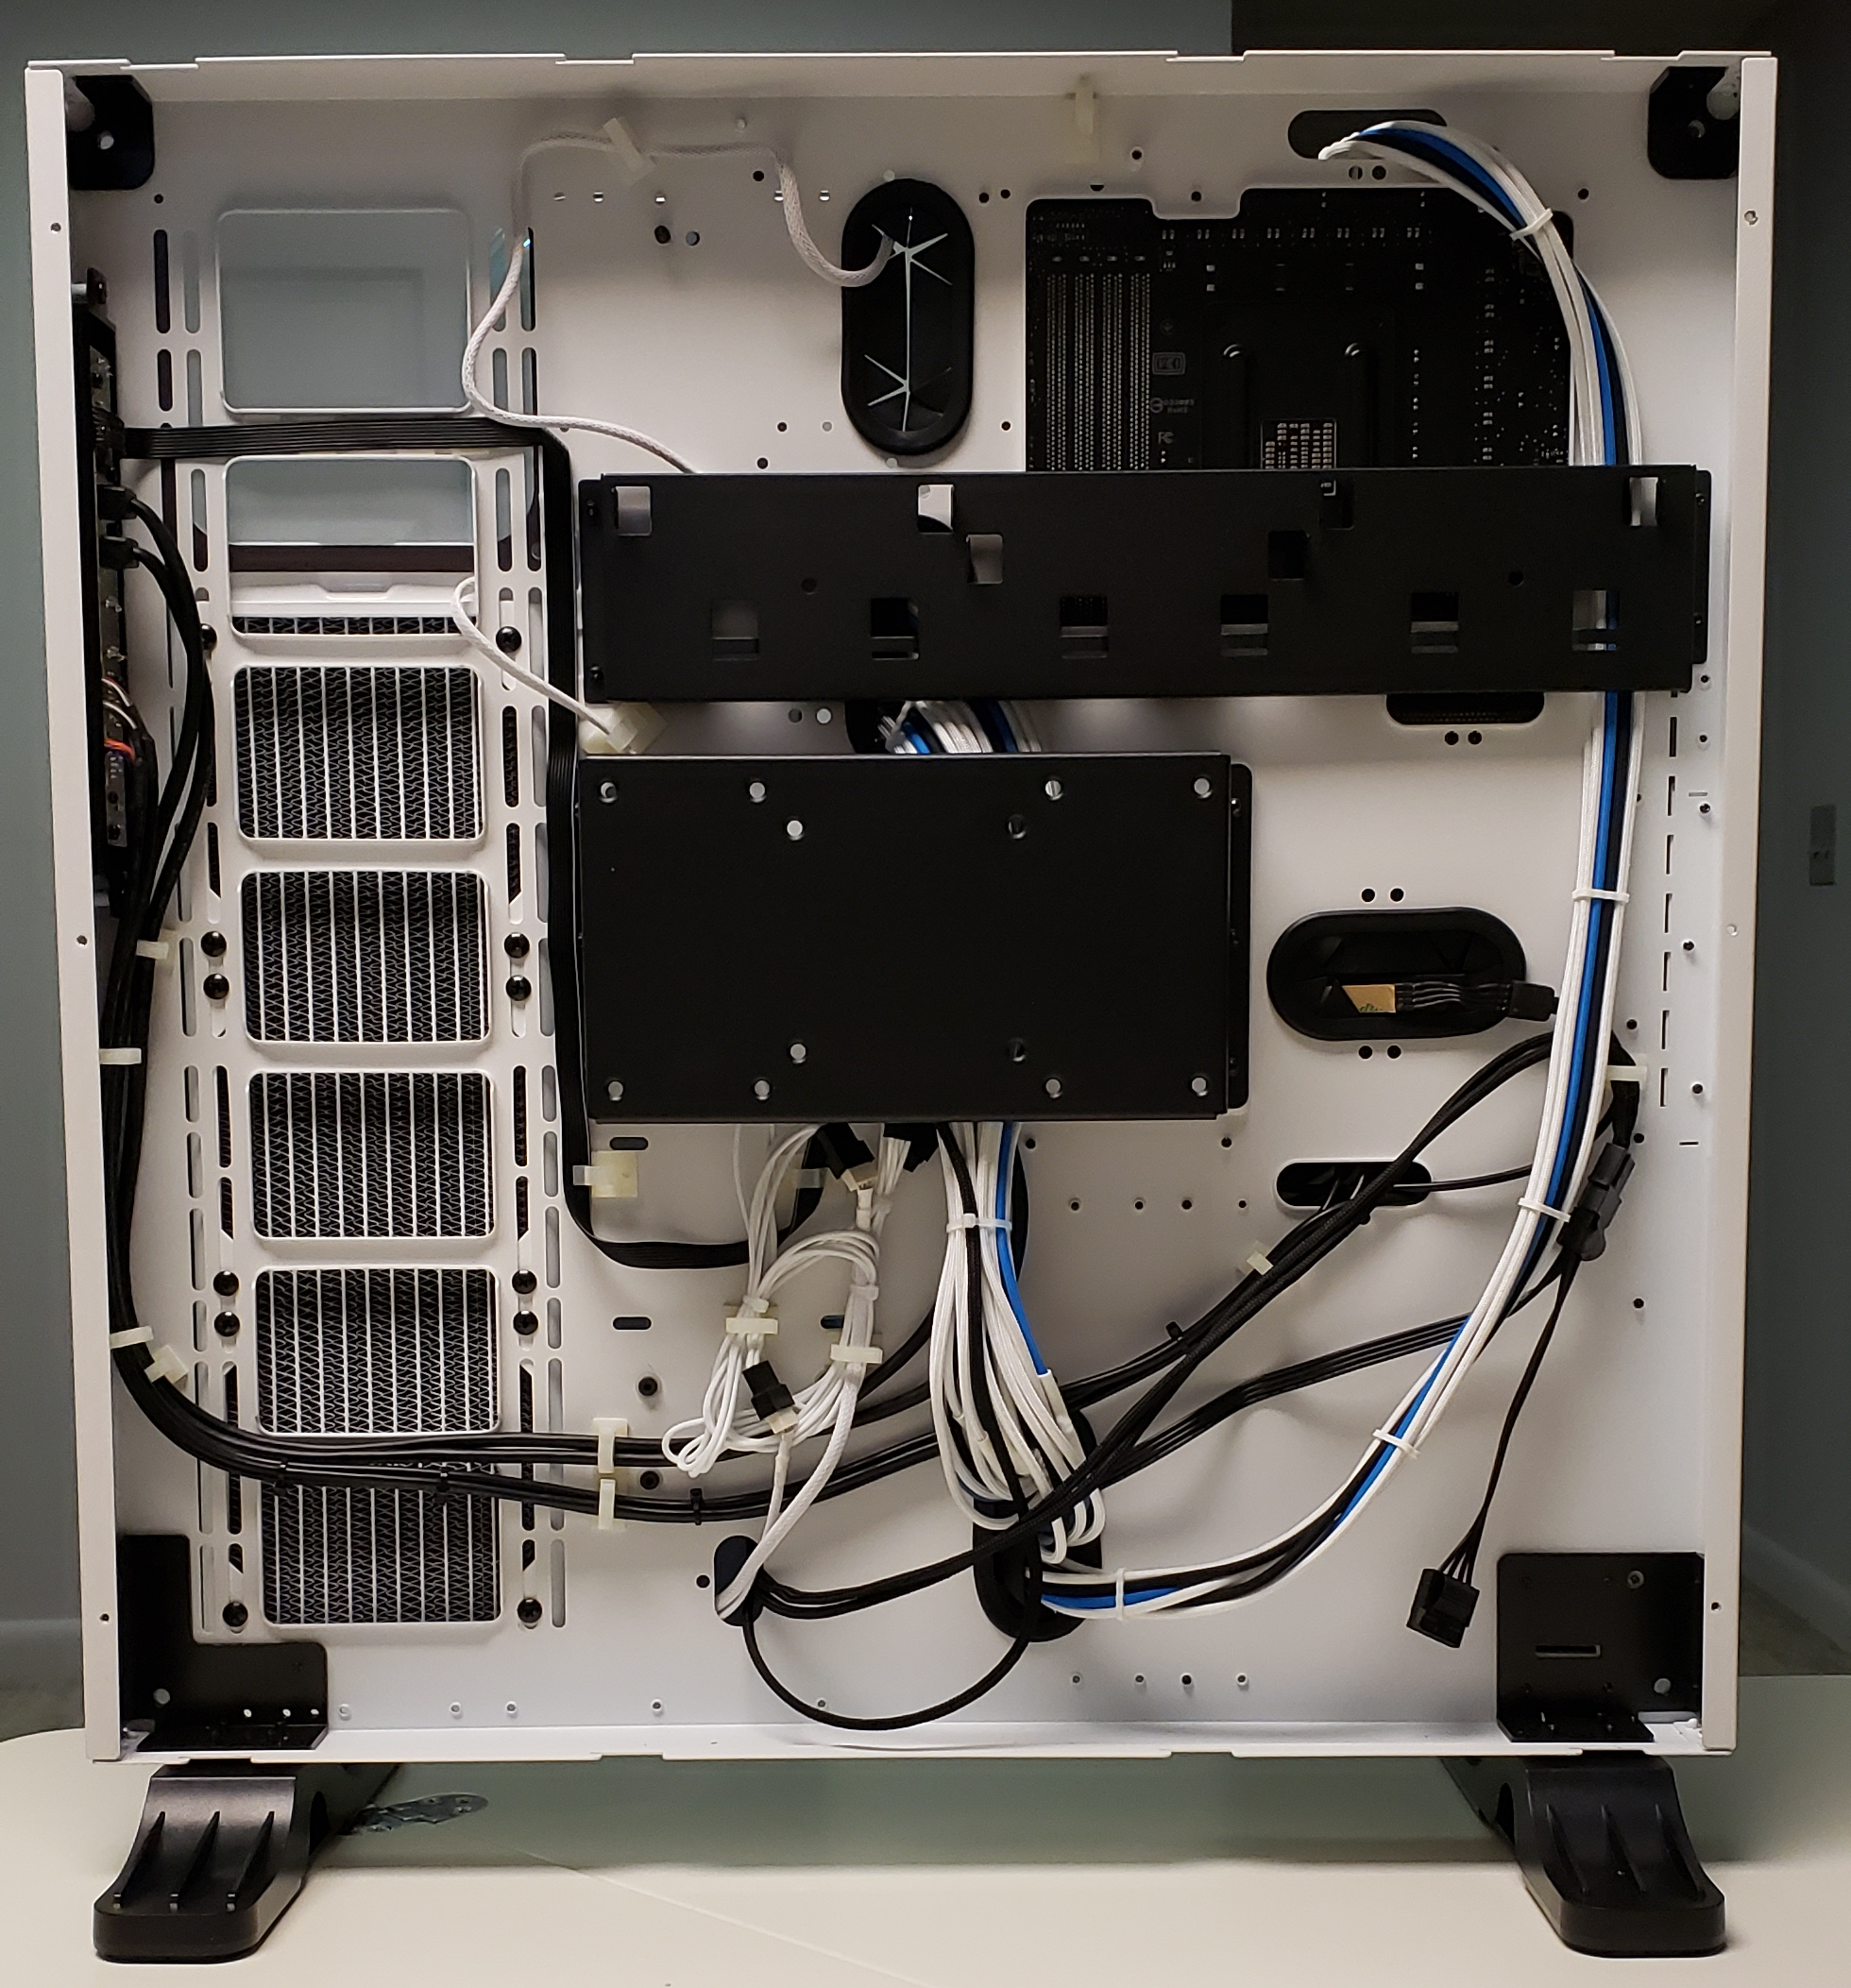
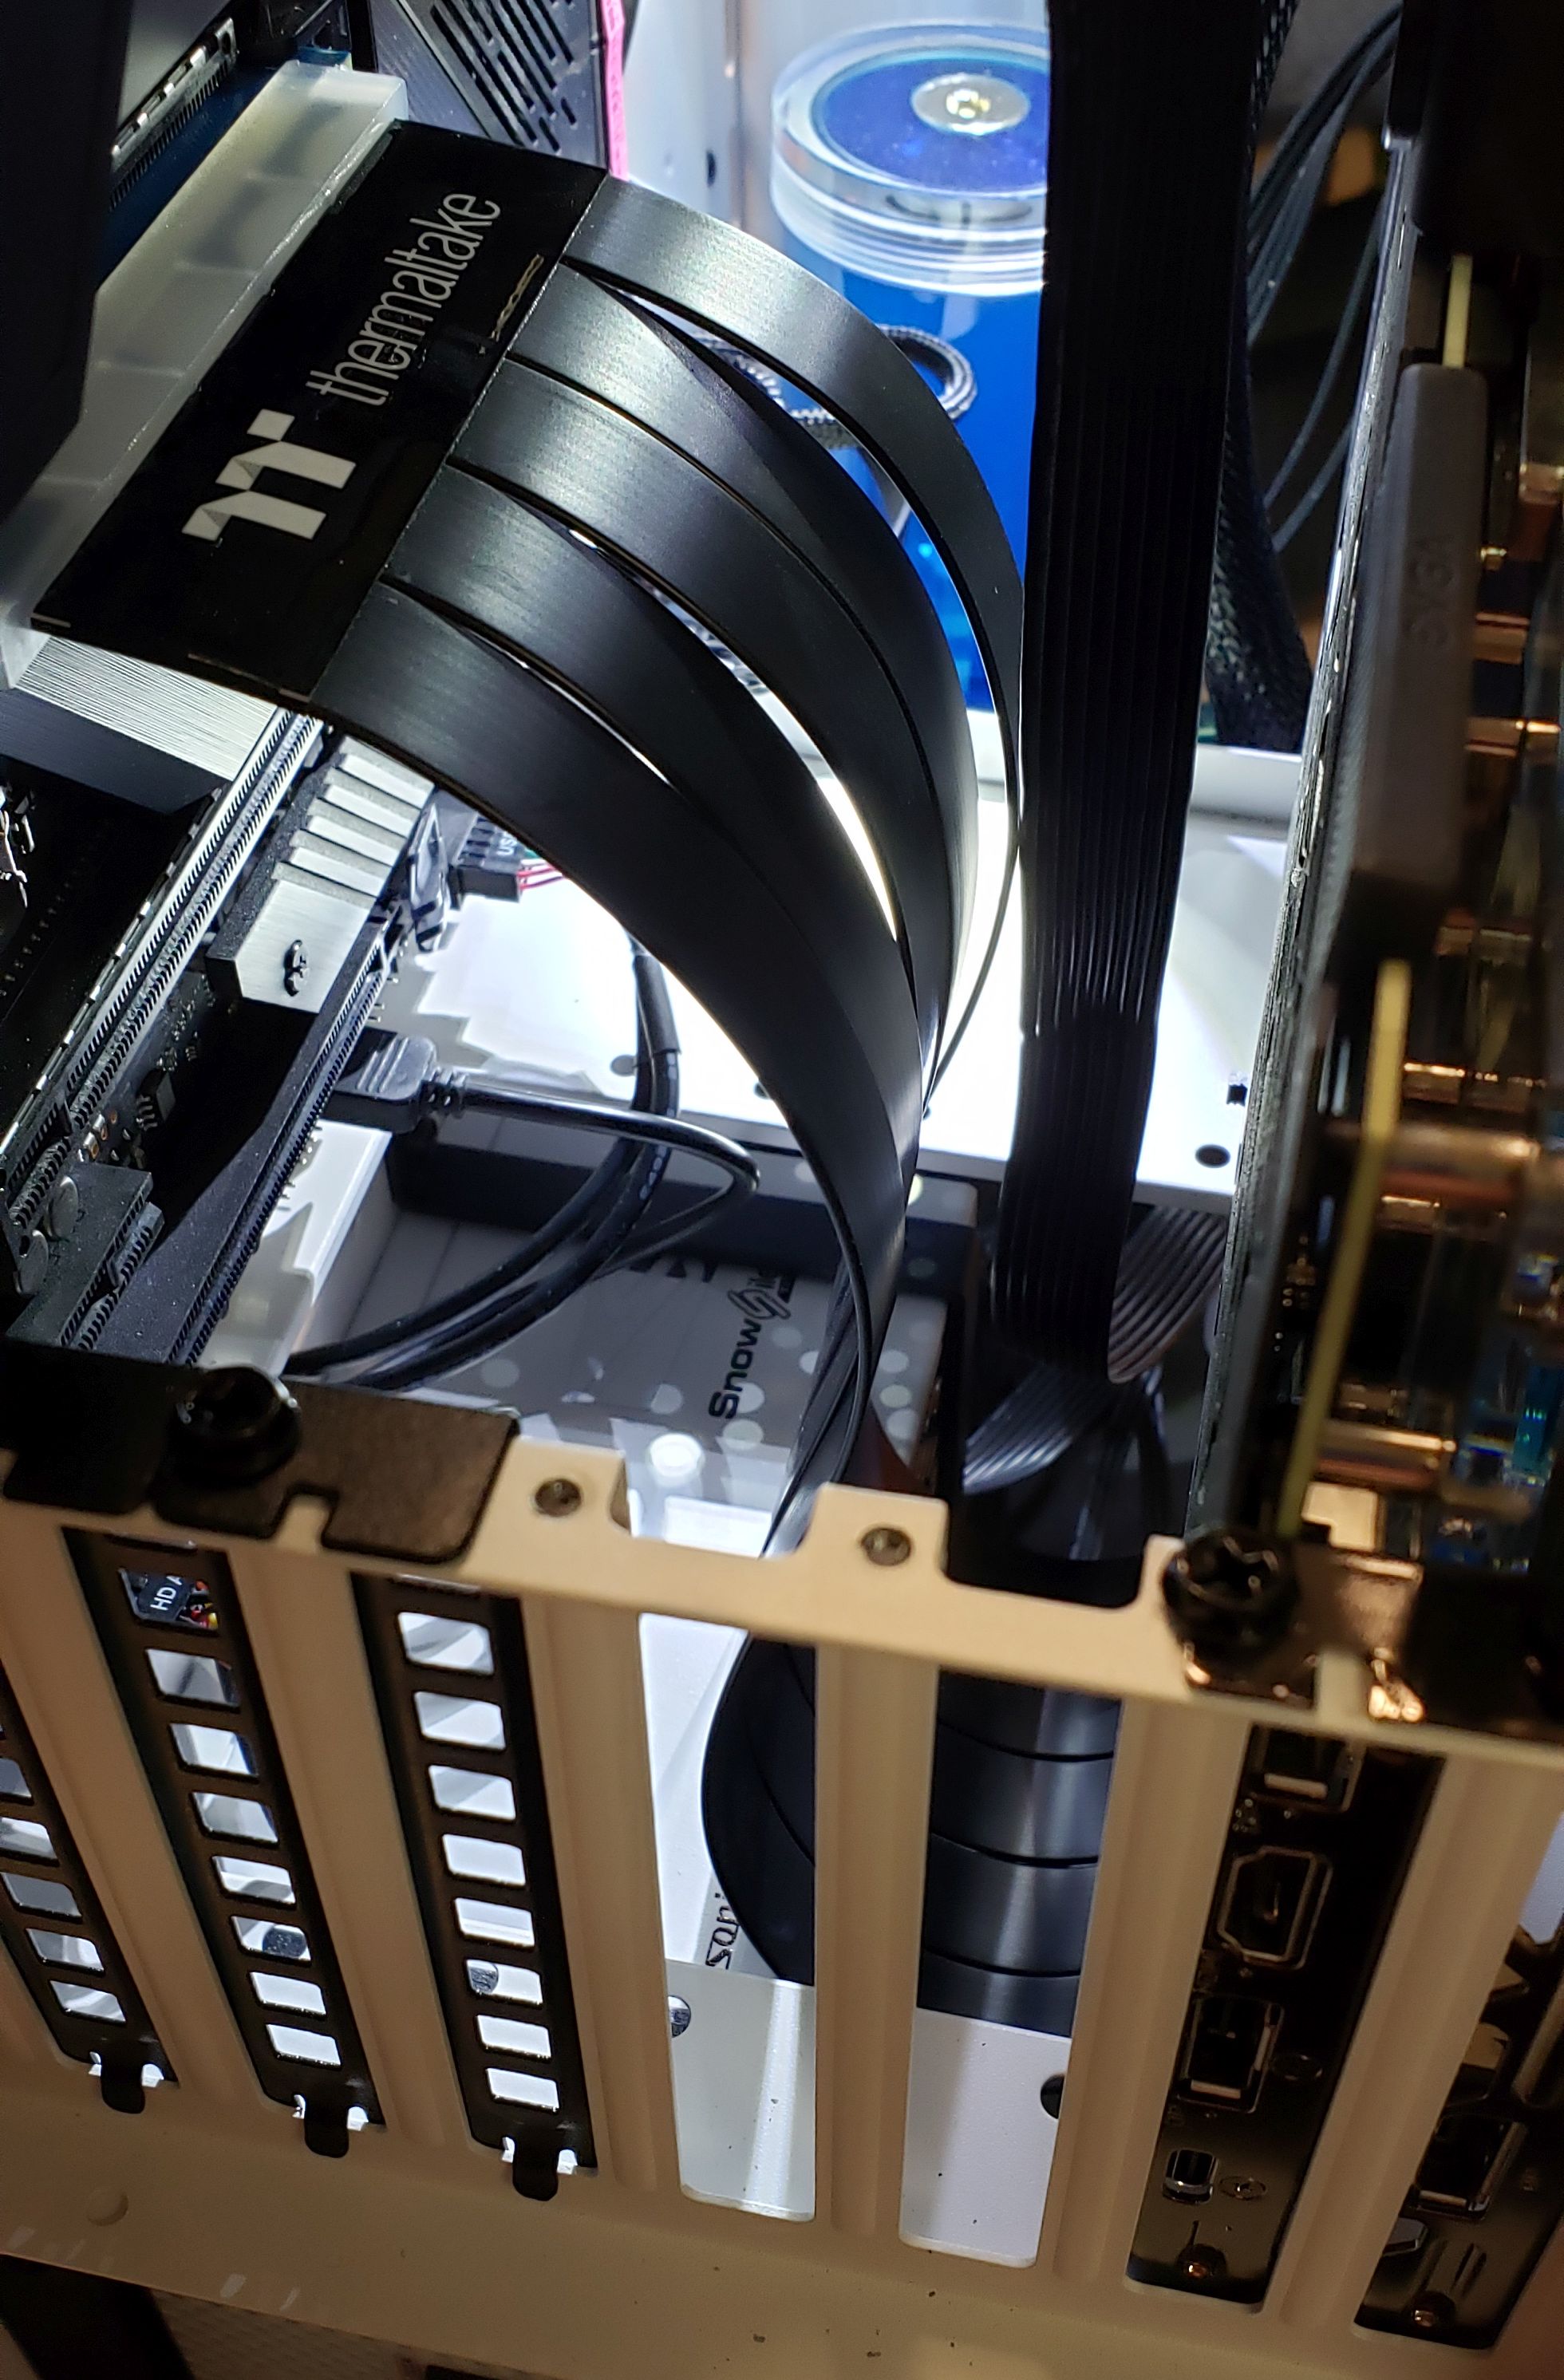
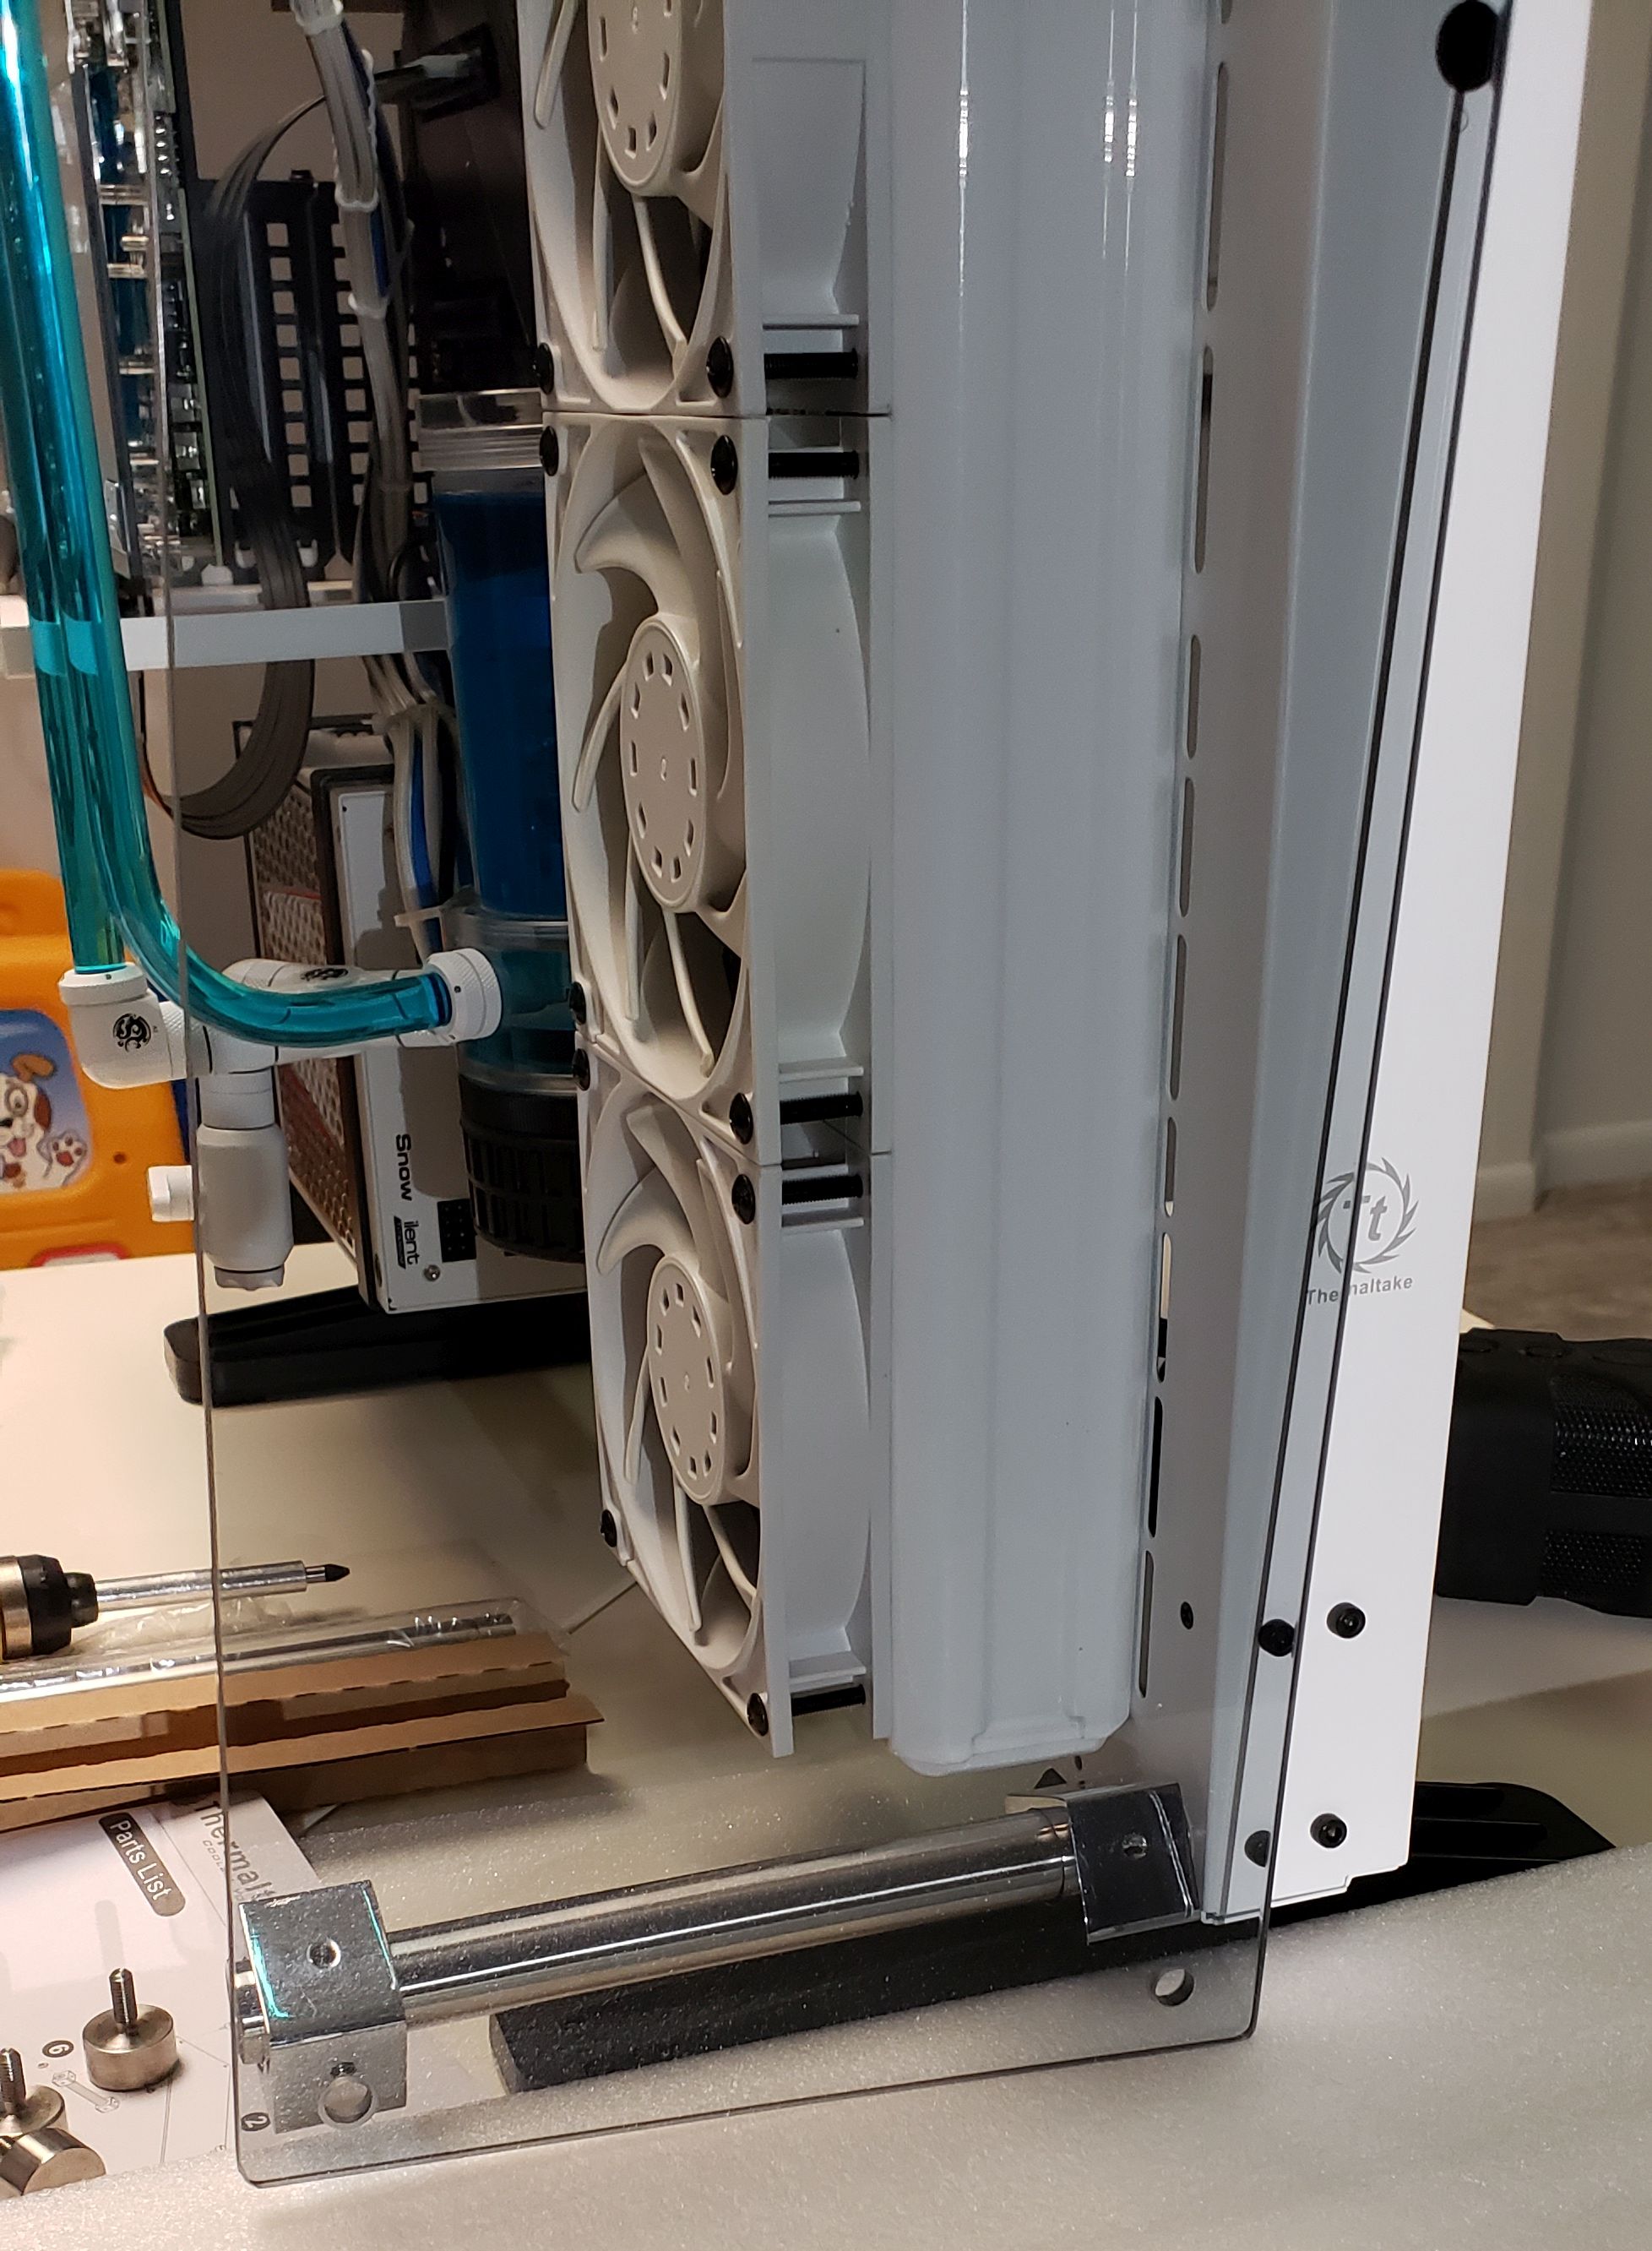
I removed the two case fans I had mounted mid-case to blow air across the motherboard. Without the radiator fans and case fans, I needed an alternate way to get airflow through the case. I mounted four case fans to the back of the case, oriented to pull air from behind the case and exhaust into the case. I needed to redirect the airflow from straight toward the side glass panel to blowing across the motherboard and out the back of the case, so I 3D-printed four air fan ducts to redirect the airflow 90 degrees.

When building "into" this case, I realized it doesn't have a traditional "inside." It is just a raised back panel upon which the other components are mounted. After all the parts are mounted, four posts that hold the tempered glass side panel are installed, followed by the glass panels. There are no tight corners or reaching down into the case, making assembling this system the easiest one I've ever used. Unfortunately, as with the previous system, the upper left post is too close to the motherboard (when the motherboard has a fixed I/O shield anyway) for one of the square glass mounts to clear the motherboard. That would typically hold one of the corners of the top glass panel. I just put a piece of neoprene on the post to support the glass.
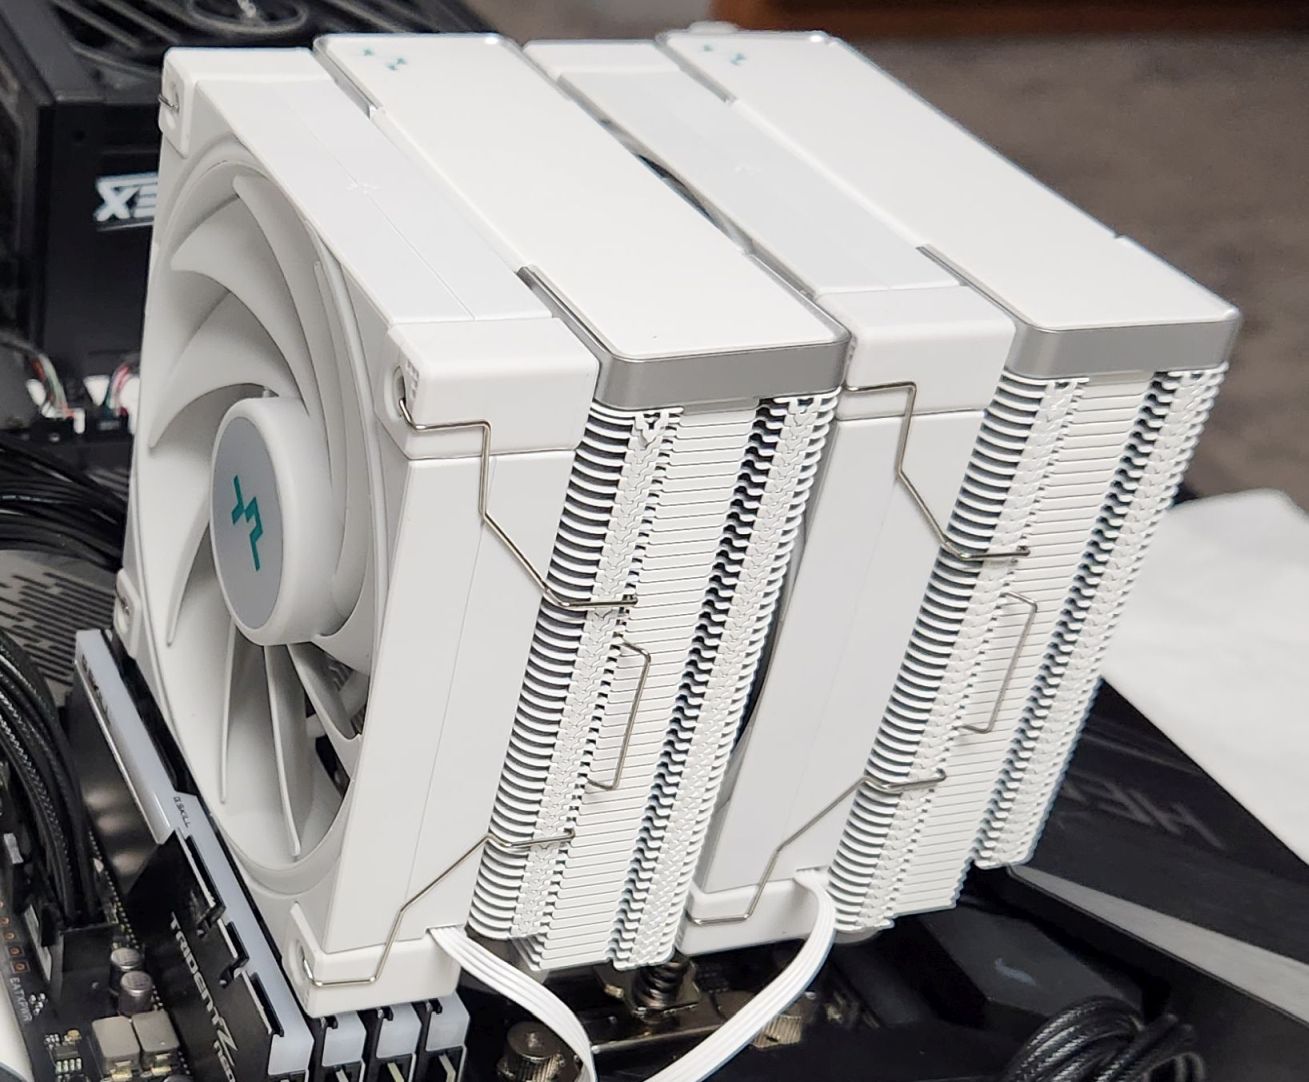
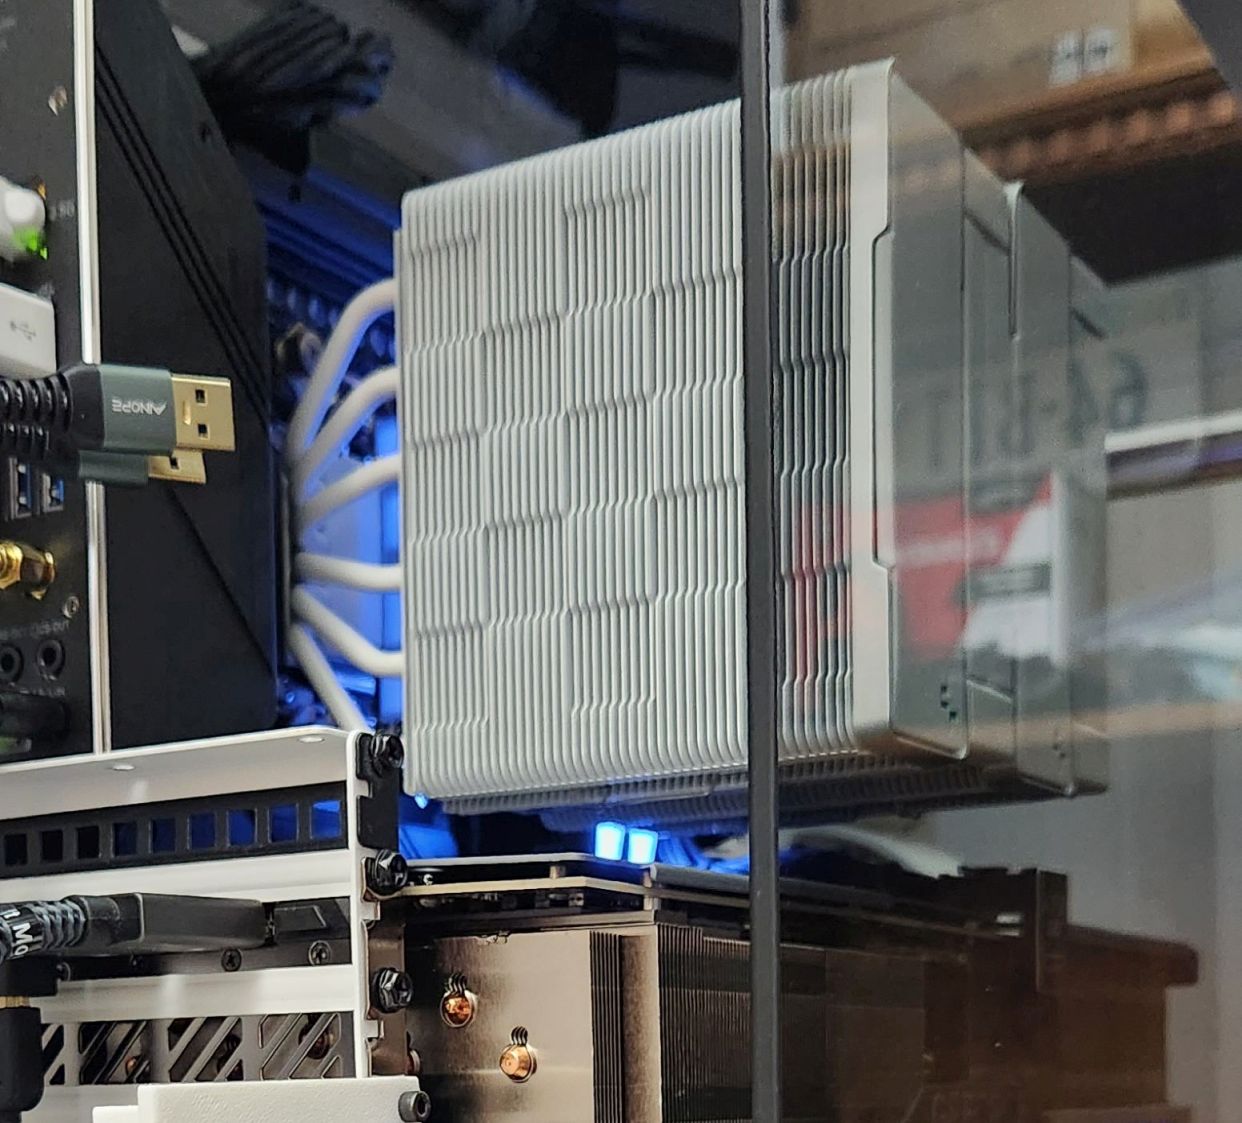
This section was extensive in my previous build because of the water cooling. Without a radiator, pump, tubing, connectors, and all other pieces of the open loop, there's a lot less to talk about. Besides the four case fans with ducts (discussed in the section above), the only other cooling device (unless you count the fan in the PSU) is the CPU's air cooler. I used the DeepCool AK620-WH High-Performance CPU Cooler (White) for this build. For $65, it has excellent performance. I rarely see CPU temps hit the high 60°C range. I used variations of this cooler in three other builds I did last year.
Unfortunately, it is no longer available in the US. The US State Department has sanctioned DeepCool (the China-based company) for selling products to Russian companies. A third-party reseller in China attempted to circumvent the ban by rebranding the coolers as ShakingTank, but when I searched, I found hardly any items for sale under that name. DeepCool quickly shut that retailer down, and the products I found earlier were removed. It's a shame, but DeepCool angered the wrong US government entity.
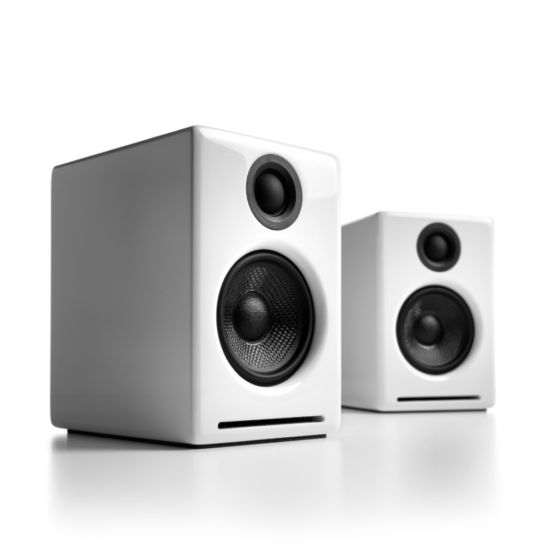
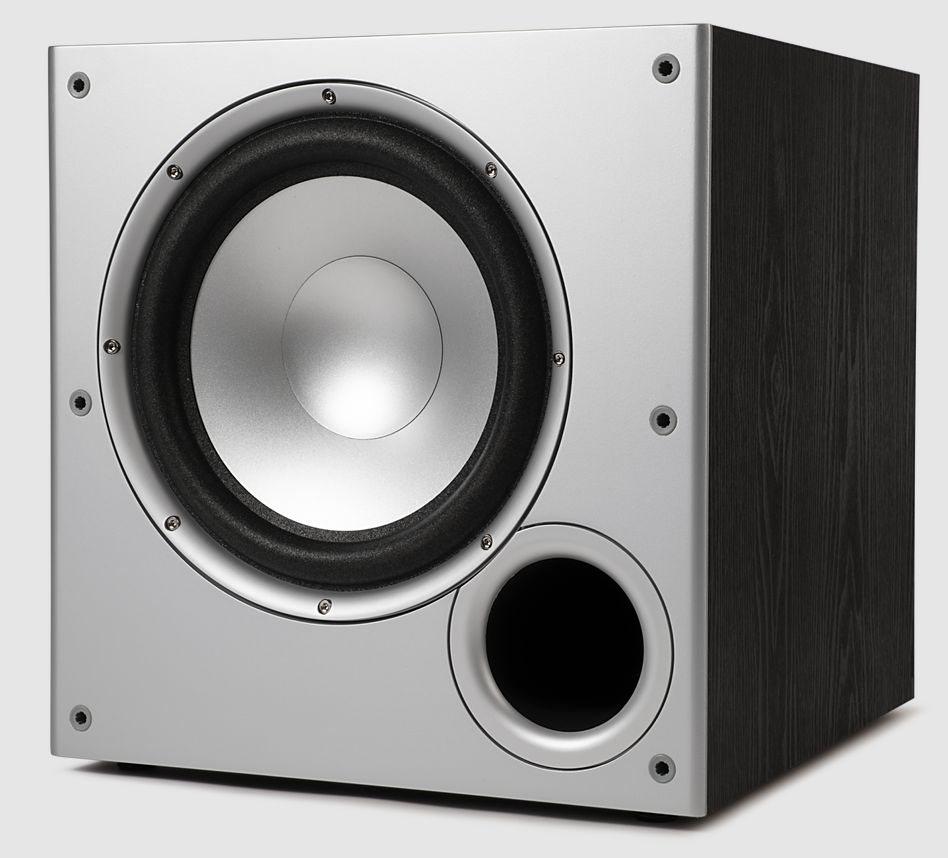
My 20+-year-old Klipsch 4.1 Promedia speakers finally gave up the ghost in September 2022. I bought them (for $400) in 1999, so I can't complain about their longevity (though I replaced both subwoofer speakers with new ones from Klipsch). The amplifier, integrated into the subwoofer, developed a constant, annoying hum. My new speaker and subwoofer setup is the Audioengine A2+ desktop speakers (in white) and a Polk Audio PSW10 powered subwoofer. I am using the audio from the motherboard analog speaker output as the input to the speakers, though Audioengine recommends using a USB or Bluetooth connection so their DAC does the conversion. The audio-out connector from the speakers feeds the subwoofer. I also bought the Audioengine DS1 Small Angled Speaker Stands that isolate the desktop speakers from the desktop.

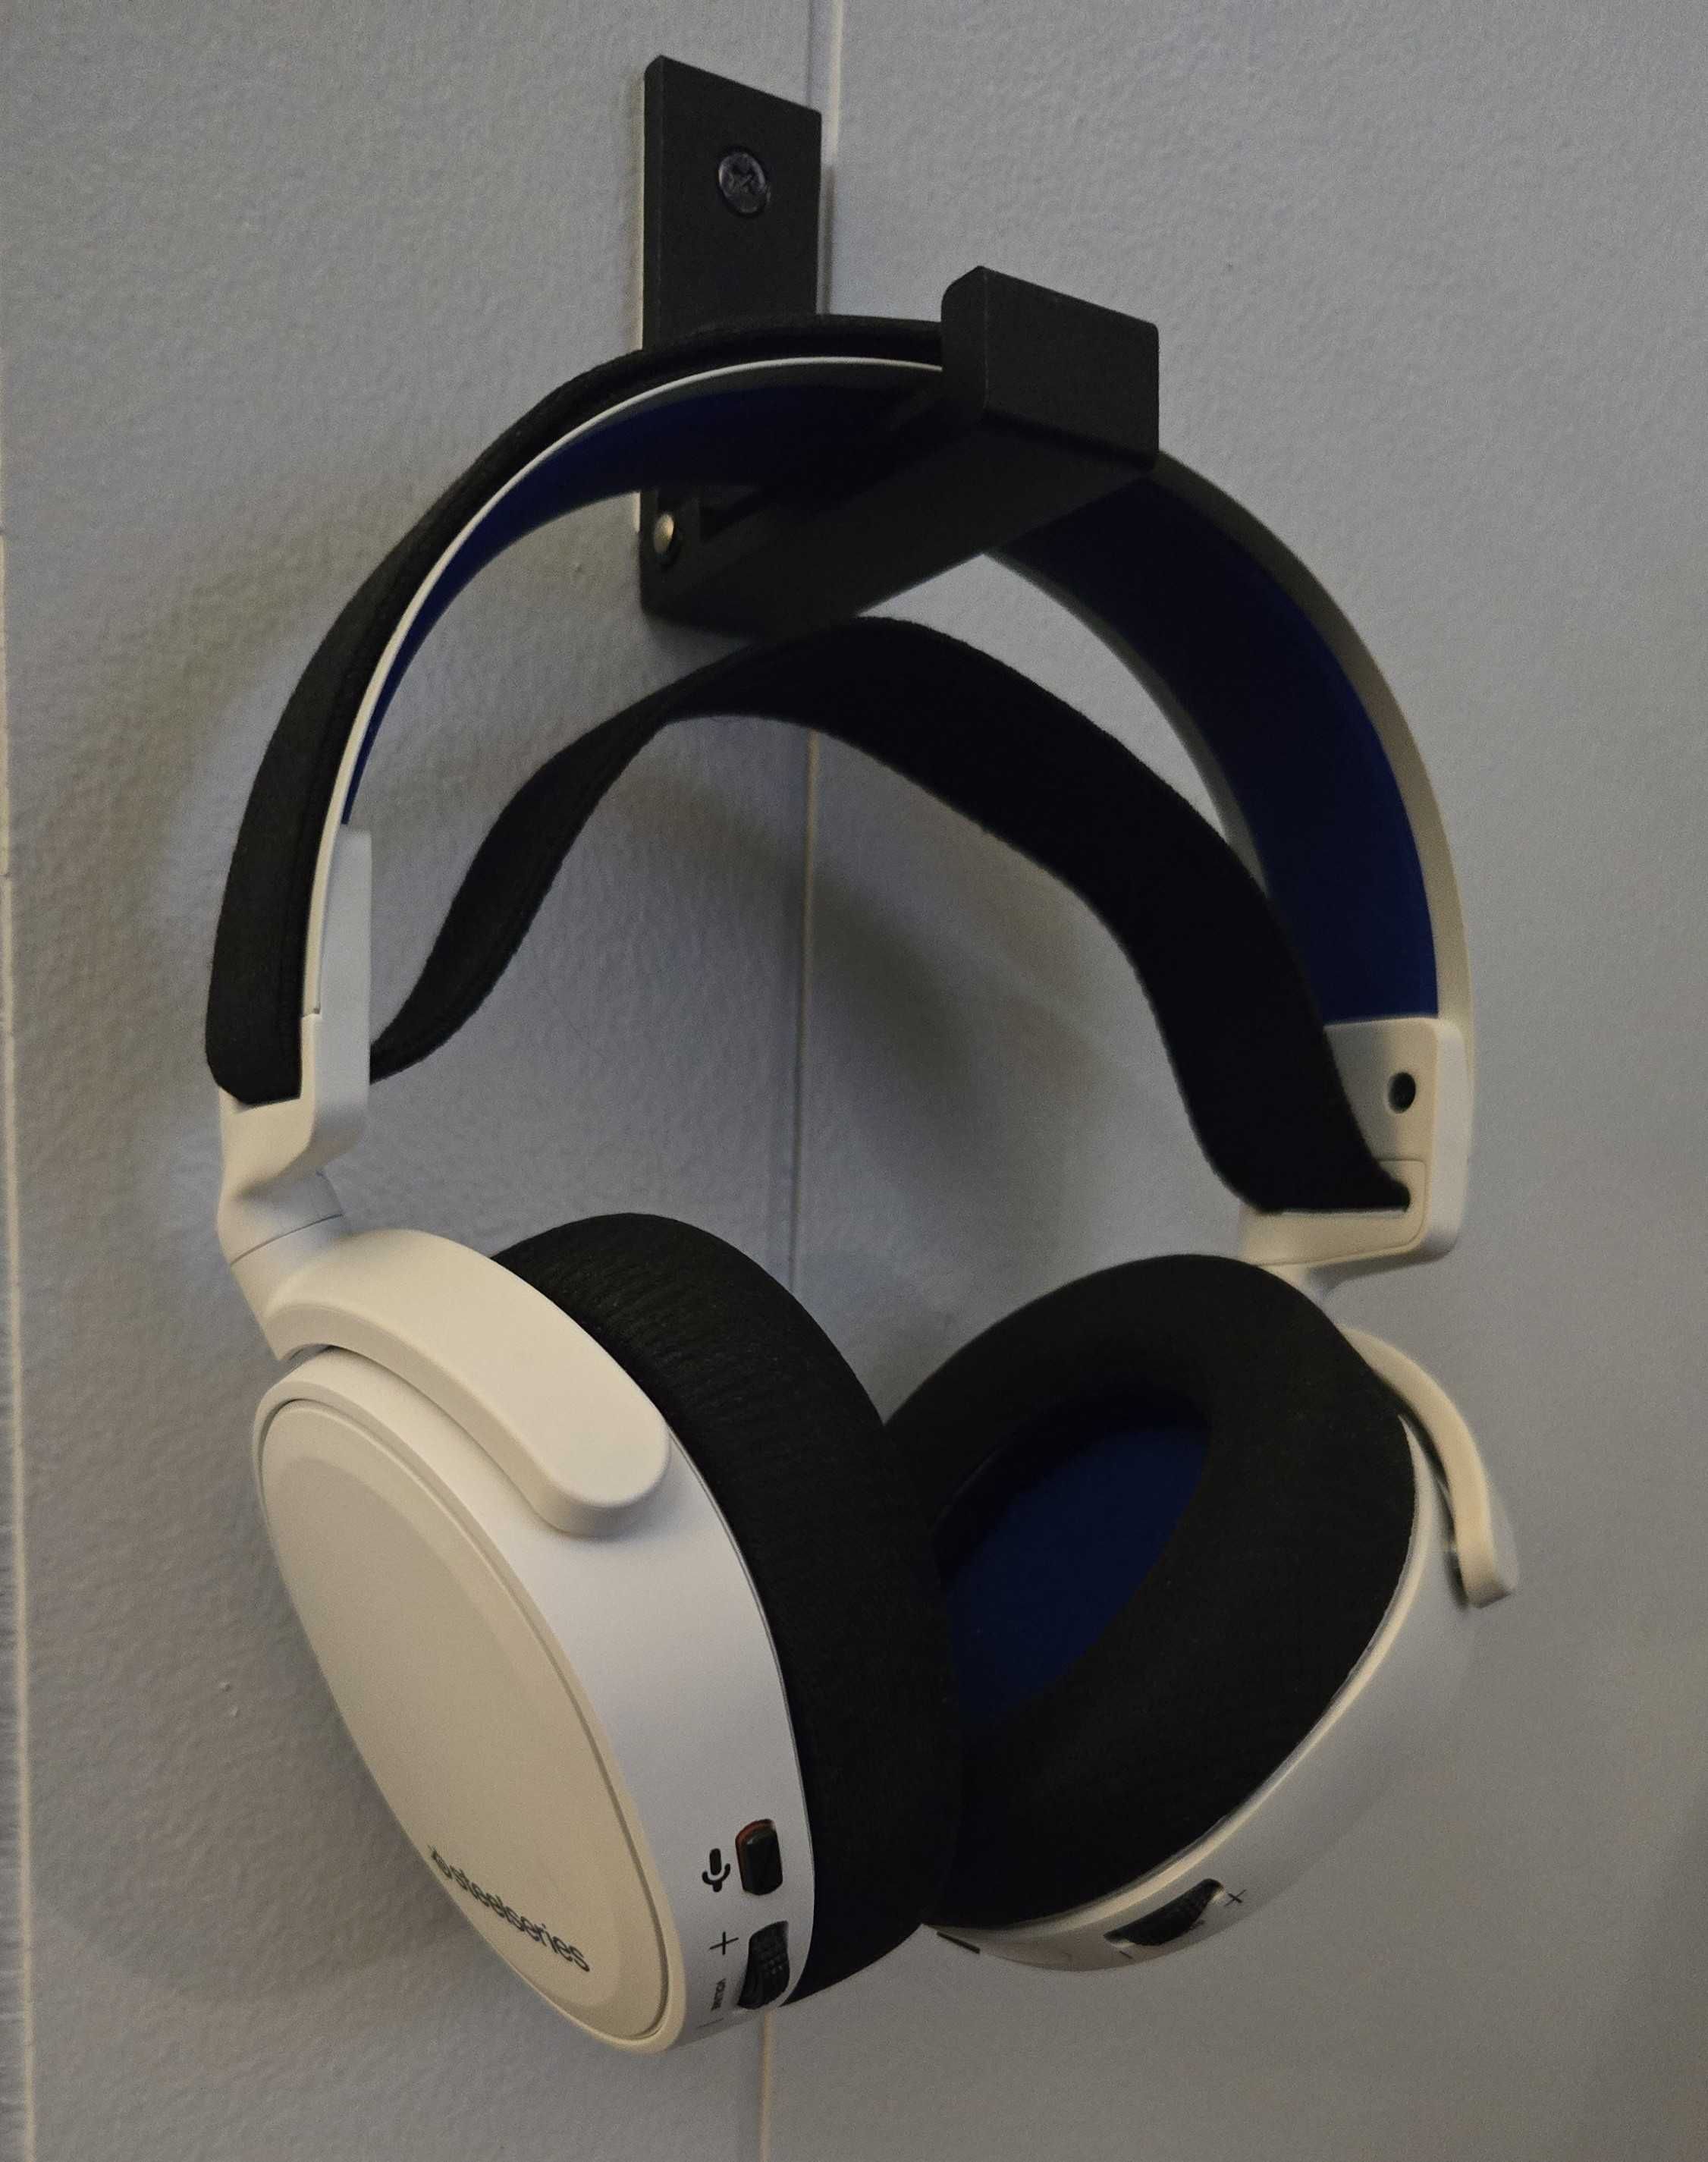
I continue to run through headsets, but my current one is the SteelSeries Arctis 7P+. They weren't cheap at $165, but the battery lasts for hours between charges and is comfortable for hours, too. The microphone on this headset is decent (unlike my last one, which was pretty bad) and can be muted. I prefer to use a separate RODE Wireless GO lapel mic.

I still use an ergonomic keyboard as my daily driver, as I have for the last 20 years. The Microsoft Natural Pro came out in 1999, and to this day, I think it is the best affordable ergonomic keyboard ever made. When I found out they were discontinuing them, I bought five. Unfortunately, gaming is wearing on keyboards, and the WASD and left control (CTRL) keys eventually gave out on all. It took years to go through my stash, but I eventually did. For the next several years, I used the Microsoft Ergonomic Keyboard 4000. The 4000 had an issue in that the keycaps wore off in a very short time. I am primarily a touch typist, but sometimes, I need to look at the keys. Both of these keyboards lack, and I would like to see, some form of backlighting.
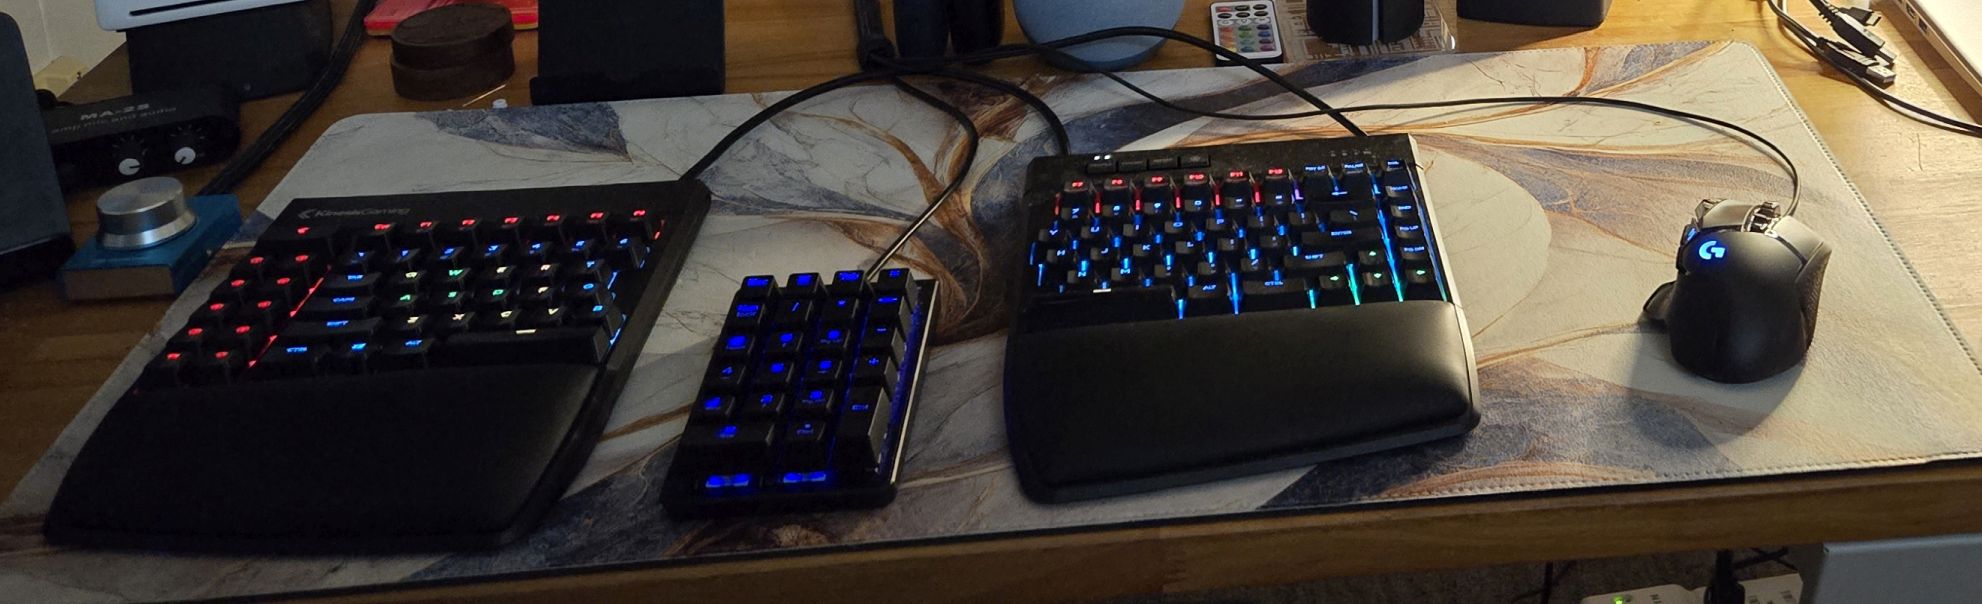
I finally broke down and bought a mechanical ergonomic gaming keyboard, the Kinesis Gaming Freestyle Edge RGB with Cherry MX Brown switches. It's a split keyboard, and I found I like it with the two halves about 6" apart at the top and maybe 7-8" apart at the bottom. (I have the two halves at roughly the same angles as a fully ergonomic keyboard, but further apart.) The keyboard doesn't have a numeric keypad, so I bought a Rottay 22-key Numpad. I put it in the middle between the two halves of the Kinesis keyboard. I took a bit of getting used to it, but I now like it. I can type more quickly and accurately (except I seem to hit caps lock a lot).
I am using the Logitech G502 Hero wired gaming mouse. I preferred the wired Logitech G502 Proteus, but they no longer make that model. The G502 Hero is significantly cheaper at $40 than the top-of-the-line G502 X Plus Gaming Mouse at $140. I don't believe I have the reflexes to tell the difference.
I'm currently using two monitors mounted on a dual-screen support arm. My primary monitor is the MSI MPG 321URX QD-OLED. There was a decent sale on it at Microcenter, and I couldn't pass it up. It is a 4K (3840x2160 - UHD) QD-OLED panel with a 240Hz refresh rate and HDR. Primarily, I wanted to utilize the RTX 4090's capability to handle 4K. I've gained a bit more screen real estate, and in some games, HDR makes a noticeable difference - especially in dark areas.
My secondary monitor is the Acer Predator XB271HU bmiprz 144Hz 2560 x 1440. I got that from B&H Photo Video as a black Friday special in November 2018, but because of the excellent price, it was back-ordered. I didn't receive it until the end of January 2019. The monitor can be "overclocked" to 165Hz, but I leave it at the default 144Hz, as I don't need it to work at that rate. I can tell the difference between games on a 60Hz and 144Hz display, but I can't discern any differences between 144Hz and 165Hz. This monitor also has Nvidia G-Sync built in, which pairs with the Nvidia RTX 4090 to eliminate screen tearing at lower refresh rates.
2019 (September) Build
2019 (September) Build
2019 (September) Build
or ...
OK. That's kind of a lie. I had been thinking about building a system with water cooling for a while. This is after years of saying I didn't think I would ever make one. The idea of water next to expensive electronics made me nervous. Times change. Computer water cooling parts have become more common and are well-made. After watching a ton of YouTube videos on the subject, it seemed that most leaks were due to operator errors, not hardware failures. I knew that going down the water-cooled route meant extra cost and more maintenance, but I wanted to give it a try. Additionally, I wanted to wall-mount my system. Mostly, that was to get it off my desk, but I also wanted to create a flashy, unique-looking system that would show off the components.
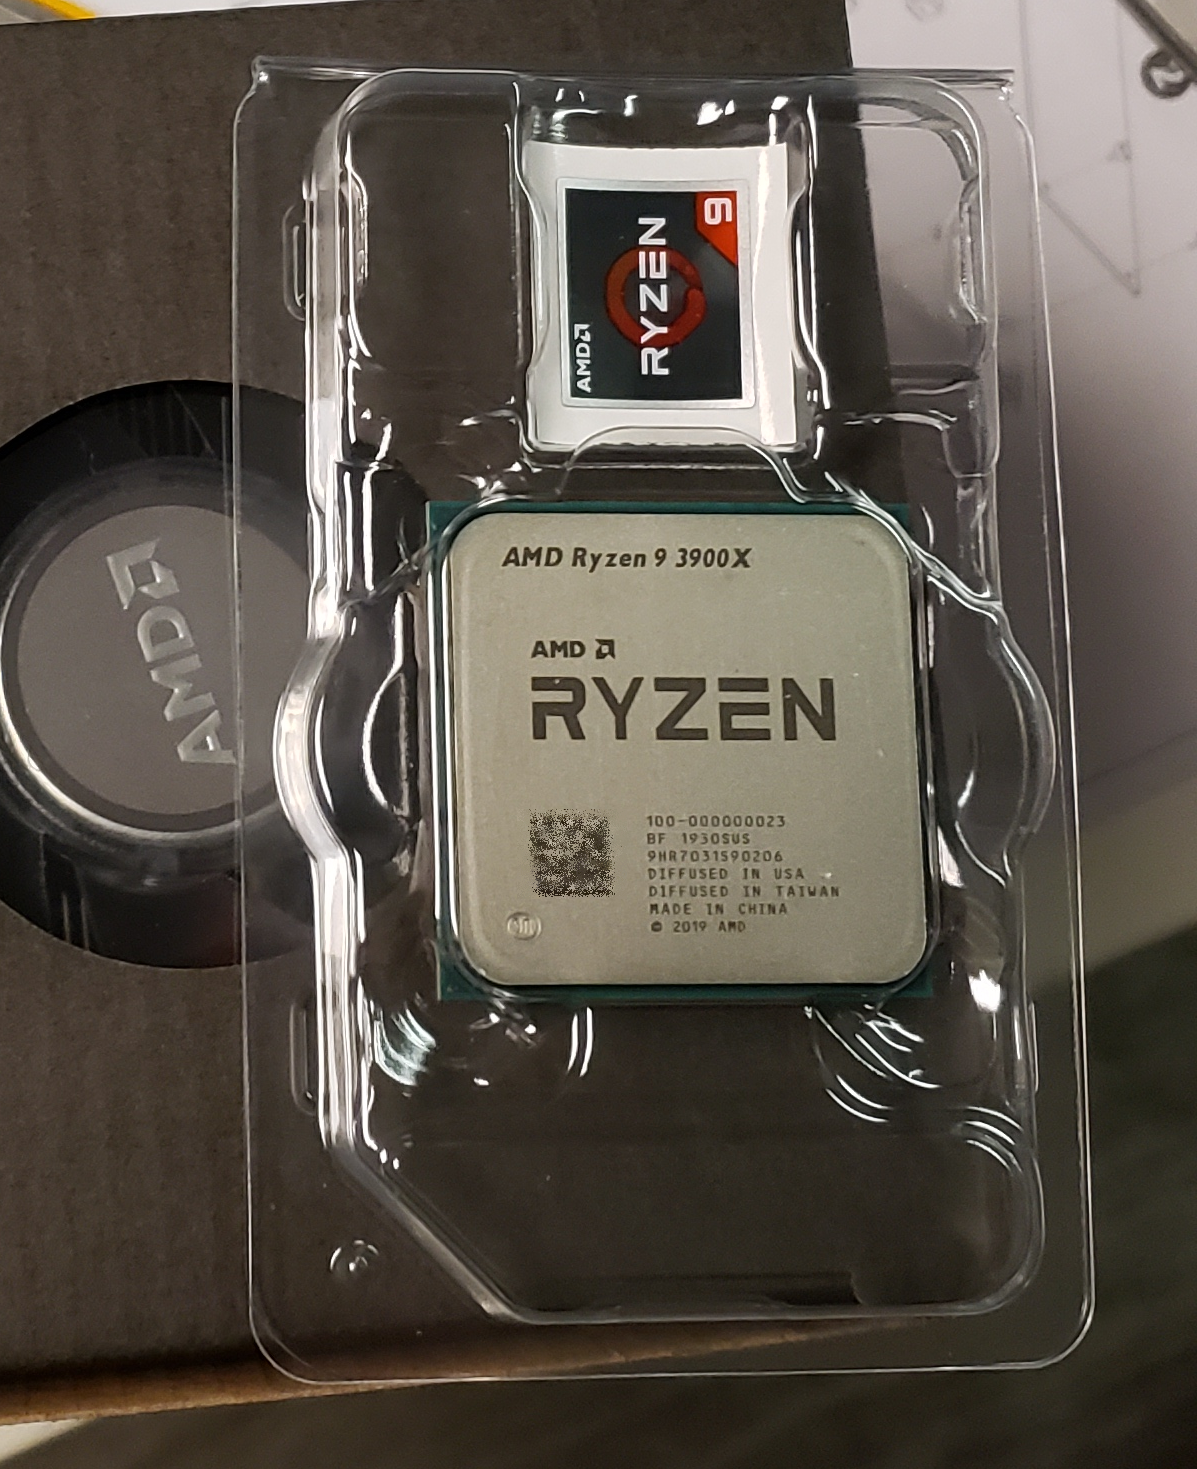
Then AMD came out with the Ryzen 3000 series. Specifically, the Ryzen 9 3900x caught my eye. Along with the X570 chipset and a PCIe Gen 4 SSD in an M.2 form factor - I couldn't help myself. I had not built an AMD system since the Athlon 64 days (probably about 2003 or 2004) because there was no AMD part at the price level I tend to build .. until this year. So, I watched the how-to videos again, ordered parts, and started down the tranquil water path.
For this build, I upgraded from an Intel Core i7 6700K to an AMD Ryzen 9 3900x. As I mentioned above, I had not used an AMD processor in a gaming build since an AMD Athlon 64. I tried to find the exact date, but it was too far in the past for me to find receipts; it was about 2003 or 2004. It's not that I had any reservations about using an AMD processor. They didn't have anything particularly compelling to offer. When Intel came out with the Core 2 Duo processors, they took back the crown, and AMD couldn't get it back. The AMD 3900x changed all that. Interesting? Absolutely! Faster than Intel's offerings? Yes and no.
In pure single-thread performance, the fastest Intel processors still have the edge (which is even more true with the Intel 10900K that was available then, which was the AMD 3900X's closest competitor). This tends to make those CPUs faster in games, which use from one to even eight threads. Many current games require four or six threads, and a couple of games are reported to work best on eight to twelve threads. The difference between AMD's IPC and Intel's IPC tends to be hard to notice in most games. However, the extra cores on the 3900X (and now, the lower price) make it better for just about everything else. I do a bit of video editing, and this CPU is a dream for that.
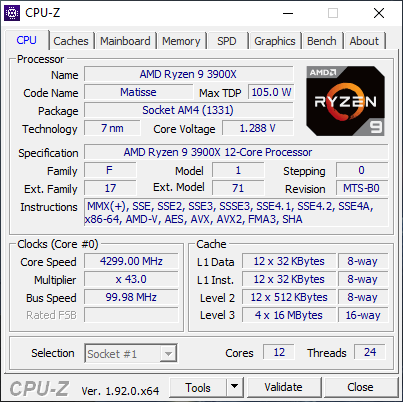
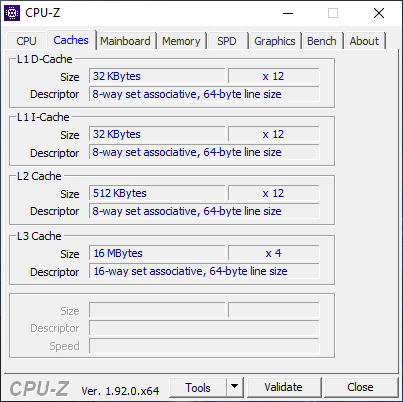
Since I'm using water cooling (more on that later), I can keep 12 cores (24 threads) running at 4.3 GHz on all cores at 39°C idle. I suspect I could do even more if I worked at it. (It's about a 13% boost over stock.) Even months later, I haven't tried to do the "ultimate" tuning. Here are the numbers according to CPU-Z.
I did the obligatory Cinebench 20 multi-core and single-core benchmarks. According to the rankings at HWBOT, that's about what's expected for this overclock. When I ran these benchmarks, I never got over 55°C in CPU temperature, which is what water cooling does.
I have also been using this desktop to transcode and edit more videos than I used to. It's an absolute beast for that. I don't have any numbers for my previous desktop, but it is noticeably faster.
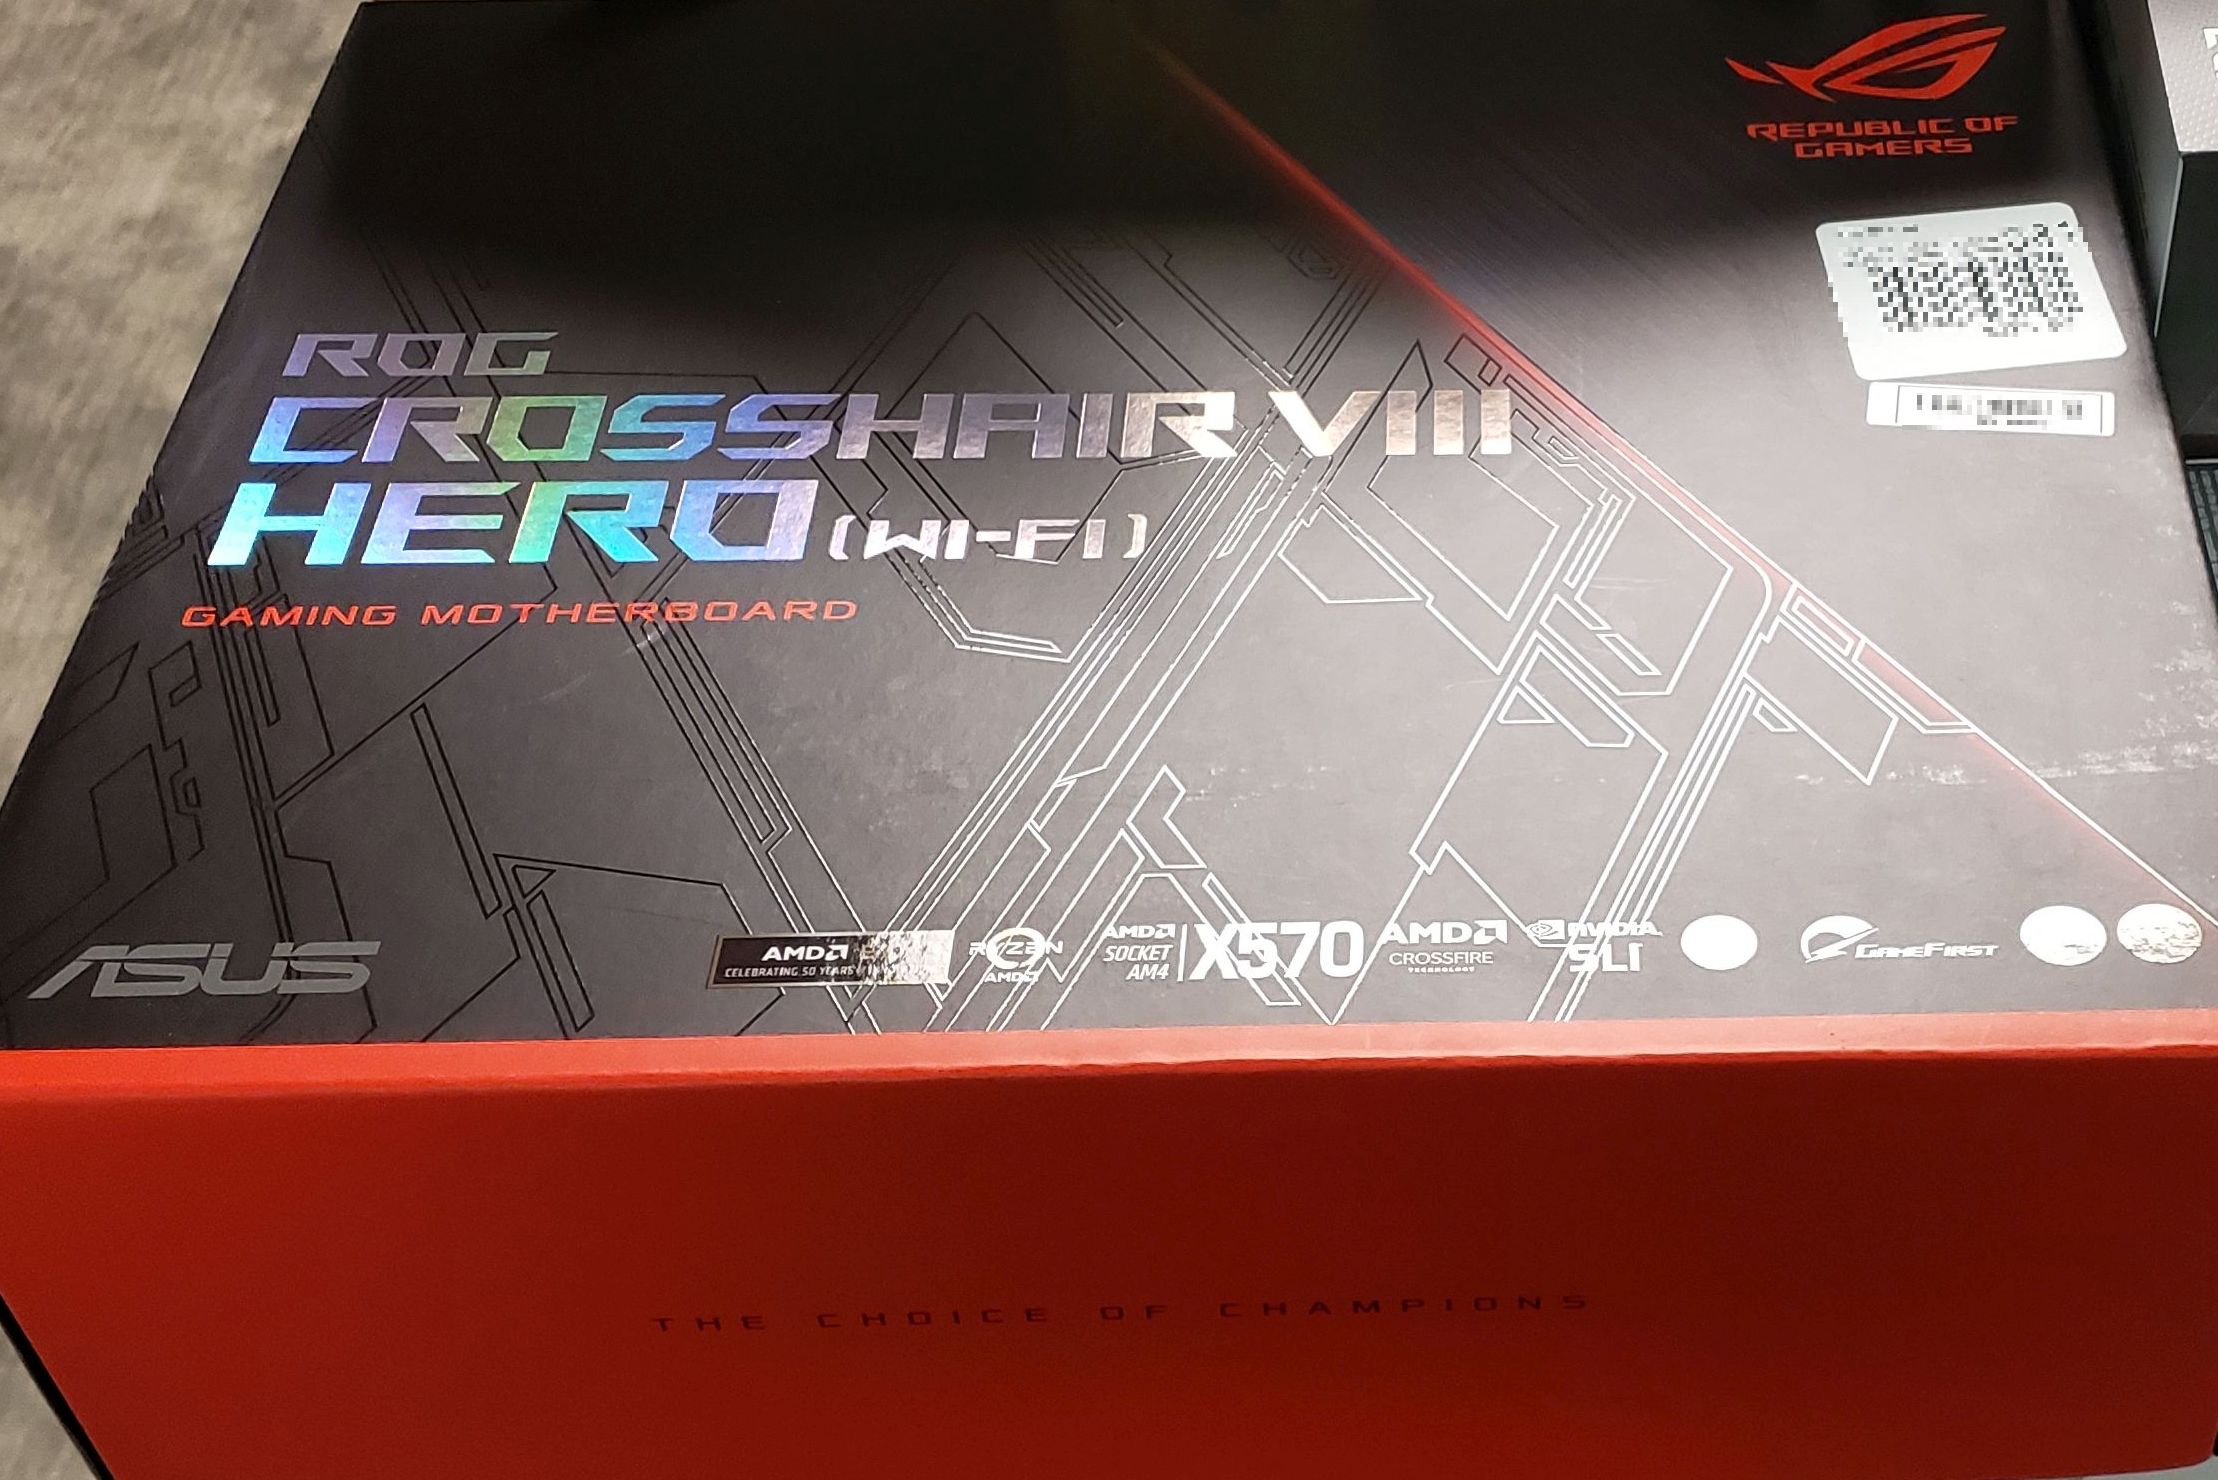
The only logical choice for a motherboard to pair with the AMD 3900x was the X570 chipset. I intended to get at least one large PCIe Gen4 M.2 NVMe SSD for storage (and some version of PCIe M.2 NVMe SSD storage - Gen4 or Gen3 for all storage). After that, it was just a matter of what features I wanted versus how much I was willing to pay. The motherboard I chose (and would likely choose again) was the Asus ROG Crosshair Hero VIII.
Some of the major draws of this chipset and motherboard for me were the dual PCIe 4.0 M.2 slots, tons of USB 3.2 Gen 1 and Gen 2 ports, high-quality Ethernet (x2 ports), headers for water cooling pump and high-amperage fans, and a fixed I/O shield. Fixed I/O shields are a bit of a recent development (usually found in higher-end motherboards), which was more or less required (if I cared to have an I/O shield) because the cases I was looking at for this new build did not have a traditional mounting system for the motherboards where the I/O shield fits into the back of the case. (More on this later.)
Also, something new for me is that I did not add a separate audio card to this build. Therefore, the motherboard audio has to be as good as I can get. Many X570 motherboards use the Realtek ALC1220, and the Crosshair Hero VIII also uses that. Asus calls their version of the SupremeFX S1220 (but is it a Realtek ALC1220) codec. It is paired with an ESS ES9023P (24-bit) digital-to-analog converter (for front-panel output) and a Texas Instruments RC4580 op-amp.
When I decided to create a water-cooled system, I justified the extra cost by going one level down from the absolute top of the heap. That meant buying an Nvidia 2080 Super instead of an Nvidia 2080 Ti. I was planning on buying the water-cooled version from EVGA, so the difference went from about $1400-1500 for the 2080 Ti to about $800-900 for the 2080 Super. I would use the $600 I saved to cover the cost of the water-cooling parts. (That turned out to be a fallacy, as I quickly discovered. $600 did not cover the cost. It was a good-sized dent, but that total cost was just over $1000. See the section on Cooling below.)
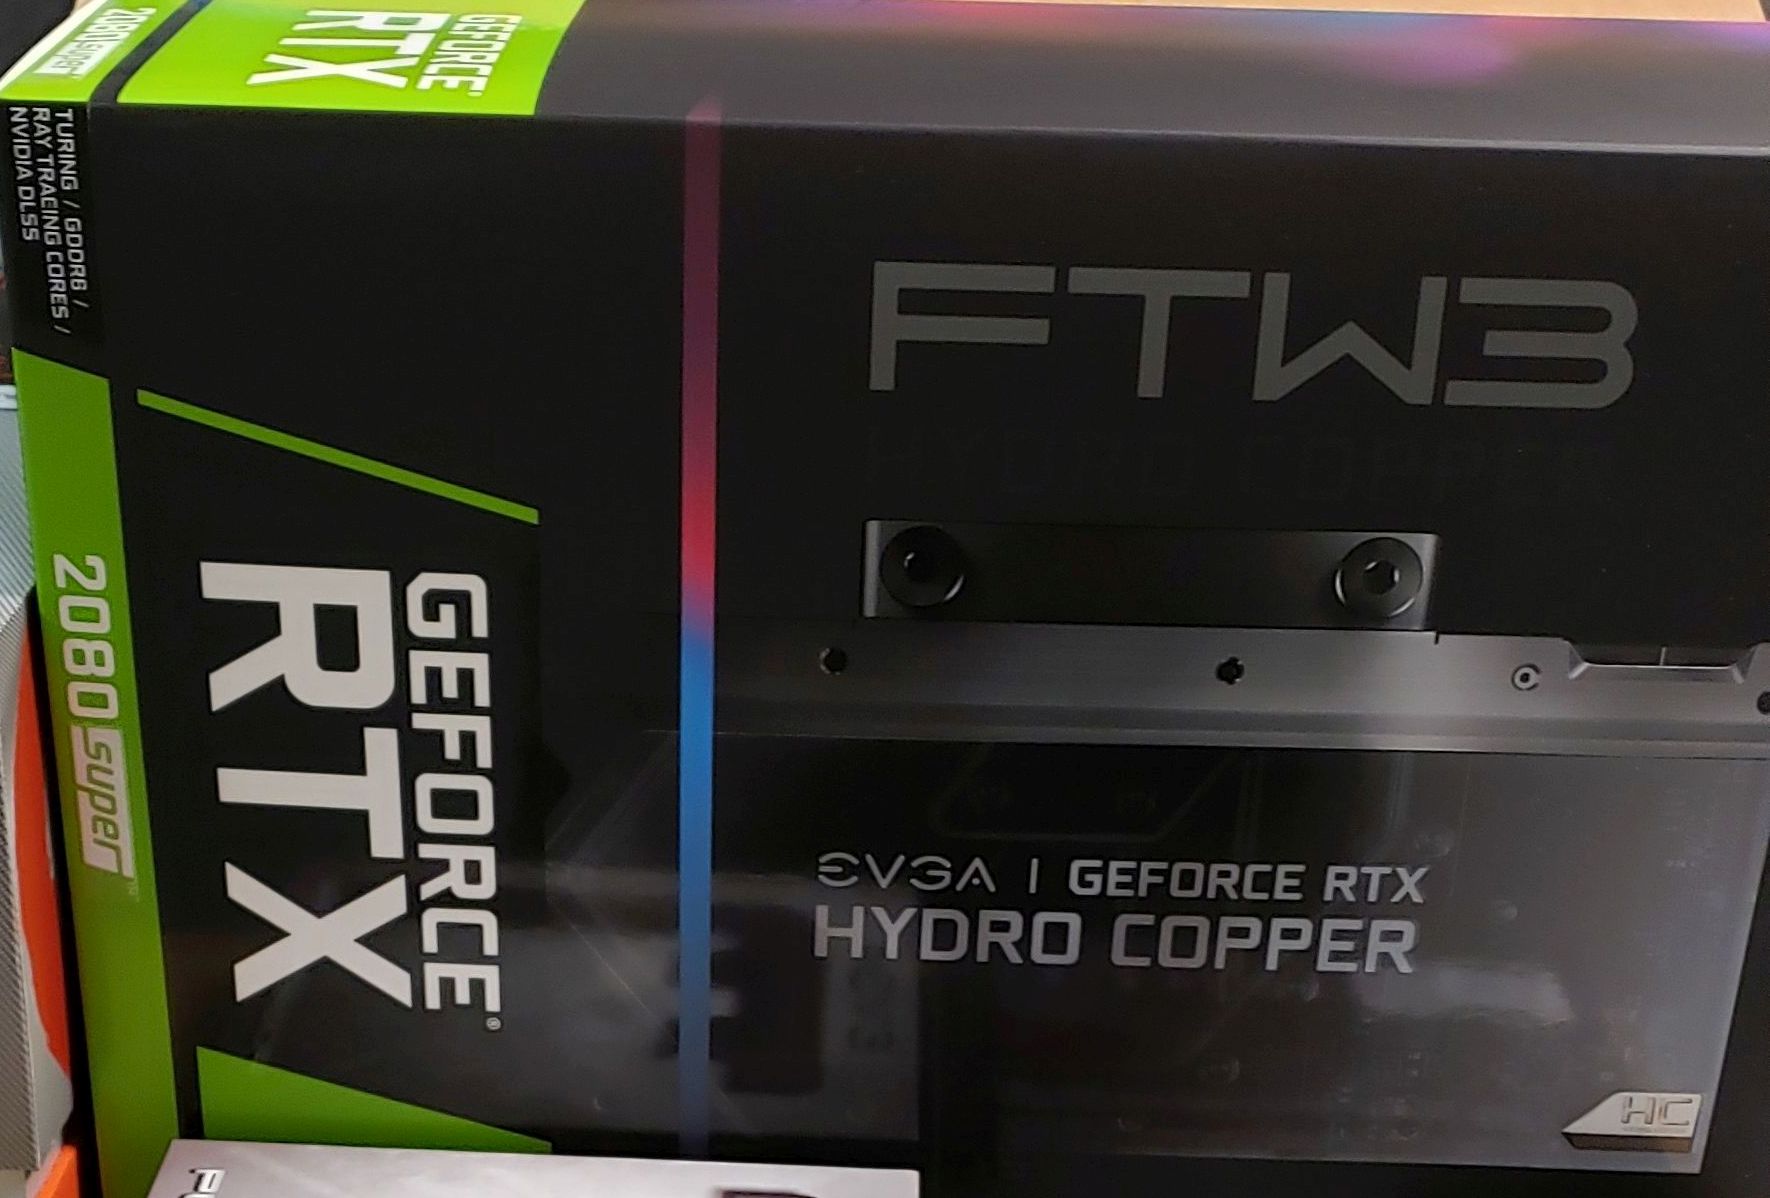
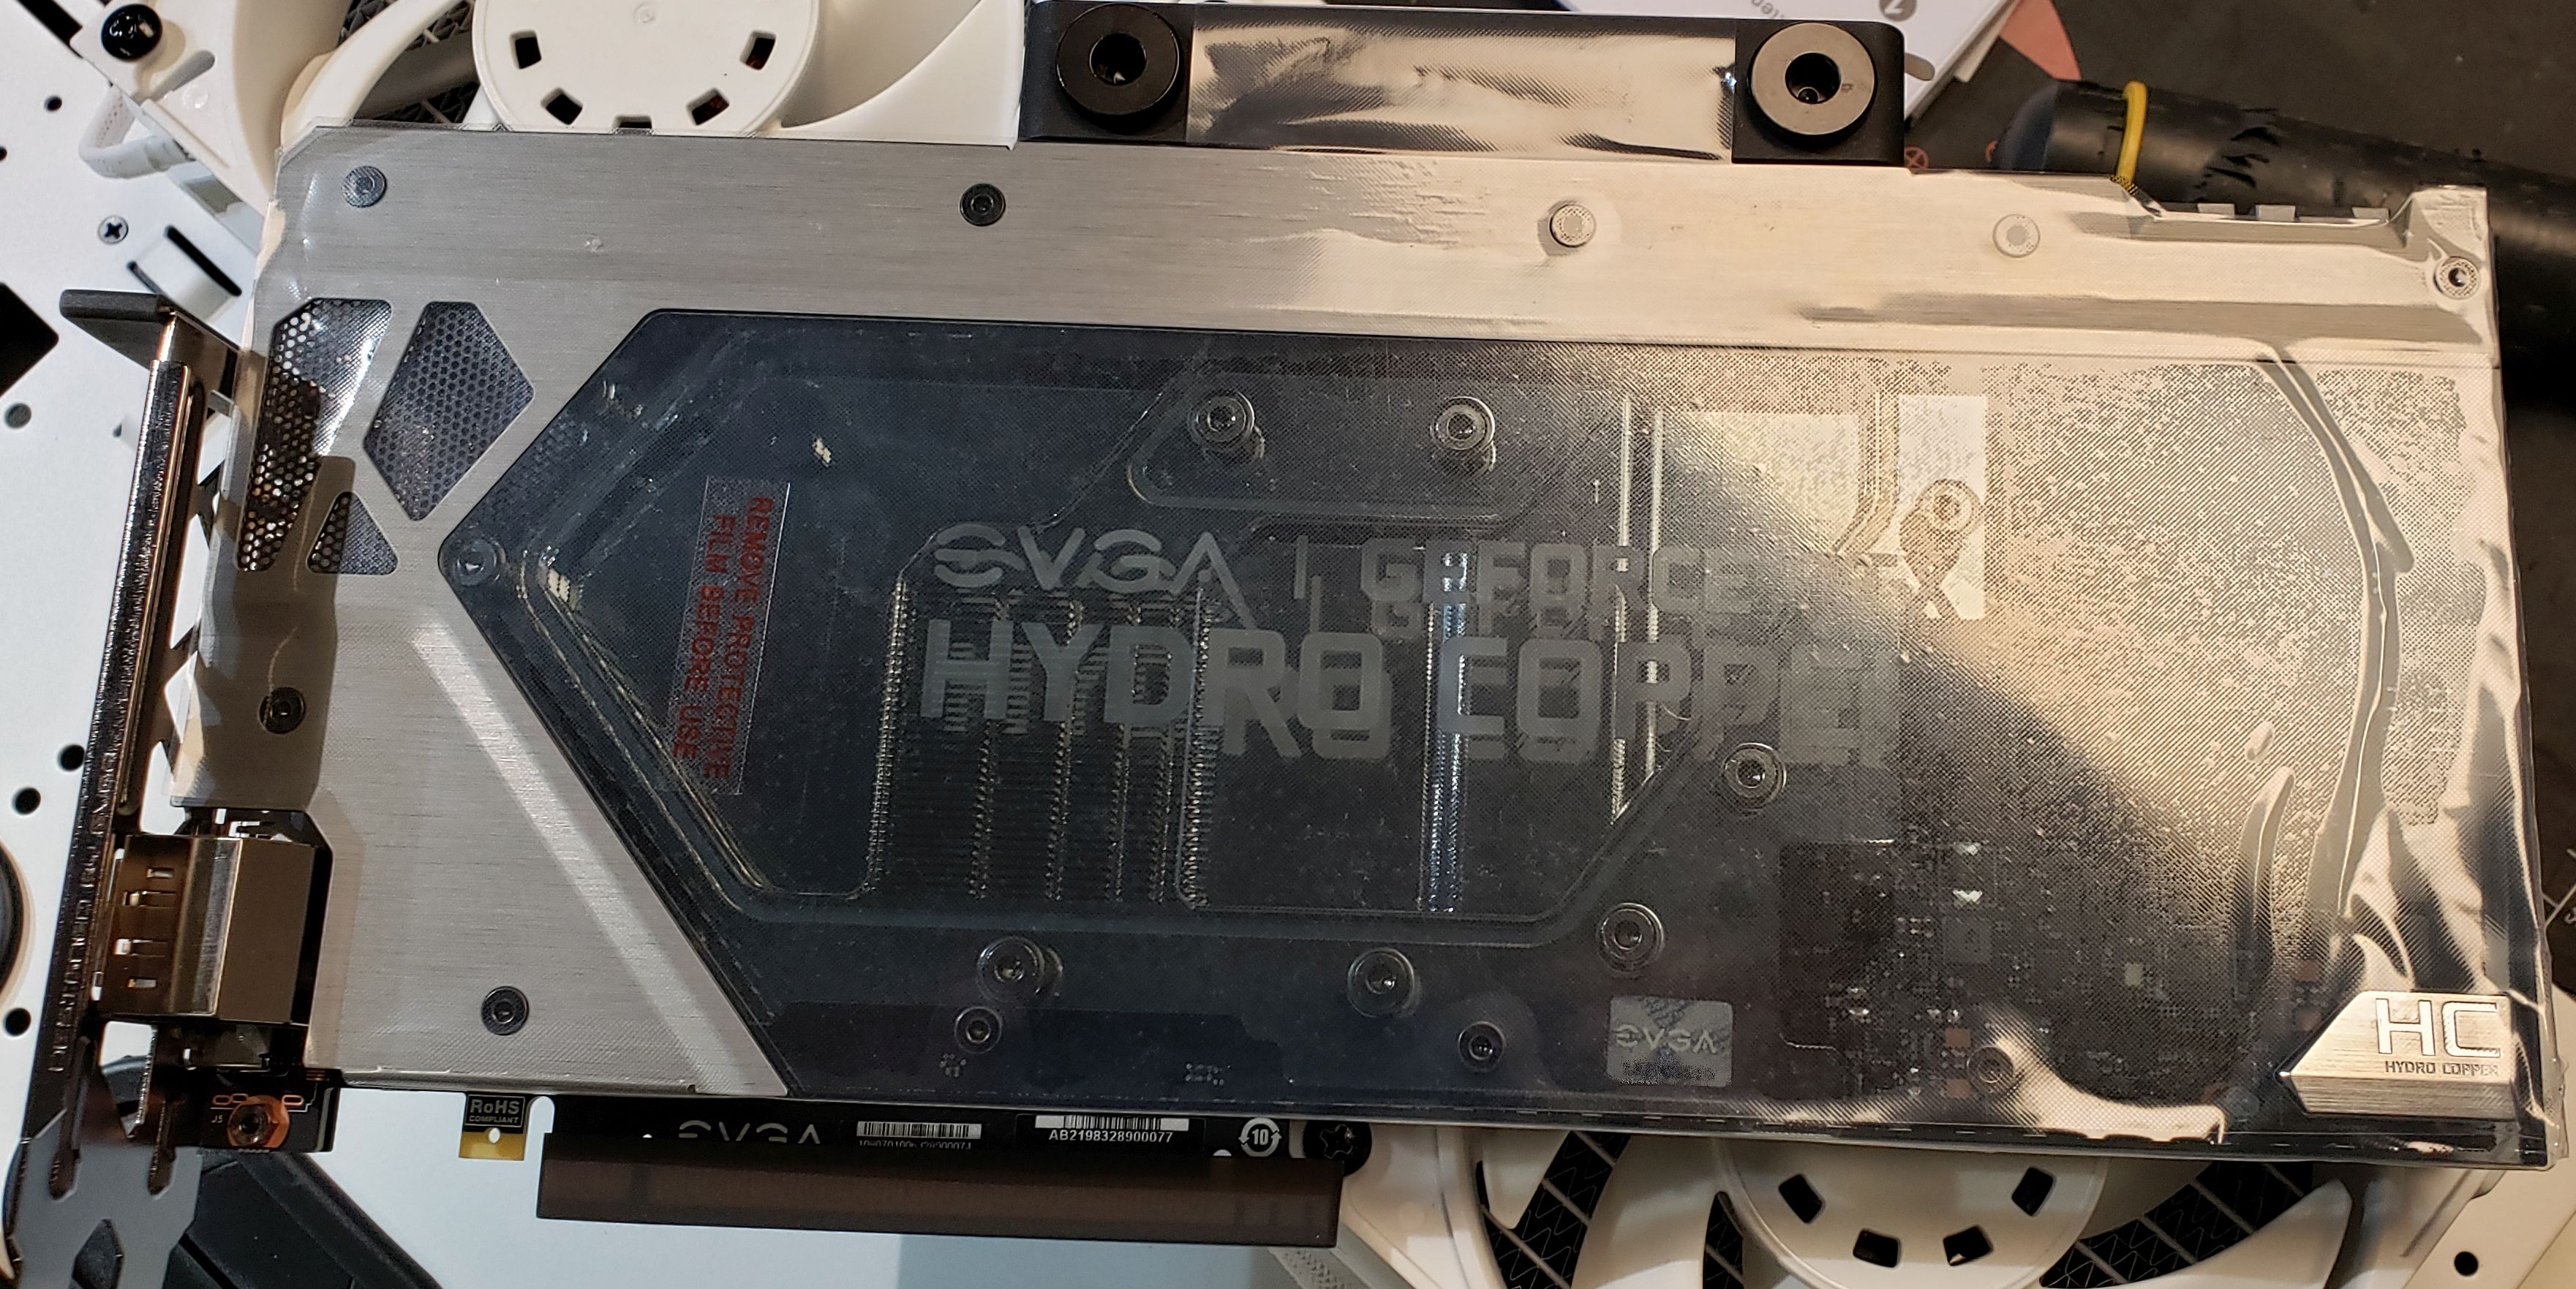
I went with the EVGA RTX 2080 Super FTW3 Hydro Copper, which includes a water block. I looked at getting the air-cooled version and adding a third-party GPU water block, but the cost of going that route was about the same or slightly more than getting it preinstalled. I've always been a fan of EVGA cards, but I've also used Asus STRIX cards. I recently purchased an Acer XB271HU, a 144 Hz, 2560 x 1440 resolution 27" monitor. The 2080 Super has plenty of power for that monitor, even with ray-tracing turned on. I also have an older Dell U2713HM, 2650 x 1440, but only at 60Hz. It's pretty much just my side monitor, but it comes in handy.
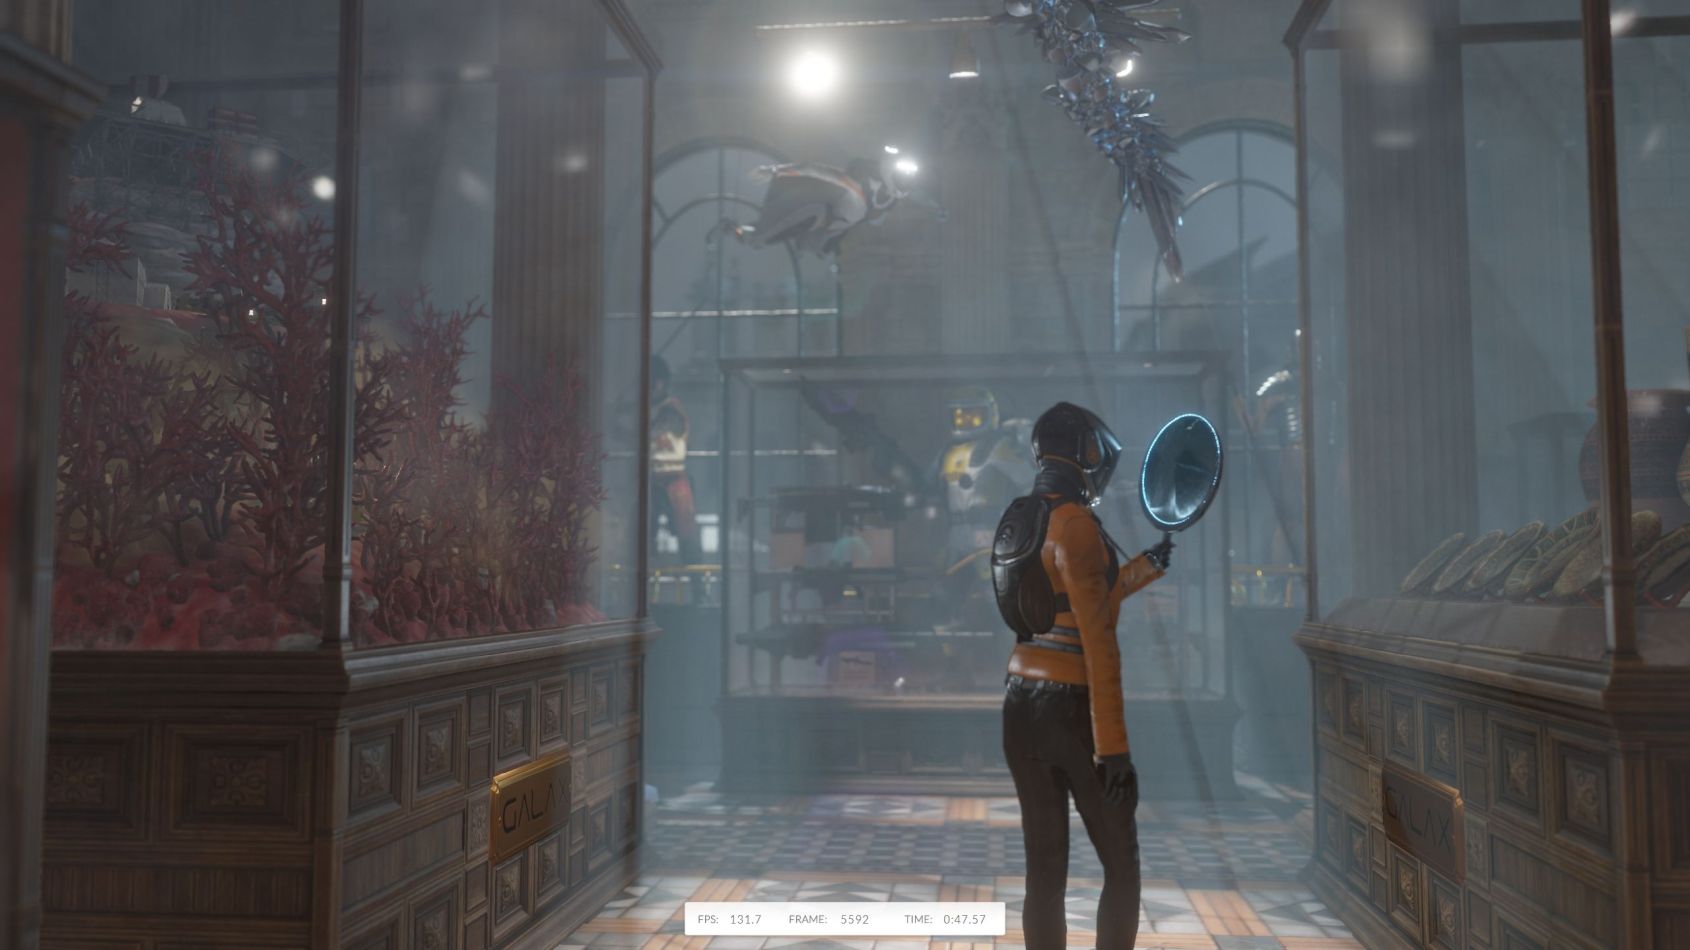
The card was bundled with a couple of games that show off the ray-tracing features of the card: Control and Wolfenstein: Youngblood. I expected to love Wolfenstein: Youngblood because I like its predecessors, but I found the game rather "meh," and have never finished it. Control, on the other hand, was a wonderful game that I played to the very end. It now has expansions, but I've not played them.
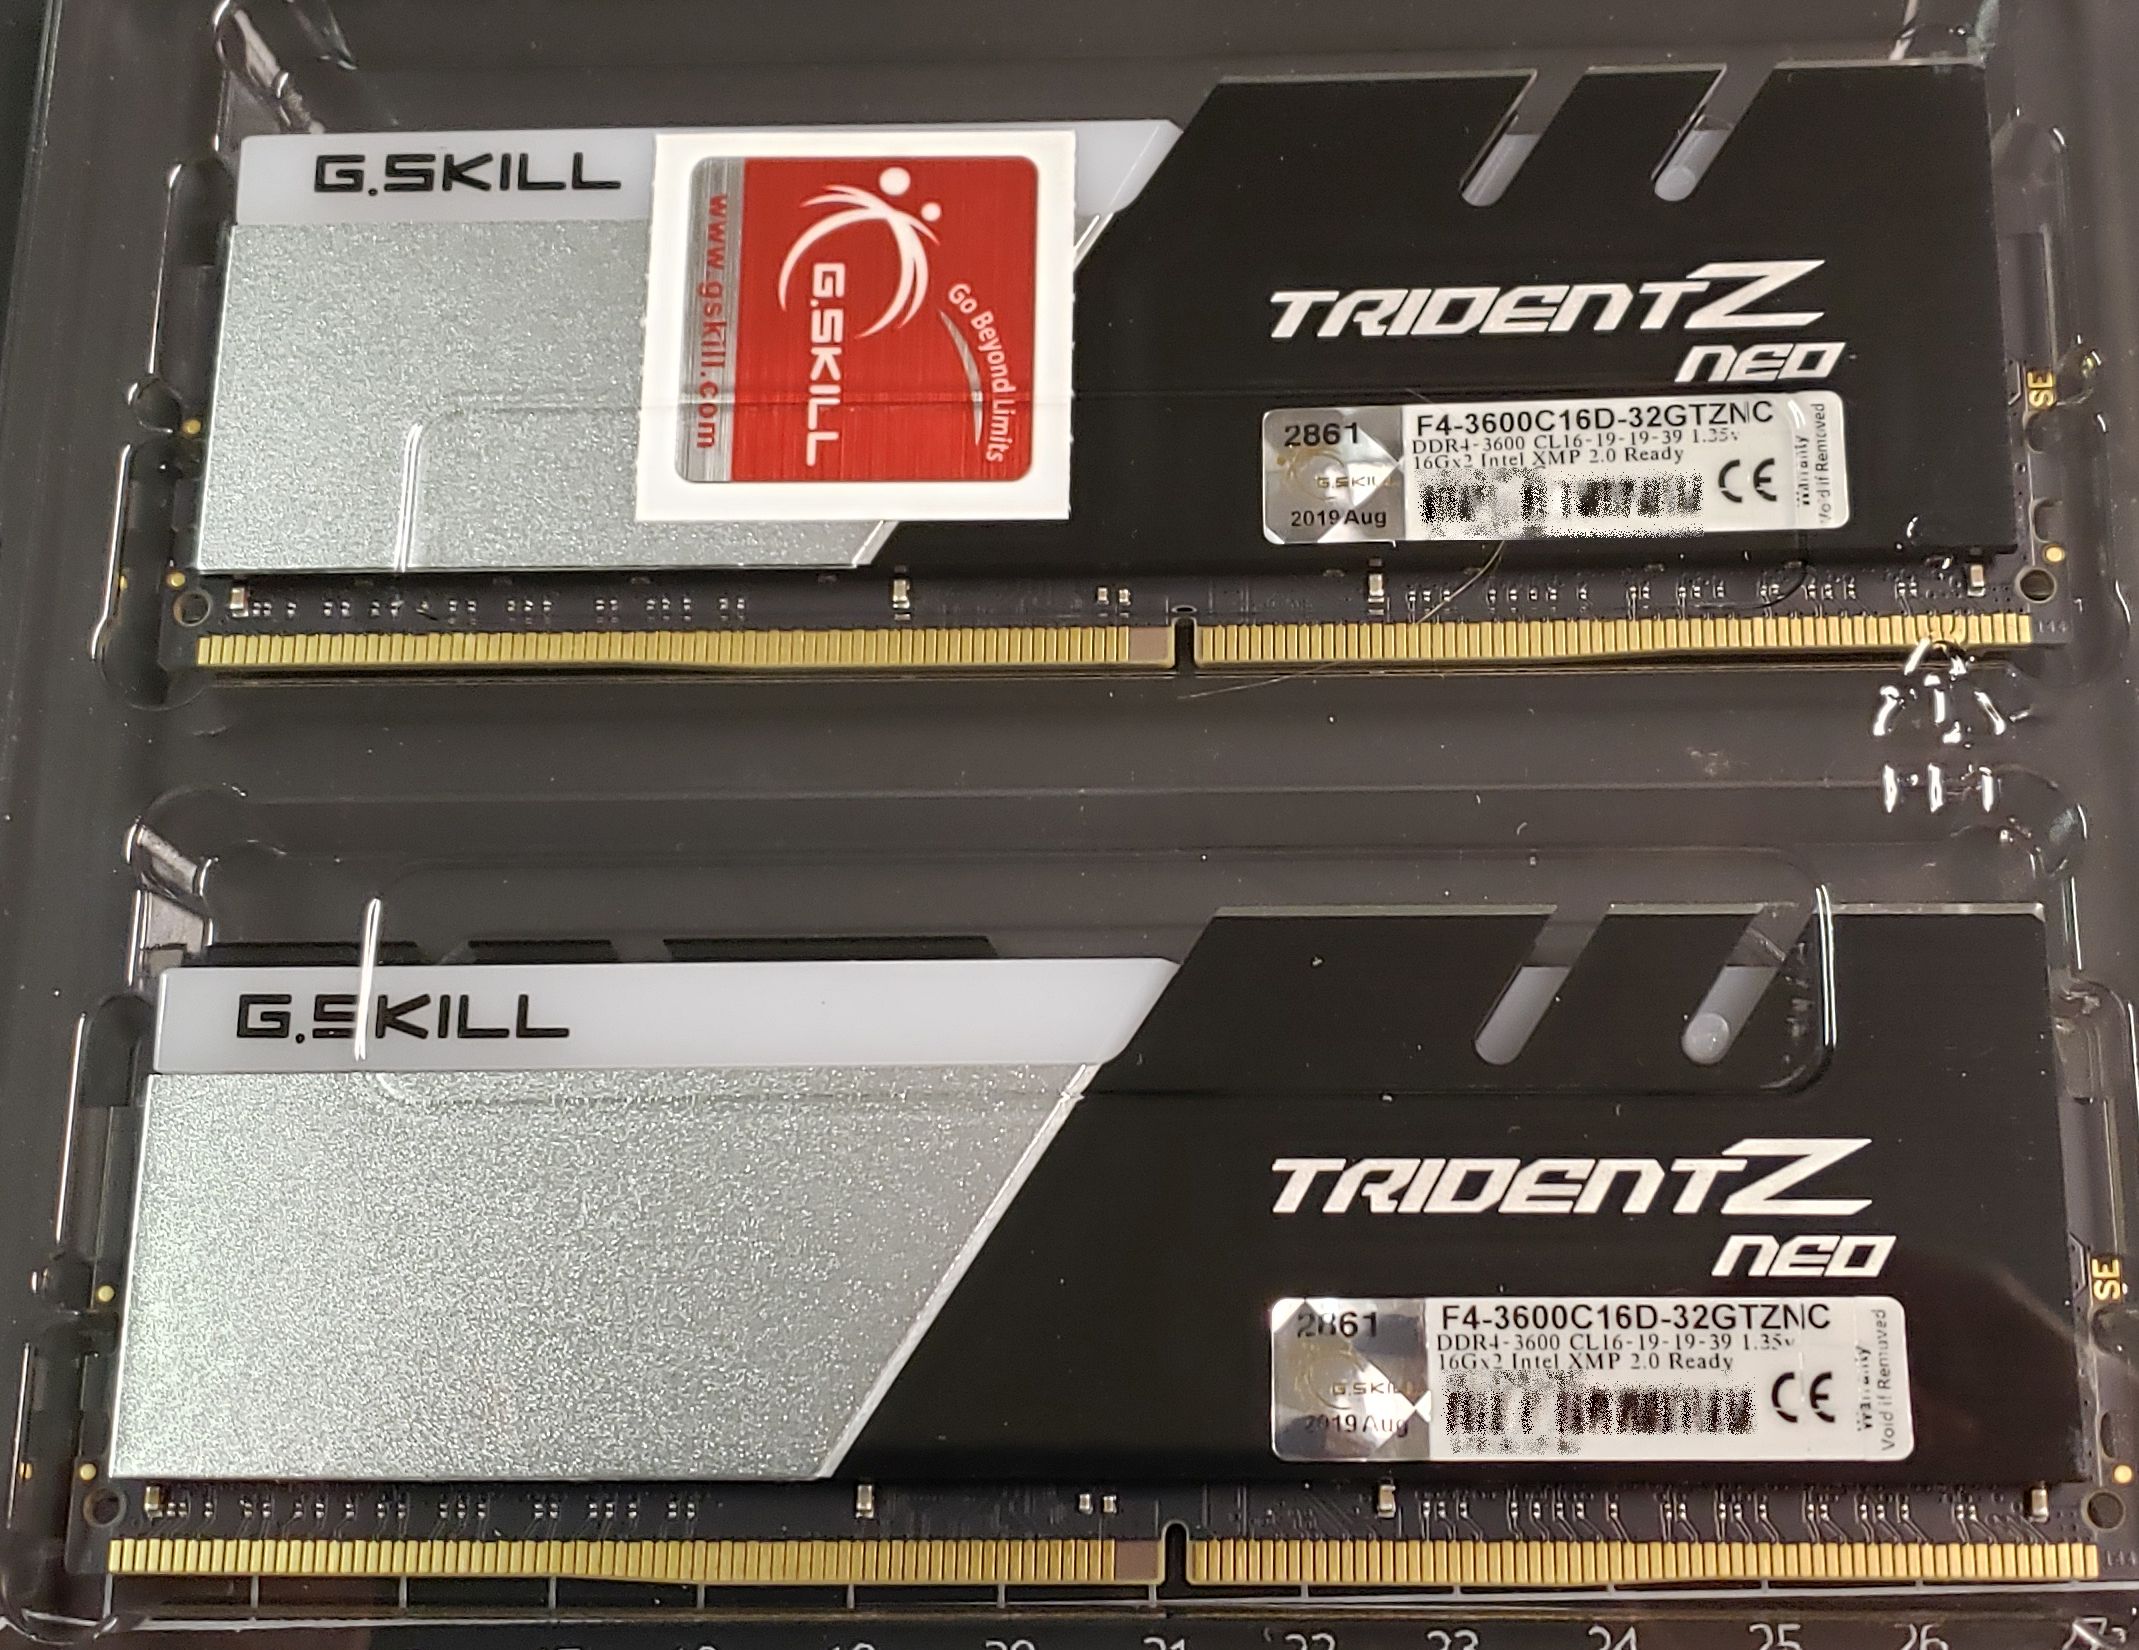
I debated whether to get 32 GB of RAM or 64 GB. I eventually went with 32 GB of Trident Z Neo 32GB DDR4 3600. I knew I wanted 3600 MHz RAM to max out the timings, but keep the AMD Infinity Fabric at a 1:1 ratio. This RAM is made to work well with the new AMD processors. It has 16-19-19-39 timing numbers (CAS Latency 16) when running at 1.35V. G.Skill has become my go-to RAM supplier. I have yet to be disappointed with any of the RAM I've purchased made by them. When I got this, it was a new model for a new CPU, so it was pretty pricey at $223. (Note from November 2021: I decided to bump that up to 48GB, so I bought another 16 GB of this same RAM for $112.)
The RGB is a nice touch, but I didn't go overboard with RGB in this system. If a component came with it, I used it but didn't go out of my way.
I decided that I would only use SSD drives in this build. In my last system, I had a few SSDs (the 2.5" variety) that handled most of the important tasks like being a boot drive and the main games drive. I used a single 3.5" 4TB HDD for music, videos, and pictures. Since this motherboard was an X570 with two M.2 slots with PCIe Gen 4.0 support, I wanted my main SSD to be an M.2 PCIe Gen 4.0 drive. (Otherwise, what was the point of buying X570?)
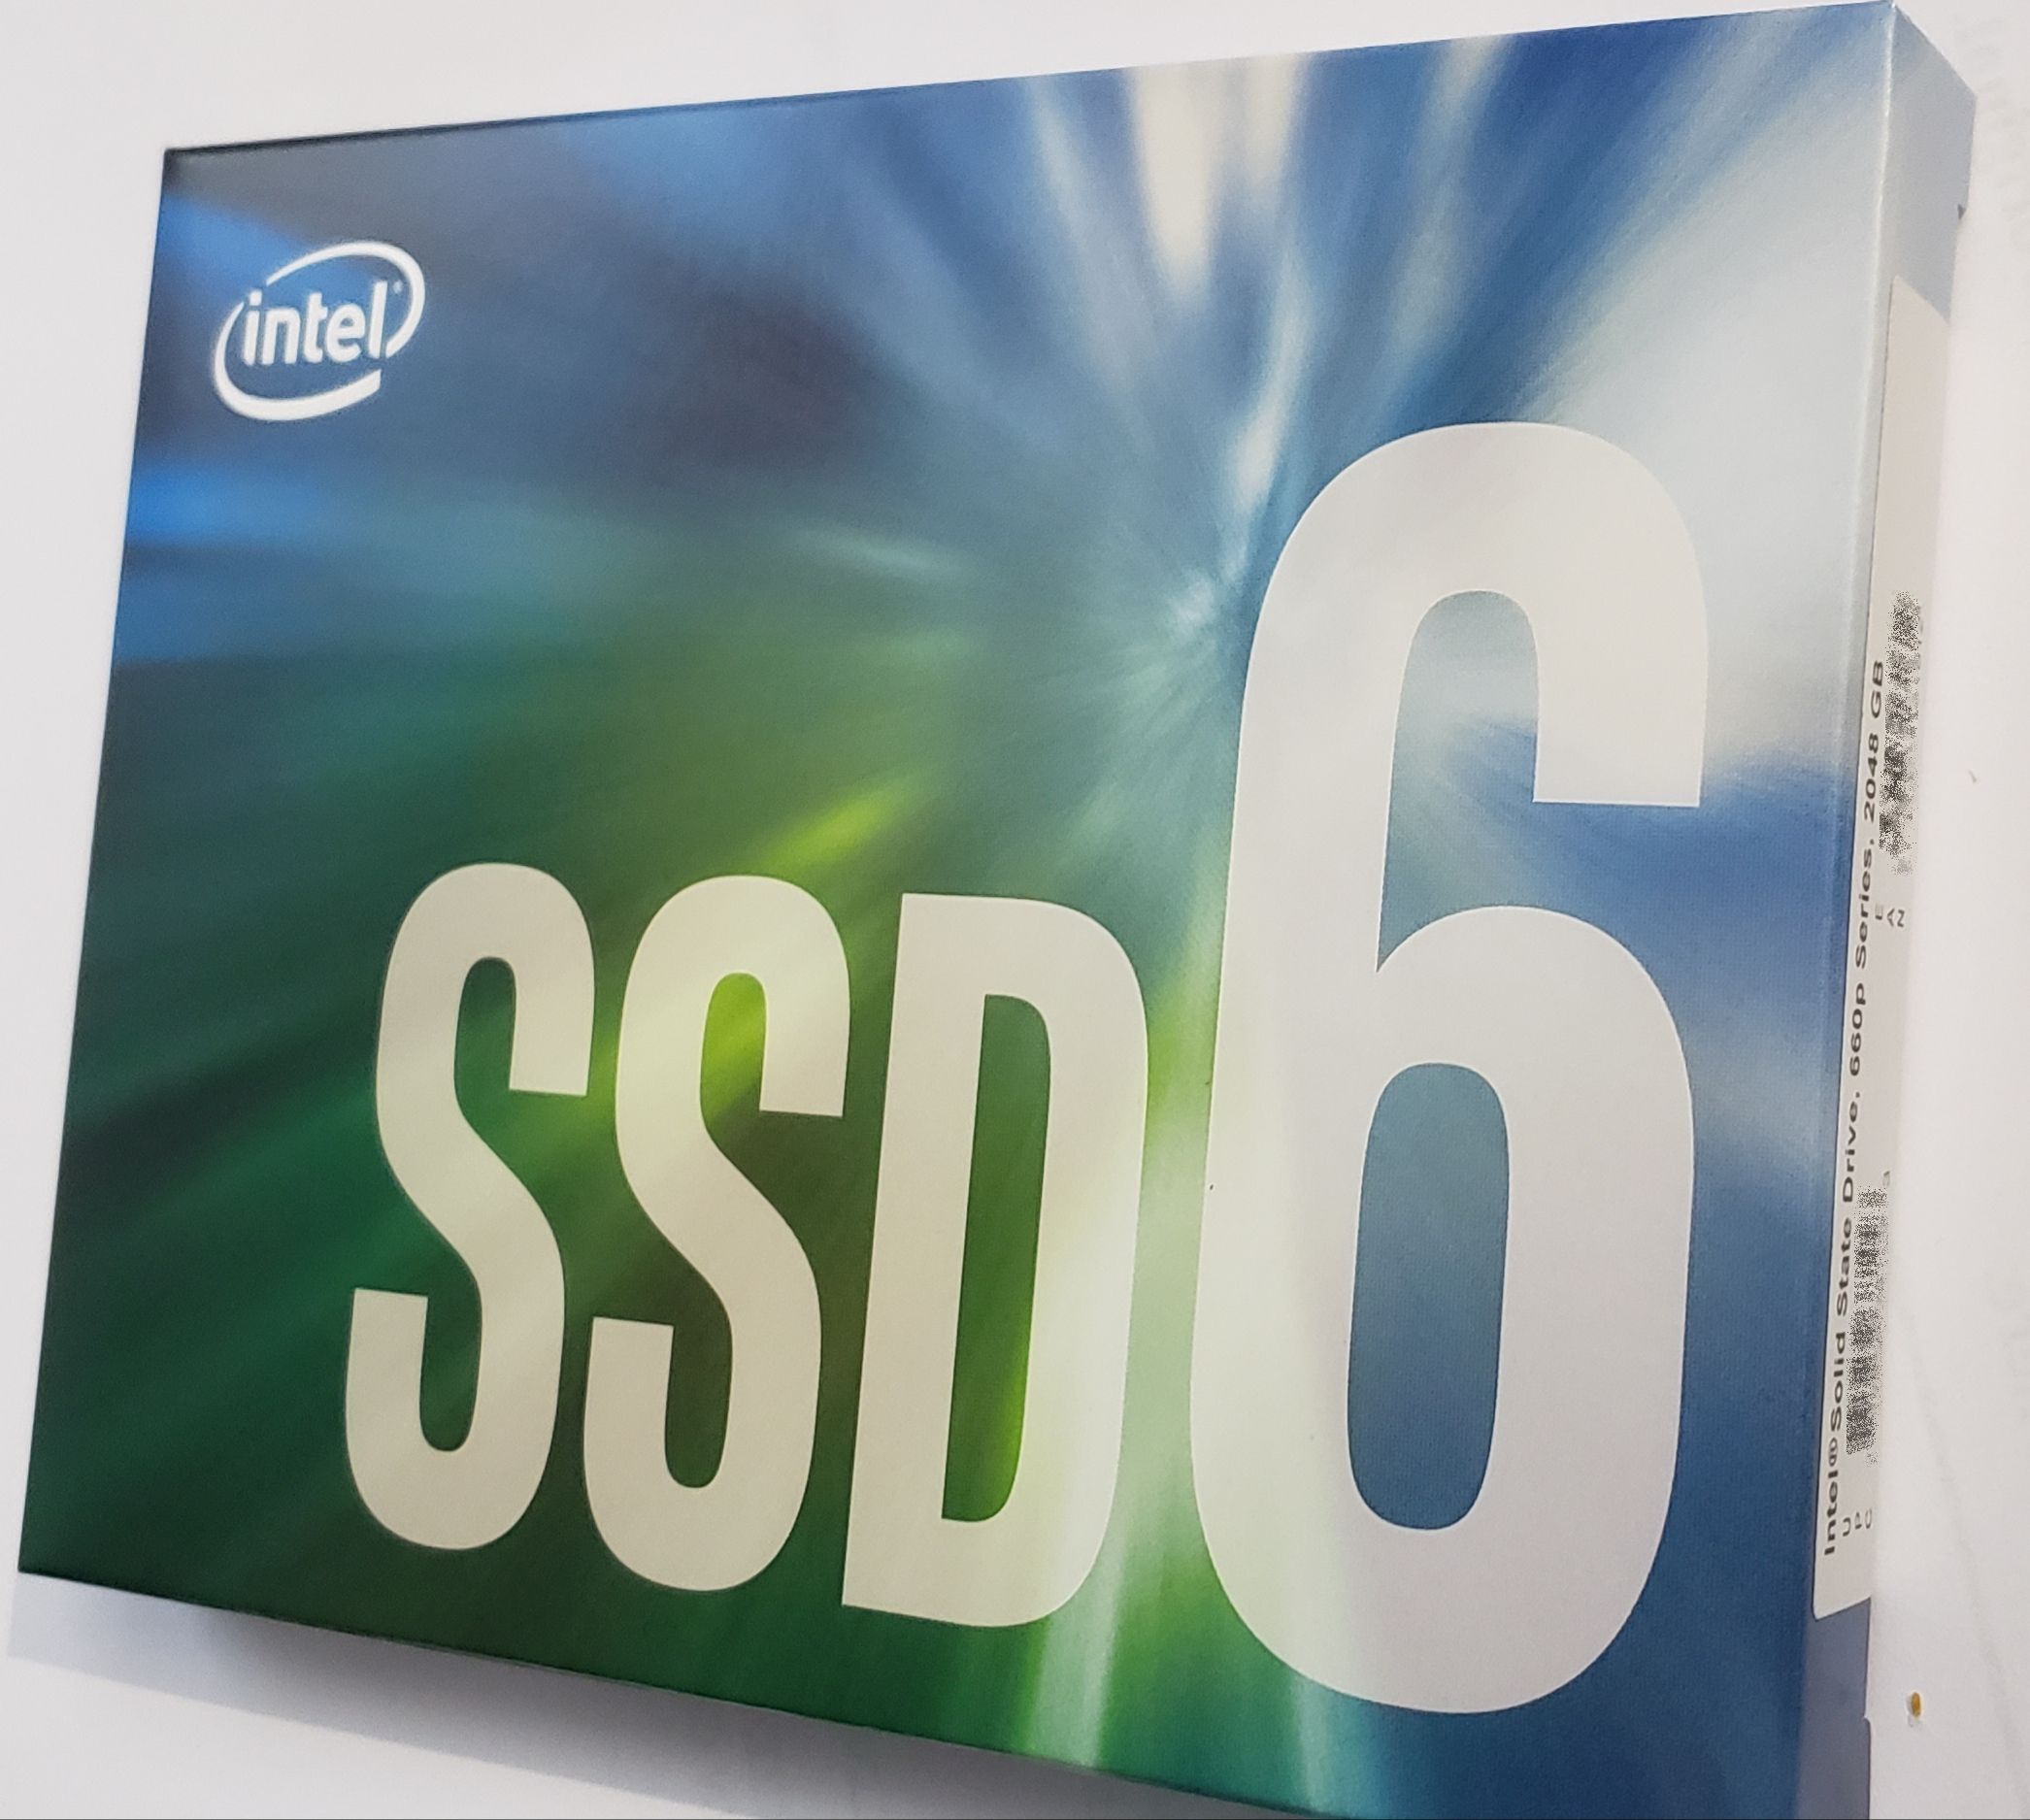
I went with a Sabrent Rocket NVMe 4.0 2TB drive for my main drive. I use 2TB of very fast SSD goodness for my boot drive, primary applications, user files, and games folder. For extra storage for music, videos, and pictures (that I used to have on the 4TB rotating HDD), I am using an IBM 660P M.2 PCIe Gen 3.0 2TB SSD. While nowhere near as fast as the Sabrent Rocket SSD, it is significantly faster than the old HDD and cheaper than the Sabrent Rocket SSD. Interestingly, it was about 1/2 the cost and about 1/2 the performance. Neither drive was especially cheap, but it lets me use only the M.2 slots on the motherboard for storage. With no SATA cables - data or power - anywhere to be found, it helps give the system a very clean look.
Now, the question is, was it worth the cost? Let's trot out a few benchmark results.
Compare these results to the PCI Gen 3.0 Samsung 970 Pro 1TB. I can't quite compare like models since there is no 2TB model of the Samsung 970 Pro. The 970 Pro was in the $350 range for half the storage. There is a 2TB version of the Samsung 970 EVO Plus, which at the time I bought the Sabrent Rocket (at $410) cost $90 more (at $499.99. It's since come down about $50 to $450). Here is a Guru3D review of that model's benchmarks. Depending on the test, the Sabrent Rocket performed similarly to the 970 Pro. In others, the Sabrent Rocket left the 970 Pro in the dust at up to 68% faster.
That said, benchmarks are just that. I had a 1TB Samsung 860 EVO 2.5" as my boot drive before, so I wasn't expecting a mind-bending increase in speed. I don't notice much difference when booting Windows from powering on. But then, even the 860 EVO booted Windows 10 in about 15 seconds. It's probably a few seconds less with the Sabrent Rocket. I can say that the Sabrent Rocket feels fast when loading games. It was fast before, so a faster fast is a relative thing. Given the cost savings relative to the increase in speed, I'm pretty happy with that choice.
The theme for my new system was mostly white with black and blue highlights. I knew that getting a white X570 motherboard at the time was not a possibility. (That still seems to be the case.) White memory on a black motherboard would look odd and stick out more than I wanted, so I didn't try to get that either (although white memory was available, at least). However, I did want to go with an all-white power supply unit (PSU). Lately, my favorite PSU supplier has been Seasonic. I went with the Seasonic Prime SnowSilent 750W Titanium fully modular PSU for this system.
This PSU comes with a 12-year warranty. I had estimated my worst-case power draw to be about 470W. While 470W is higher than half the rating of this 750W PSU, which is where I like to keep my systems to leave plenty of headroom for overclocking and expansions, this PSU is titanium-rated, so it should be between 90 and 94% efficient at the load I anticipated and have a power factor of 0.95. This PSU also has a feature that shuts the internal fan off when the PSU is running at a low load. Except when playing some games, the fan is almost always off. I've heard that this feature has caused some problems for Seasonic in that people have returned the units because they have a "broken fan."
This model comes in nice packaging - suede-like pouches for the PSU and the included cables. They included black cables. BLACK CABLES! The (unusually thick and long) 120V plug was black, too. While it's true that many people who buy this class of PSU will get custom-sleeved cables or cable extensions (myself included), this unit should ship with all-white cables. The modular cables appear to be of really solid construction and thicker than most. But they were all black and plastic coated. Since I was getting custom cables, I didn't fret too much about it. However, I had to search for a white 120V NEMA 5-15P to C13 Power Cord with 14/3 AWG wiring rated at 15 amps. It would have cost Seasonic very little to supply white cables in the first place.
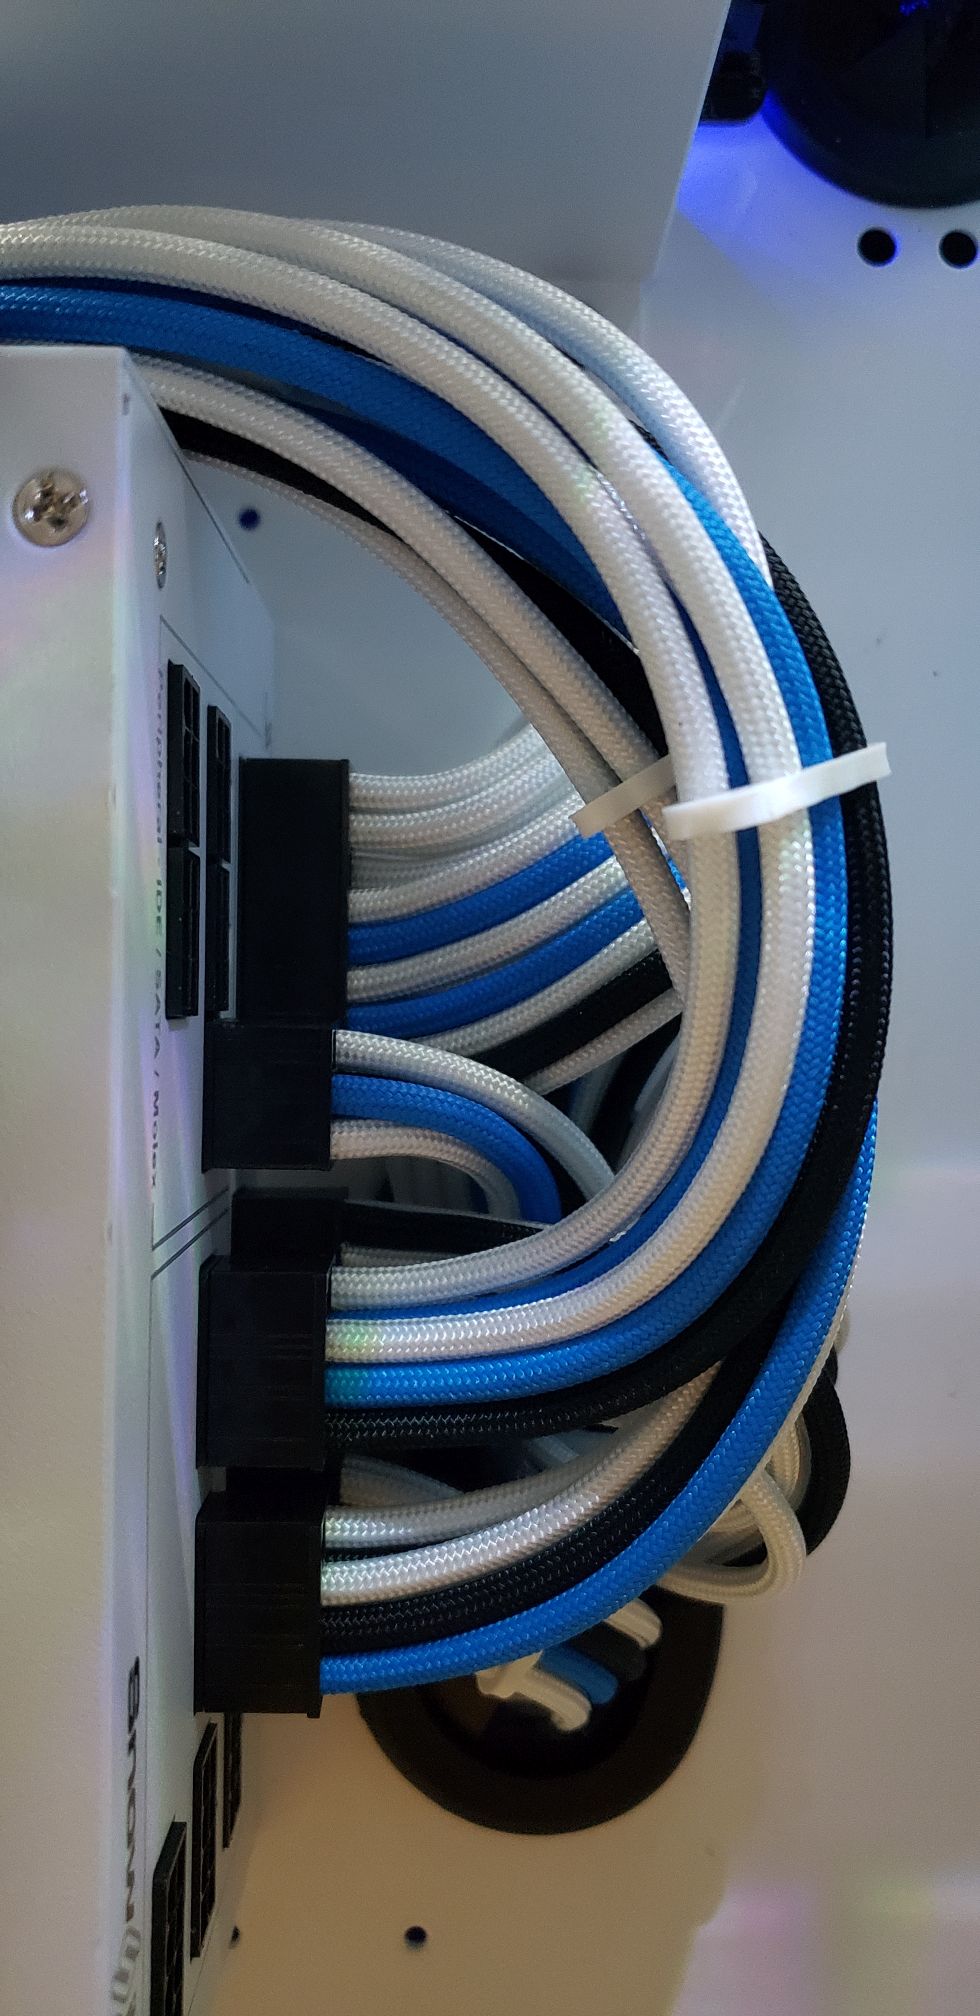
For the custom cables, I went with Ensourced special order cables that are primarily white with a streak of blue and black to go with my theme. These include the necessary number of cable combs. Due to the layout of the case, I needed an extra long 8-pin CPU cable to go from the PSU near the bottom of the case to the top of the case to the motherboard's CPU power connector. (See the picture of the cables in the back of the case below.) Ensourced gave me the longer cable for the same price. These aren't cheap and take a while to get, but wow, do they make the build look professional. They have dozens of colors in both solids and patterns. They also have a worksheet for creating the cables, which is pretty simple. I highly recommend these.
When I decided to build a new system, in addition to water cooling, I decided that I wanted to have a unique case and a unique look. I also wanted it to be wall-mounted. I found the perfect case, the Feros VM-Rigid Bravo or Charlie model. It was exactly what I was looking for. I didn't get it. You may have noticed that the URL for the link above was archive.org, not feros.us. That's because Feros tried a Kickstarter that failed. It appears they tried to make a go of it anyway. At some point, they just outright disappeared. A few of their cases exist (used, I suspect), but the prices were very high.
However, while researching wall-mounted cases, I also found the Thermaltake Core P5 and Thermaltake Core P90. I went with the white version of the Core P5 Tempered Glass Snow Edition. This case is exceptional to build into, but it is heavy. It weighs 40 lbs fresh out of the box, and it doesn't get lighter once components are mounted on it. My new system weighed 56 lbs when finished. I had to weigh it to ensure the wall mount could hold it.
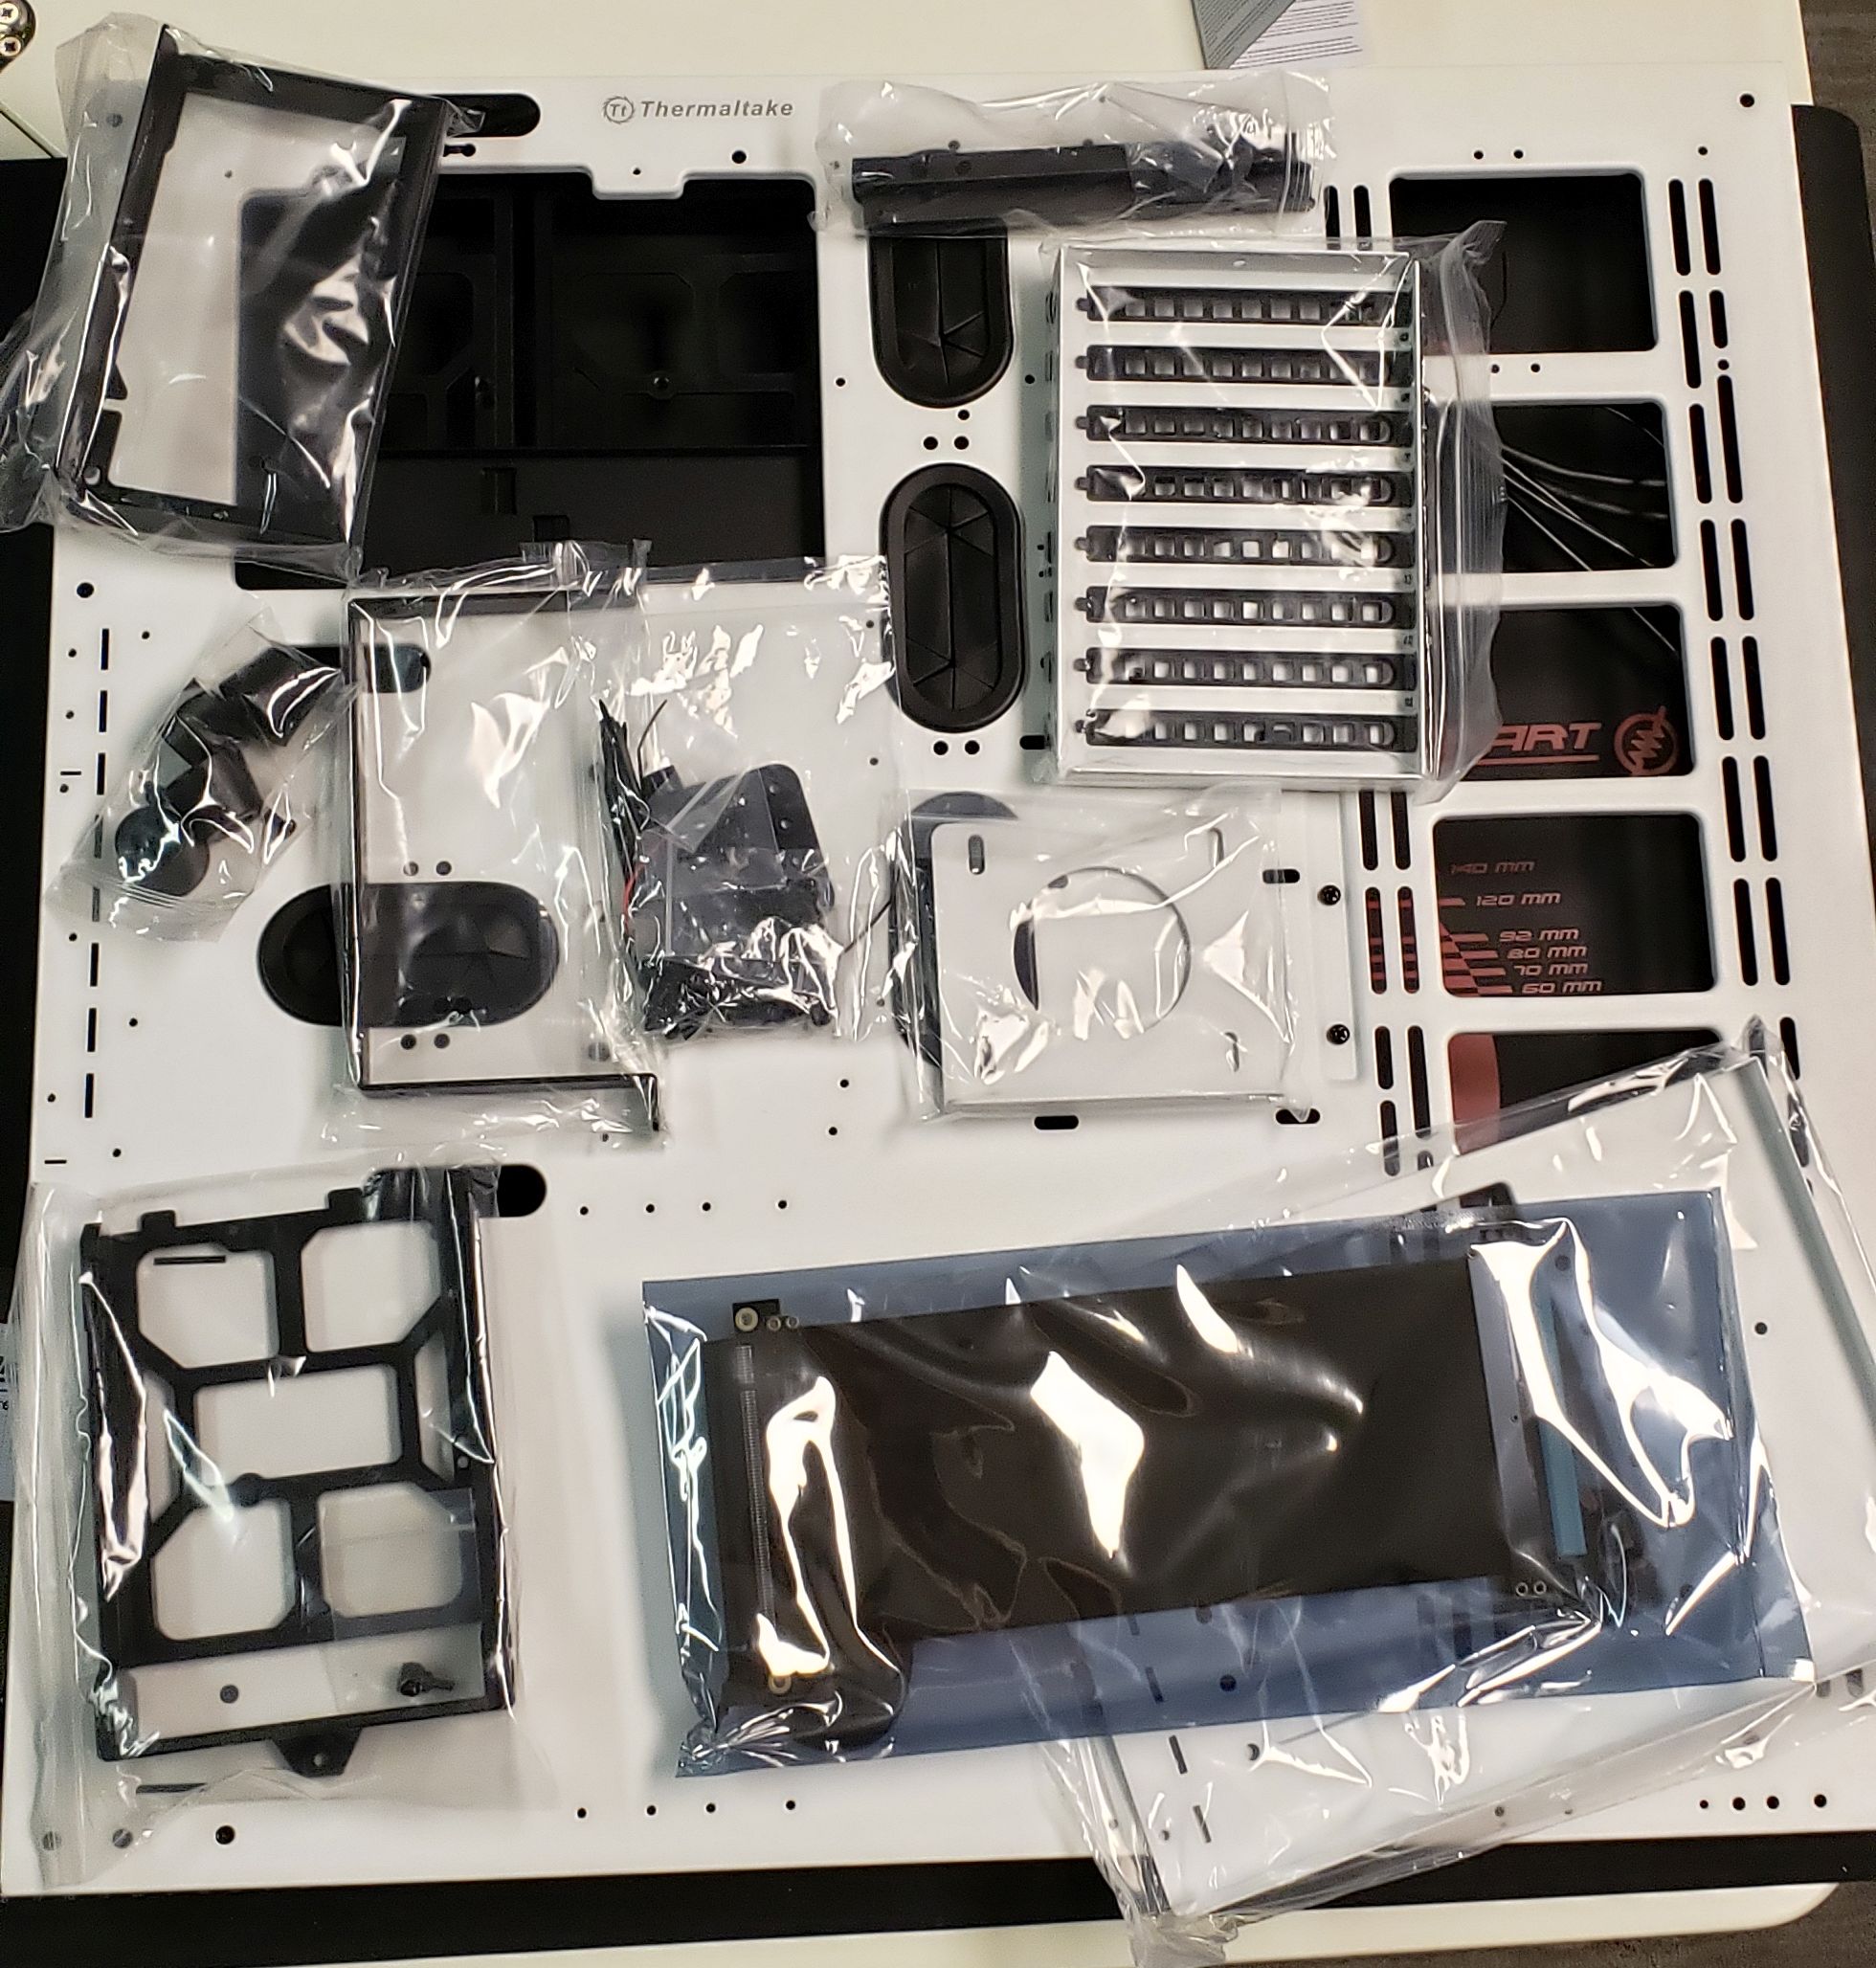


This case was made with the maker community in mind, but I wasn't considering modifications. I just hoped to mount everything nicely spread out and fairly flat. I still needed to maintain good airflow for the non-water-cooled components. This thing comes with all 3.5" / 2.5" drive bays - one on the front and three on the back - none of which I ended up using. The expansion card cage can be mounted either horizontally or vertically and comes with a PCIe riser cable. Also included is a water pump mount, which seems only to fit some Thermaltake Pacific PR22-D5 Plus water pumps.
Something I realized when building "into" this case is that it doesn't have an inside. It is just a raised back panel. After all the parts are mounted, the posts that hold up the tempered glass are installed, followed by the glass panels. There are no tight corners or reaching down into the case, making assembling this system the easiest one I've ever used.
I have two dings against this case. The first ding I have against the specific unit that I got was that it was missing one of the 12 very unique thumbscrews. (See the fourth picture above.) I filled out the Technical Support form at Thermaltake, including a (reduced-resolution version) of that image (to fit their 500K file limit). Amazingly, I heard back .. never. I'm not convinced anyone ever reads the submitted forms. Thermaltake, when you offer a technical support form on your site, you should answer the requests. This is a $250 case, not a $50 case. I found some matte black thumbscrews that look better, but I should not have had to.
The second ding was that the upper left post was too close to the motherboard (when the motherboard has a fixed IO shield anyway) for one of the square glass mounts to clear the motherboard. So, as it turns out, I only needed 11 of those thumbscrews, which I figured out after my substitute thumbscrews arrived.
So as not to end this section on a low note, I like the final look of this case. It's unique enough that people who have seen it really take notice. It's practical enough that it's a pleasure to build on top of it. It looks fantastic on the wall, even if it is a two-person lift.
Since this was my first time using any custom loop cooling, I researched and watched YouTube videos. The YouTube channel by Jay of JayzTwoCents has a lot of good information. I started with Watercooling for Beginners 2018, but he has many more. Watching the later ones was also interesting because as Jay got more experienced, he changed some of the things he had recommended earlier. (e.g., He went from using colored coolant to just water with a few drops of coloring.) The guides at EKWB are also pretty helpful. Since I wanted to use hardline PETG tubing, I watched Jay's How to Bend PETG tubing. (He has other soft, acrylic, and metal tubing videos.) I also recommend Jay's The Beginners Guide to Shopping for Water Cooling Parts! and A Guide to Watercooling Fittings. People have different methods and suggestions, so don't be afraid to watch a bunch.
Watercooling parts are expensive, so you want to get them right the first time. The tubing itself is the cheapest part. The fittings that connect the tubing to the various cooling blocks, radiator, and pump range from under $10 (for plugs to close various holes) to over $40, depending on their complexity. I watched a video in which the person works for one of the water-cooling companies. He said it's a good idea to have a few of these in case you need some flexibility in height, a few for spacing, etc. It was obvious he wasn't paying. He was up to hundreds of dollars worth of fittings that one might need. Yeah. Well, I was spending real money - my money. I made my best guess for the minimum number of parts, knowing that I would probably need a second or third purchase of parts once everything was mounted. I bought the majority of my water-cooling parts from Performance PCs. Jay got many of his parts from there, and I highly recommend them as a one-stop shop.
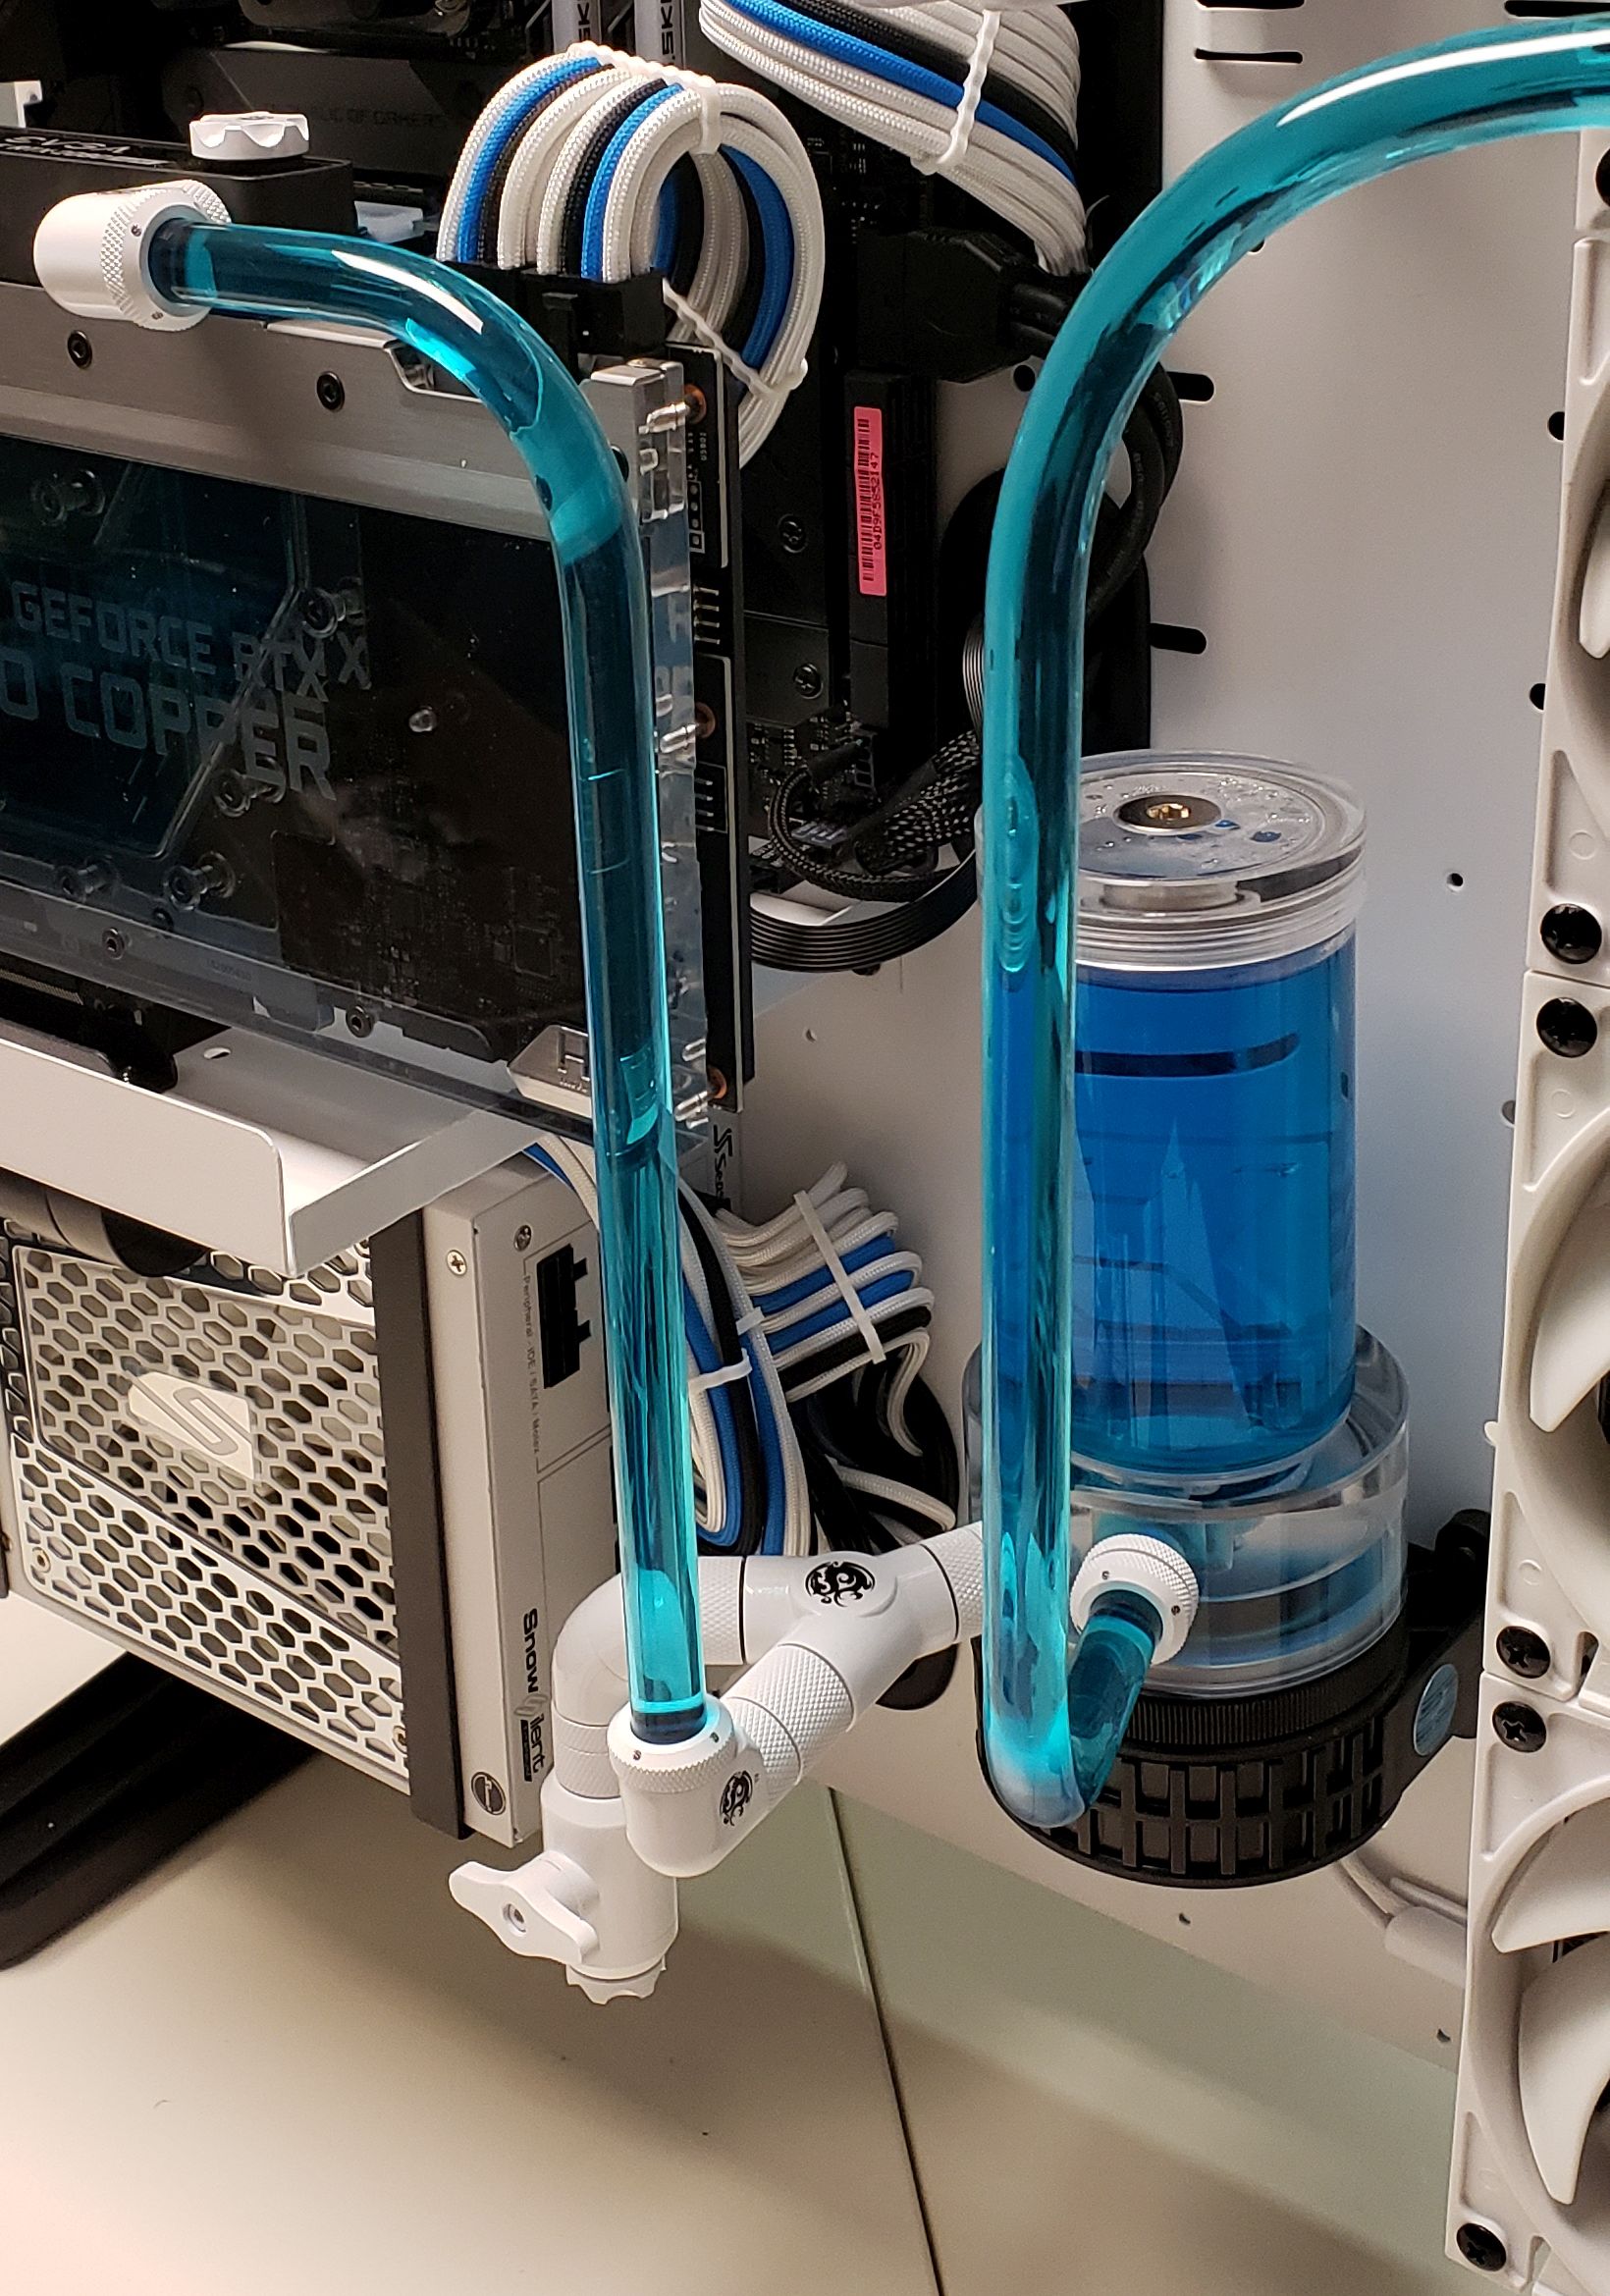
After seeing enough horror stories about leaks and failing pumps, I decided to go with what seemed to be rated the best for every part. That would mean a more expensive open-loop system, but I was willing to pay for peace of mind. After finishing the build, I was happy with all the parts I chose but realized most of my fears were probably unjustified. I went slow. If a bend or tube raised any doubt, I remade it. I never had any leaks; my only near leak was forgetting to replace a plug in the reservoir.
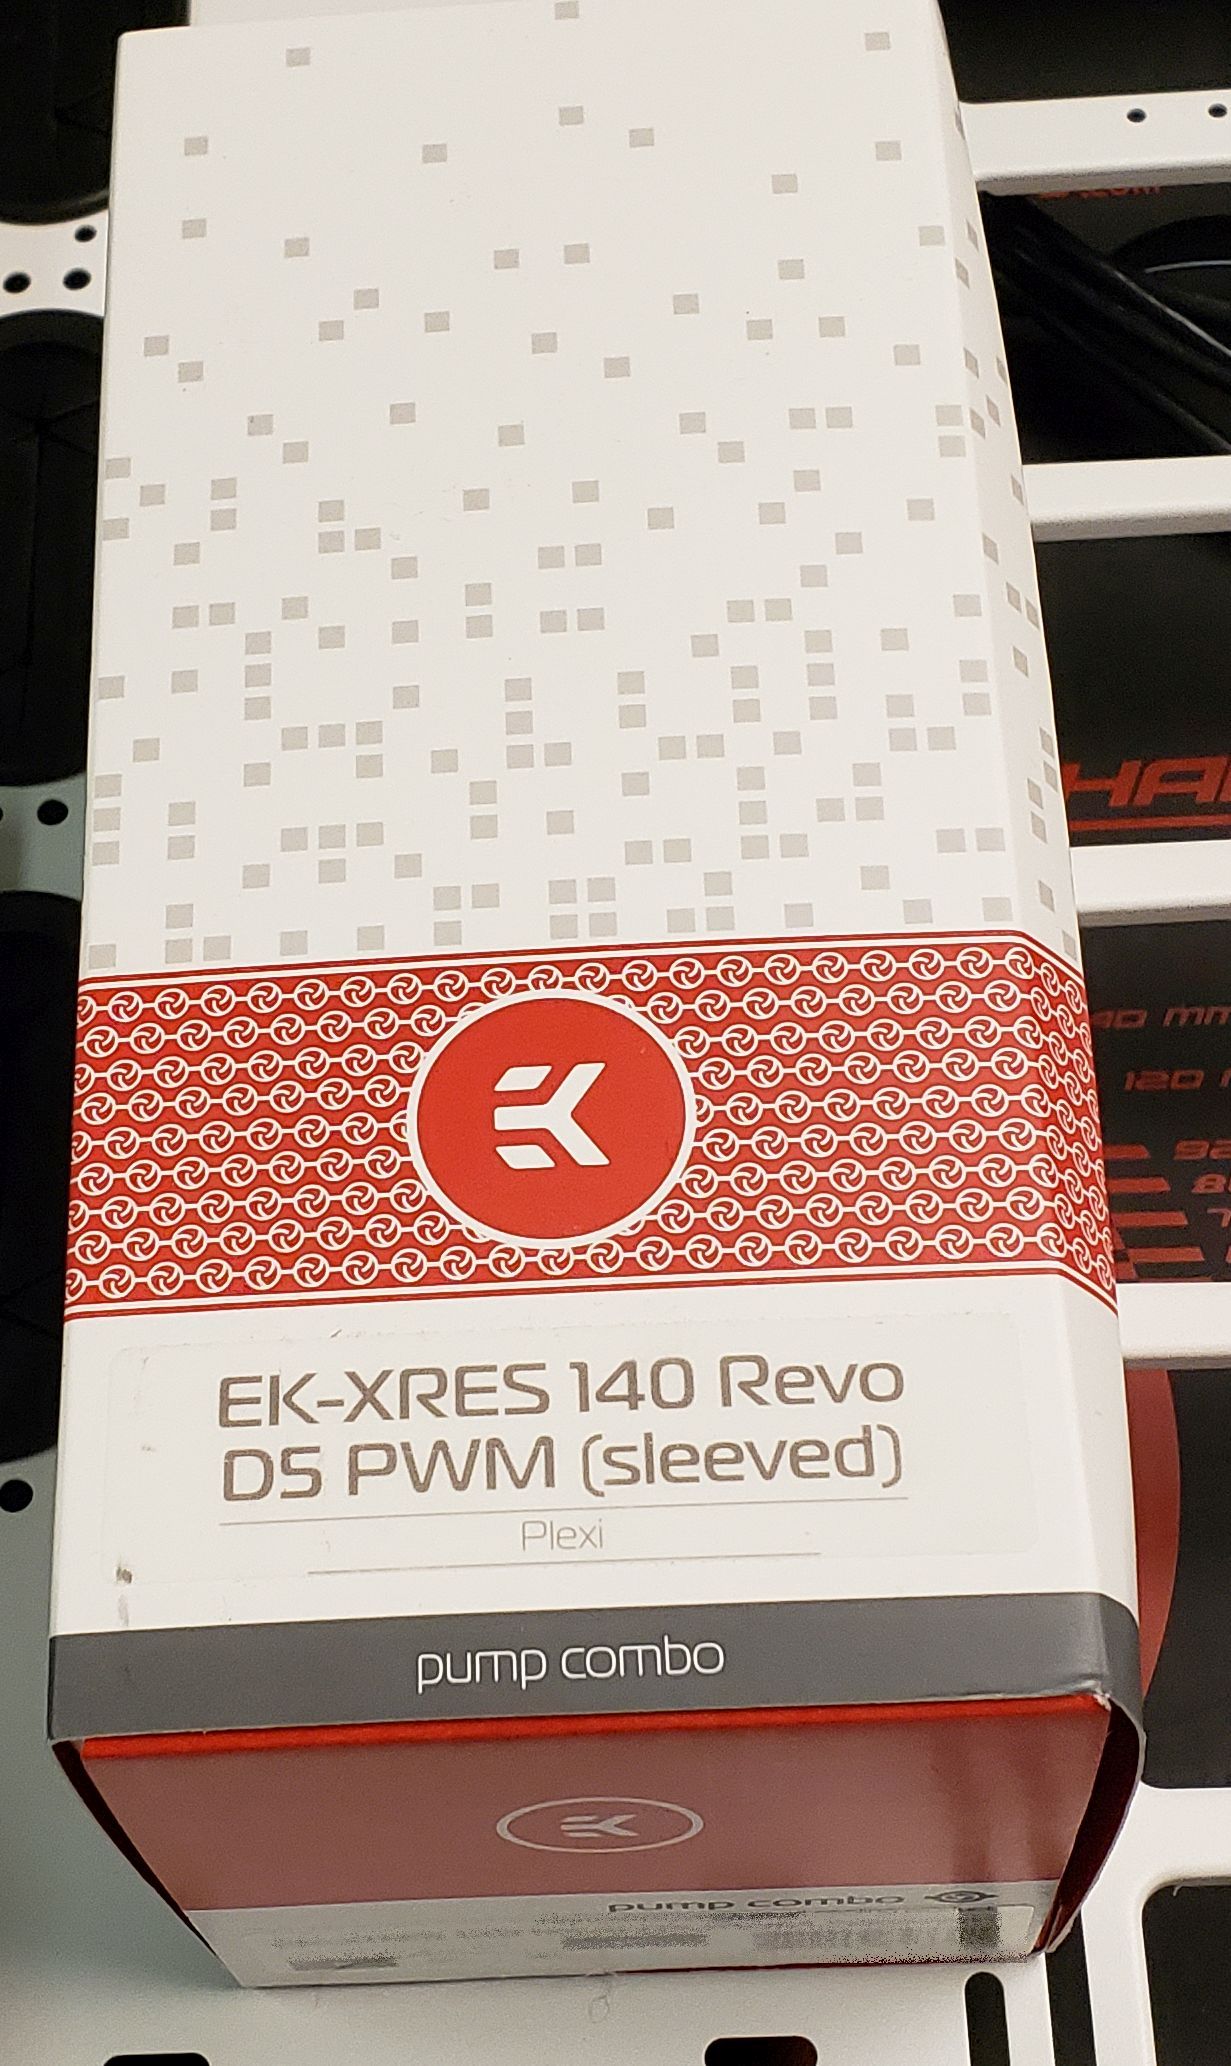
For the water pump, I chose the EKWB EK-XRes 140 Revo D5 Plexi, which is an integrated water pump and reservoir. This has recently been replaced with the EK Quantum pump/reservoir combo series. They have both flat (distro plate), and tube models and the closest one to what I have is the EK-Quantum Kinetic TBE 200 D5 PWM D-RGB - Plexi. The reservoir is 200 mm high, only about 10 mm higher than the old one. The new combo holds 205 ml, the same as my current one. The new one has RGB, and as every gamer knows, it works better. (Let's assume you can see the sarcasm tag around that sentence.)
Many YouTubers I followed stressed that the radiator is the most critical part of the system - even more so than the pump. This is the part responsible for removing heat from your system and dumping it into the air while taking cooler air to reduce the heat of the liquid. This part's efficiency dictates how well the water loop works. The Thermaltake Core P5 case allows for up to a 480mm radiator. Radiator sizes are measured by the size of the fans mounted to them, so a 480mm radiator requires four 120mm fans. The width is fixed at about 120mm. Some radiators use 140mm fans, which have corresponding sizes of 140mm, 280mm, 420mm, and 560mm.
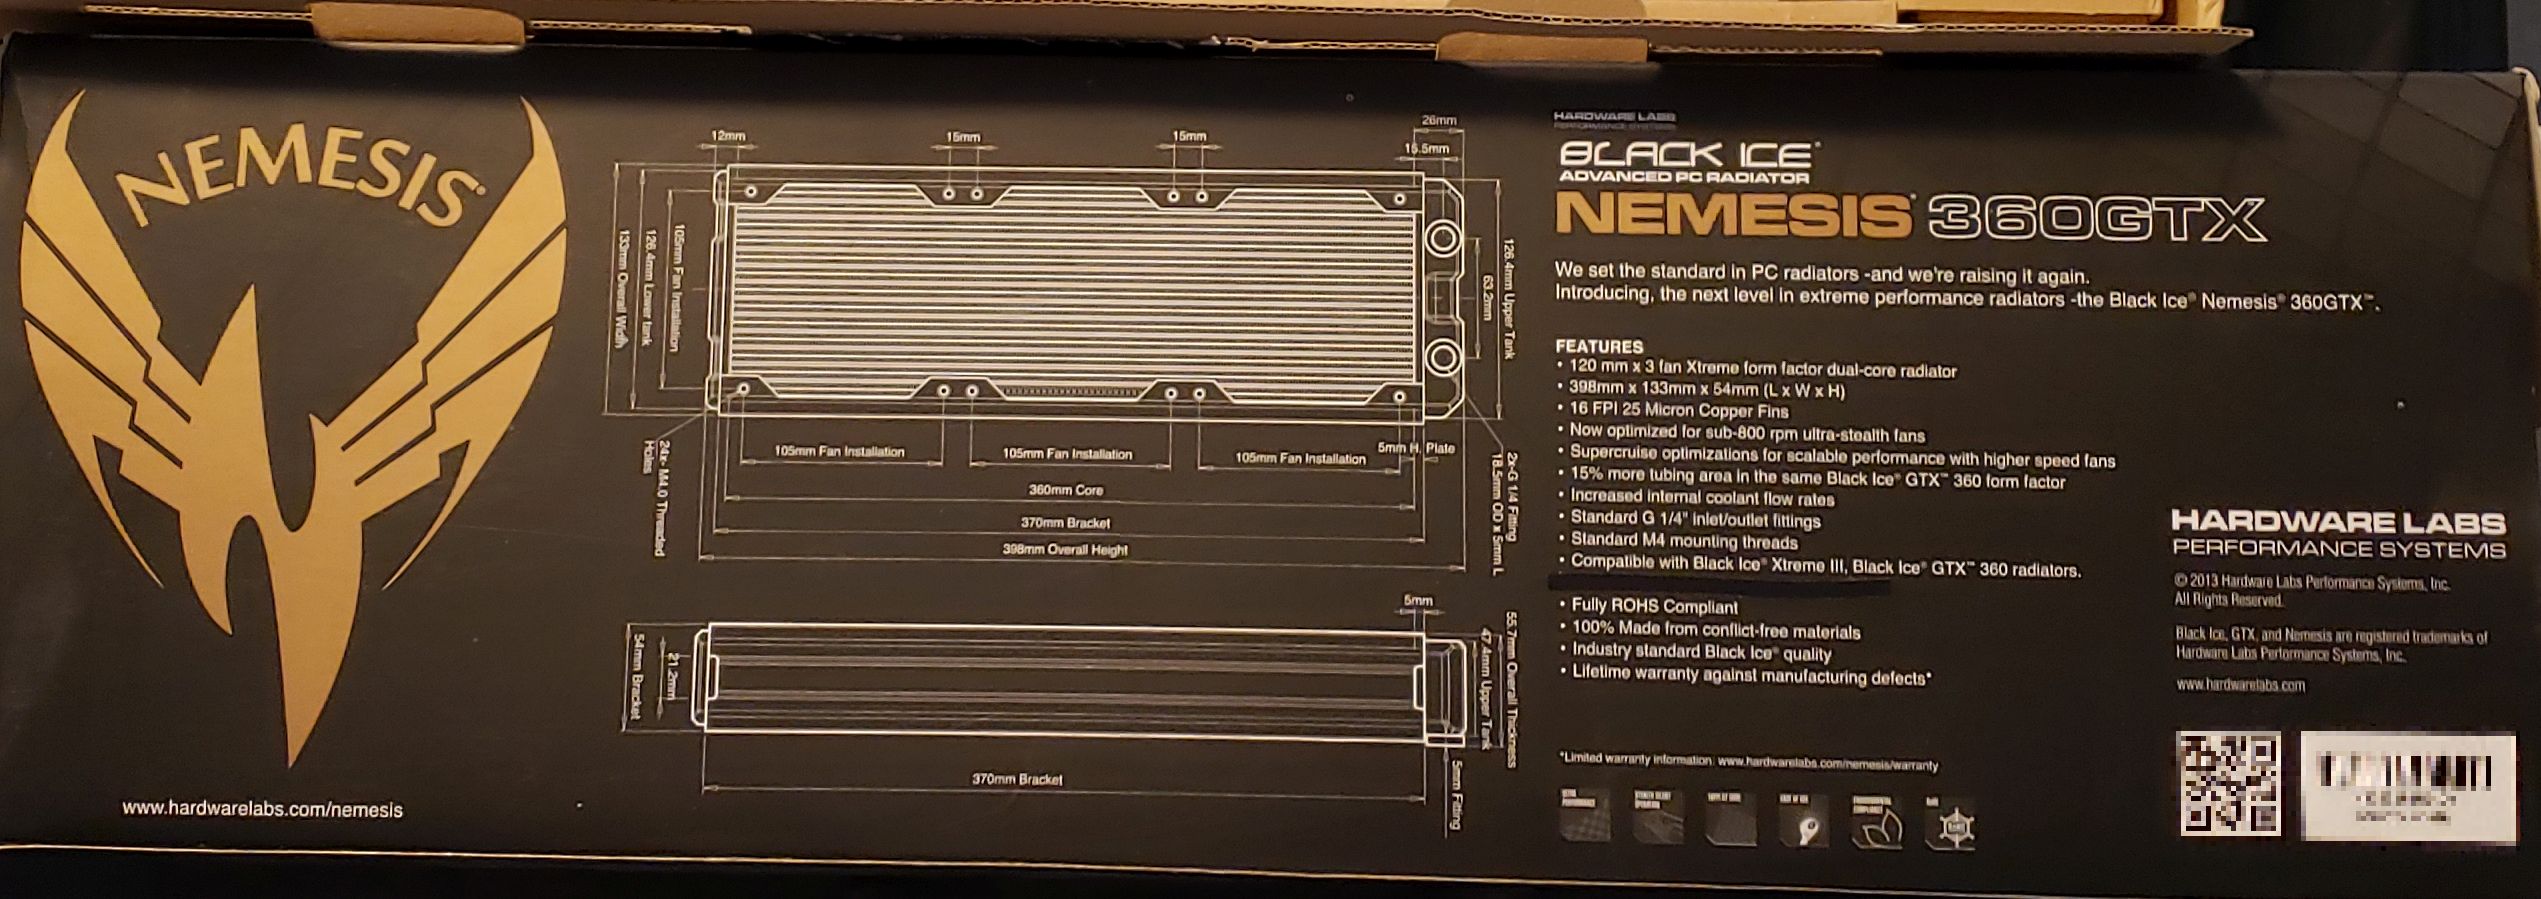
The Thermaltake Core P5 case seems to have screw slots for the 140mm radiators, but the cutouts that let air pass through the radiator out the back of the case are made for 120mm fans. So it was a matter of finding a radiator capable of dissipating the wattage the rest of the system could produce. The general rule of thumb I heard from multiple sources is one 120mm radiator section per component being cooled, which for me is the CPU and GPU. Jay of JayzTwoCents suggests following that rule for sizing, but double it if you are overclocking. I planned on overclocking the (AMD 3900X) CPU, and the GPU (EVGA RTX 2080 Super FTW3 Hydro Copper) comes overclocked from EVGA. So, with that advice, a 480mm radiator seems the right choice. However, Jay also points out that width and height are only two factors. Radiator thickness also counts, as does fin density.
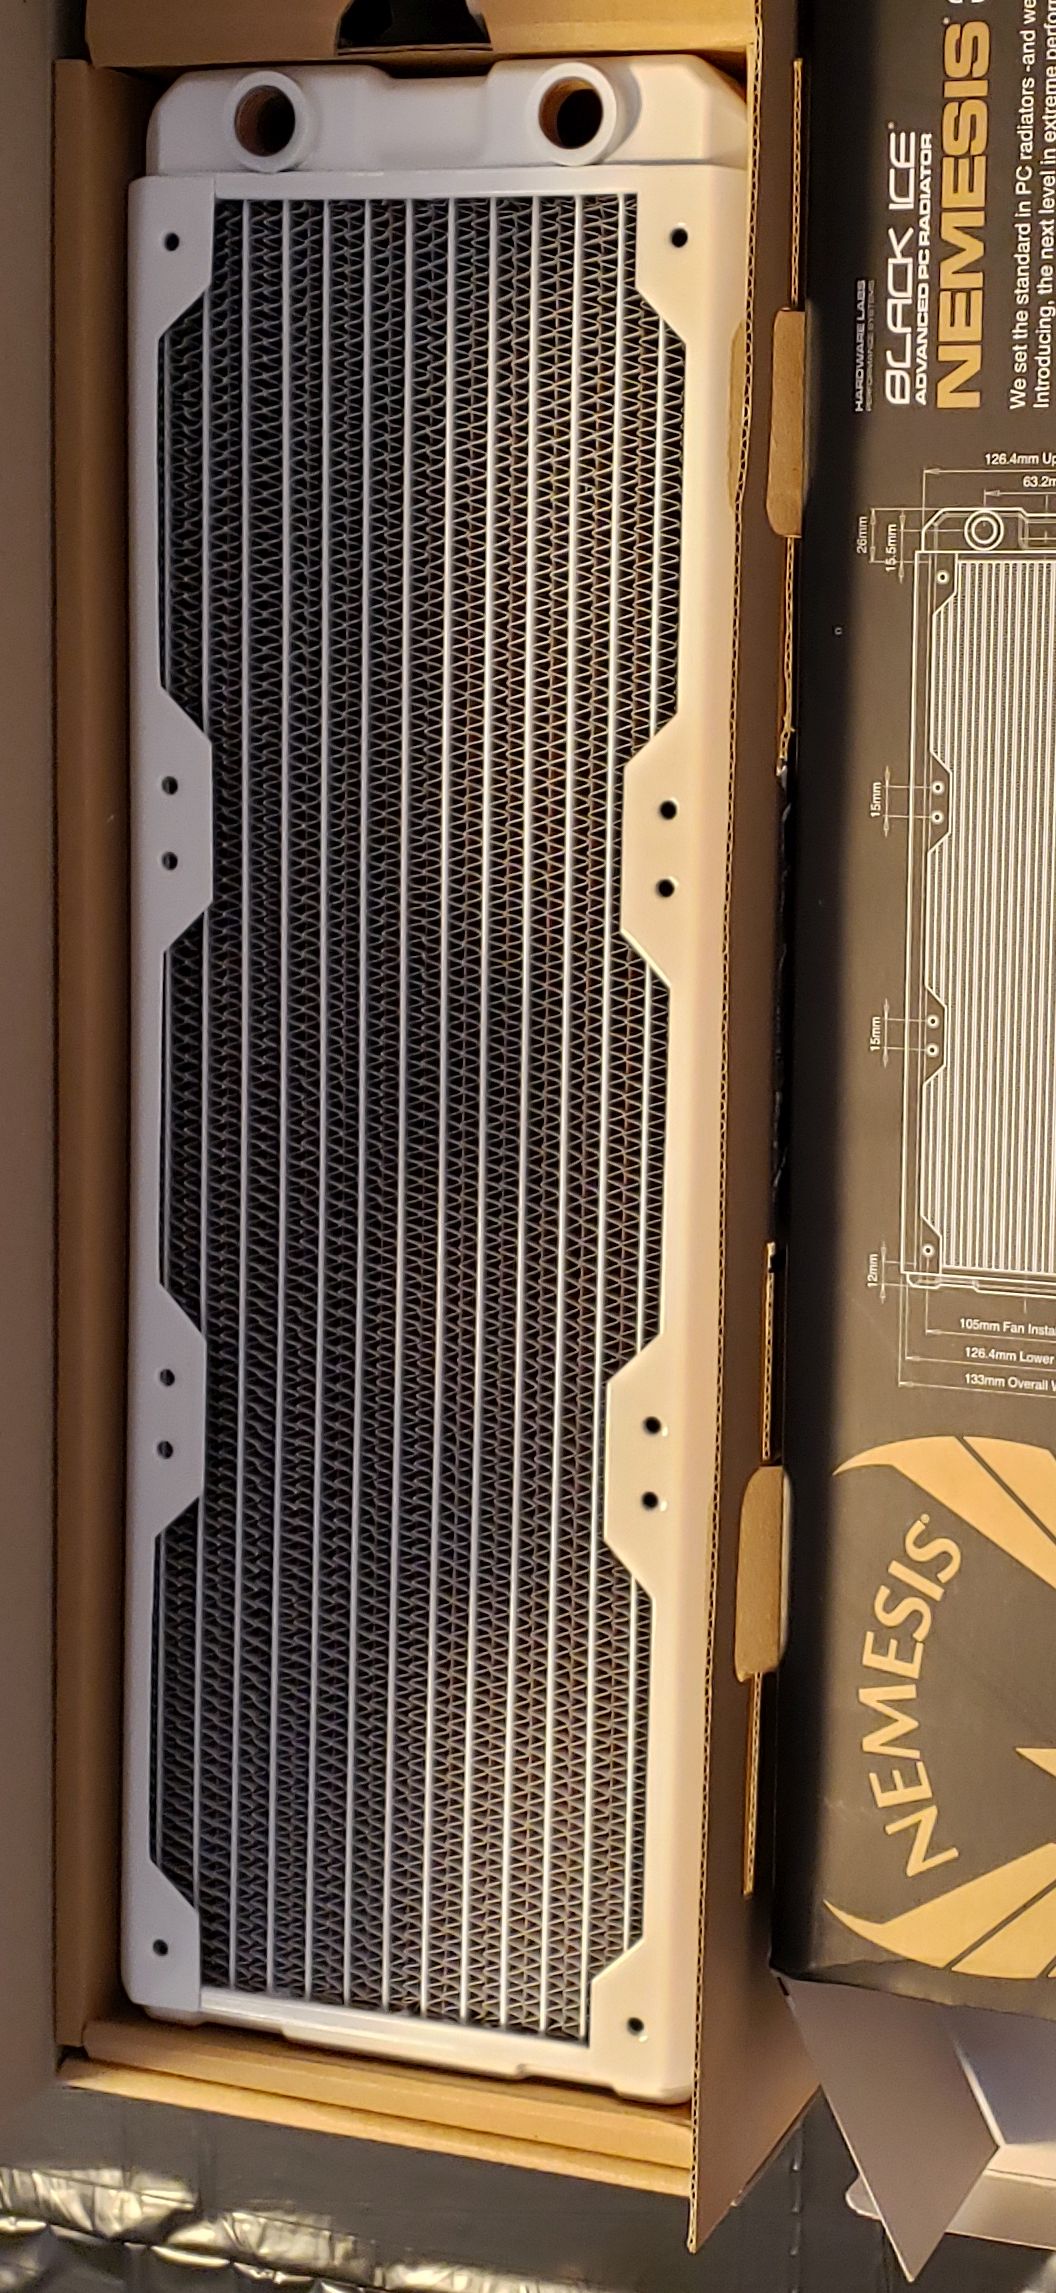
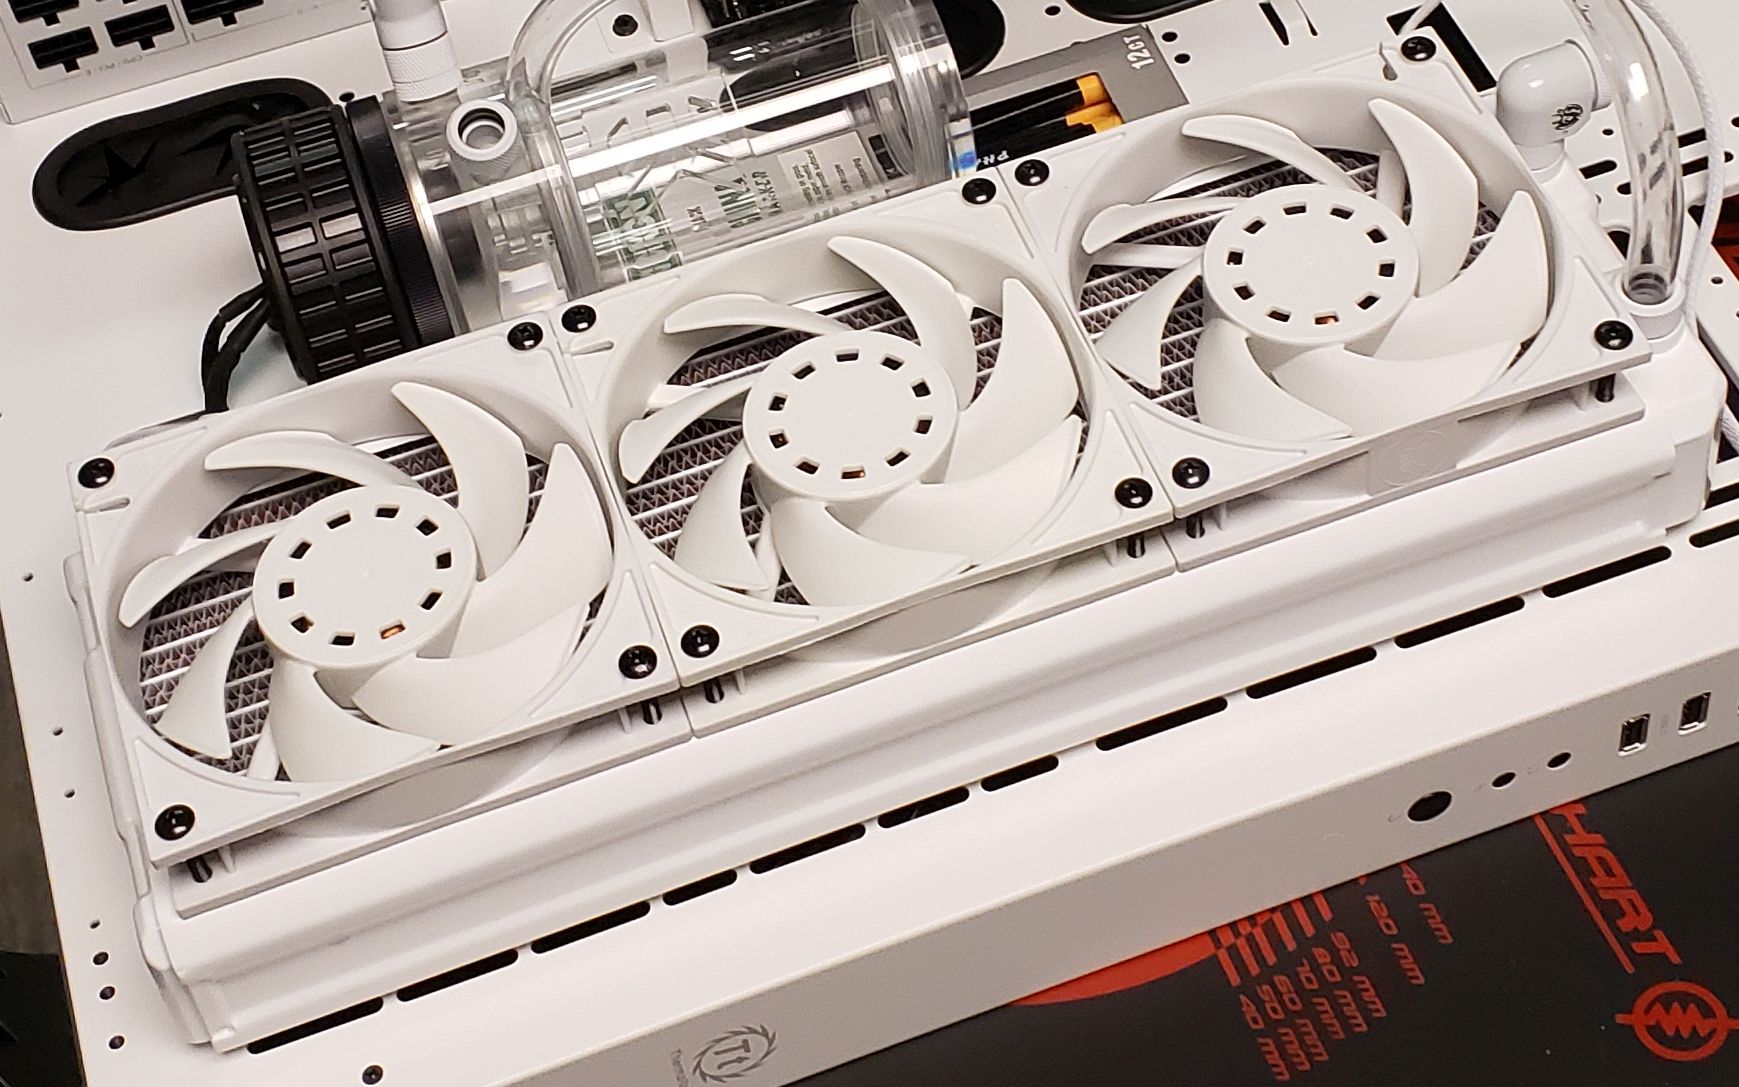
On top of those factors and the constraint that I wanted the radiator to be all white, the choices narrowed considerably, but I went with the Hardware Labs Black Ice Nemesis 360GTX Dual-Core Xtreme Profile Radiator (White). (They seem to have discontinued the white model.) Hardware Labs rates it at 1800W of capacity, which was way overkill for my system. Hardware Labs claims it would be able to support a quad GPU configuration. Even the core of the radiator is white. Often, only the outer reservoir is white, and the core (where the fins are) is black. So, while it is only a 360mm tall radiator, it is 54mm thick and has a high fin density (16 fins per inch [FPI] with 25-micron copper fins); it acts like a much bigger radiator if the fans used with it are efficient enough. This radiator can be used in a push-pull configuration, where fans are mounted on both sides, pushing air into (on the intake side) and pulling air away from (on the output side) the radiator. I decided to start with just a set of push fans and see if the system needed more air movement when under load. (Spoiler alert: It didn't.)
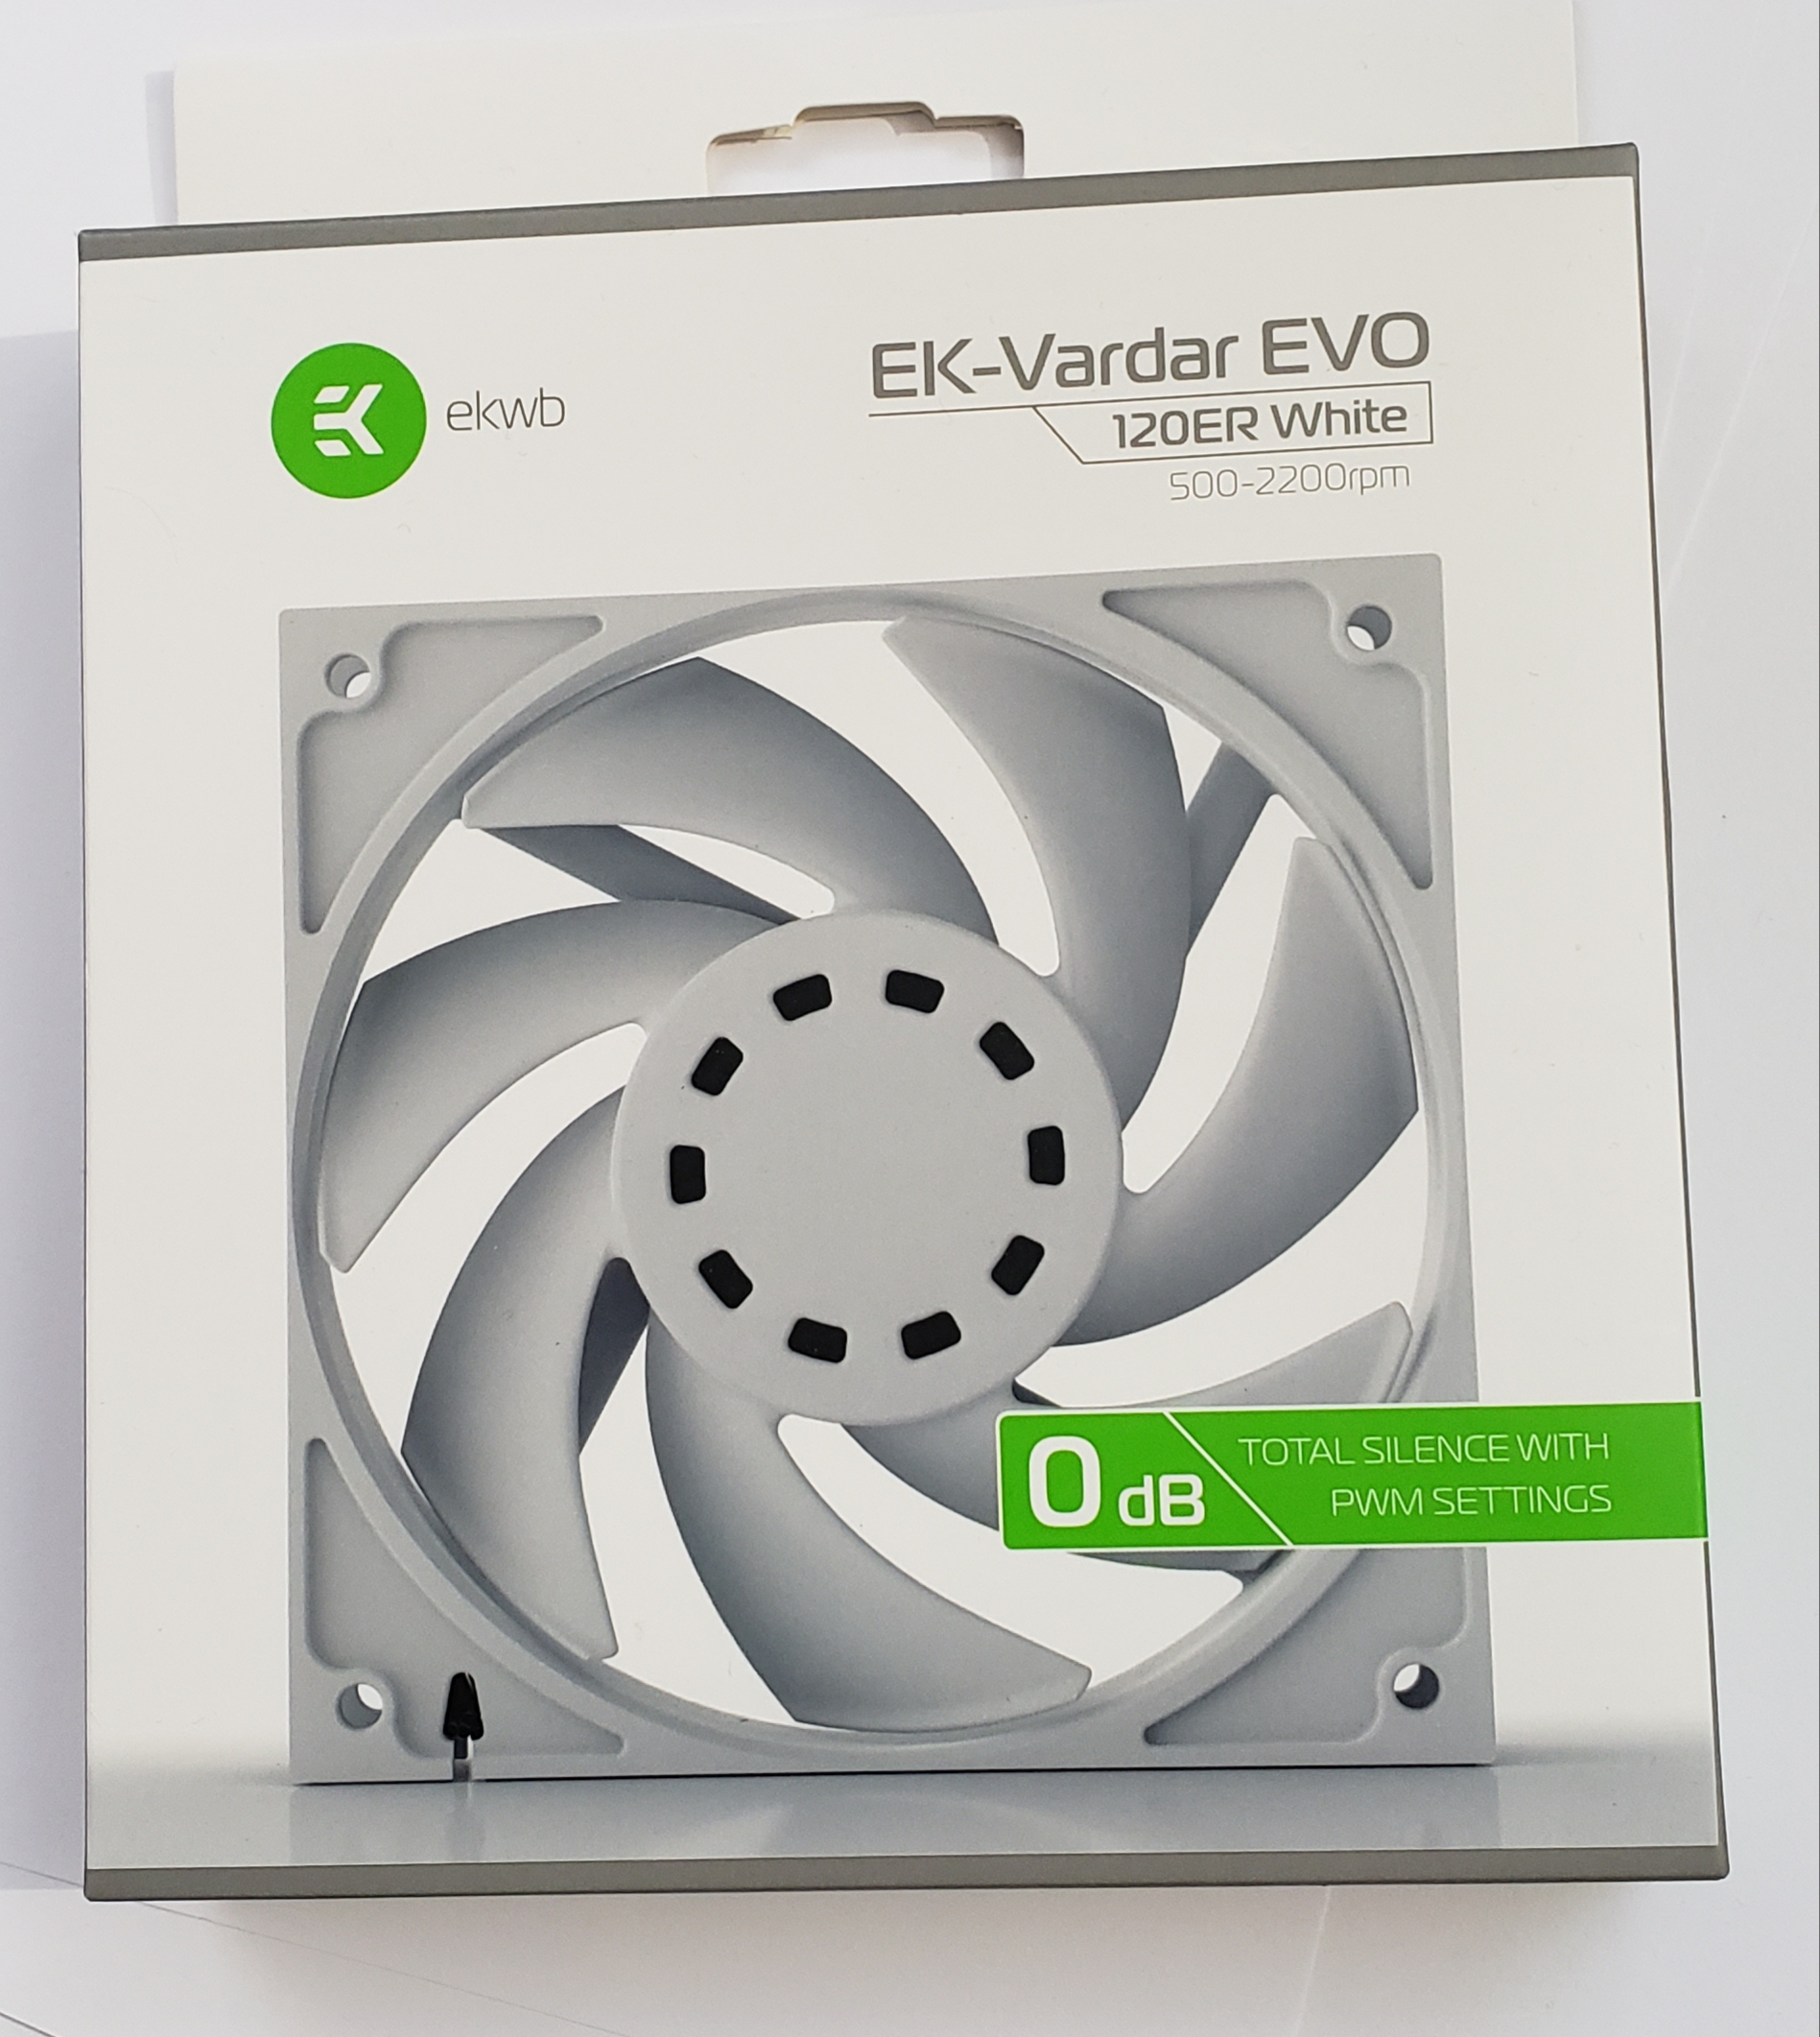
The fans that I paired with the radiator were three of EKWB's EK-Vardar EVO 120ER White BB high-static pressure fans specifically designed for radiators. These matched the white radiator and were not excessively expensive at $20 each. That's a bit more than I usually pay for fans, but these are very task-specific. Unlike most fans currently for sale, these fans have no RBG, and that's what I wanted. I don't hate or love RGB, but I wanted the RGB for this build to be subtle. One of the features of these fans that I like is that when they are set below a certain threshold for temperature, they turn off. When the computer is idle or doing light work (like editing a web page, for example), the fans will stop for a while.
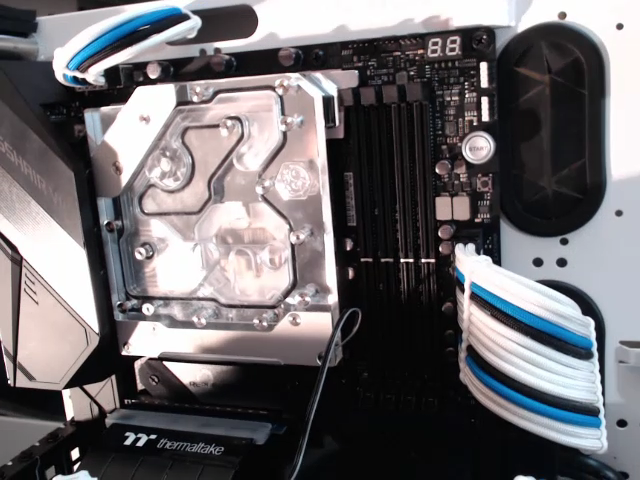
For the CPU waterblock, I originally went with the XSPC Raystorm Neo AM4 Black Chrome. However, I switched to the Bitspower Crosshair Hero VII Mono Block, which also cools the VRM. This block has a flow indicator (though it doesn't include a sensor to monitor the flow indicator's speed). It also comes with RGB lighting (which is set to white to keep with the theme). I had to remove the VRM heatsinks and apply new thermal tape.
I agonized for quite a while over the brand of fittings to get. I finally settled on the Bitspower brand based on reviews (of them not leaking) and the fact they have a bazillion different fittings (even in white). I wasn't sure what corner I might back myself into when running the tubing, but I was pretty sure that Bitspower would have a fitting that would let me buy my way out of it. I didn't expect my first attempt at guessing what fittings I would need to be perfect. It wasn't. It took me three orders to get everything right. The last order was mostly extenders of various sizes to get the tubing to line up nicely.
I didn't mention the water block on the GPU, but there's not much to say. EVGA ships it already mounted and ready to go. They even include some very nice black plugs. In the end, it all came together to look quite nice, in my opinion. I wondered if the manufacturers of the various components have some common specifications for what "white" means. I have parts from several manufacturers, and there are a lot of shades of white, but the various parts match up well.
My speakers are the same ancient speakers I've had since 1999. They are the Klipsch 4.1 Promedia surround sound speakers. I very nearly bought another speaker system because both subwoofer speakers had just rotted out with age. Someone clued me in that Klipsch sells replacement parts, and I took advantage of that. It's still going, and the repair mentioned above sounds great. I paid $400 for these (as part of a system from Falcon Northwest - the only gaming system I ever bought instead of made myself). The replacement speakers were something like $60. They can put out more than the volume needed to enjoy any game, video, or audio. The volume knob is starting to go, but I'll hold onto these as long as possible. I'd buy another set of these exact speakers, but Klipsch stopped making the four-speaker (4.1) version years ago. They still have the Klipsch 2.1 Promedia two-speaker plus subwoofer version for sale.
I've had more headsets than I care to recall. My current one is the Kingston HyperX Cloud Gaming Headset (KHX-H3CLW) - the white and black ones. They weren't super cheap at $70 (on sale) from Amazon, but they sound better than headsets for which I paid more. They are comfortable for hours, too. That's what the "cloud" part is. It's like putting a comfy cloud over my ears. At least, they stay on my head without putting it into a vise. The mic is detachable; I leave it off when I don't need it. The mic is the only part of these I'm less than thrilled with. To others, it sounds "OK," but not great. I've started using a separate microphone instead. These headphones come with every connection option I've ever seen. I can connect these to every device in my house (and my phone in my pocket) using one of the included adapters. They even have an airplane adapter (and come with a carrying pouch). I still recommend these.
I still use an ergonomic keyboard as my daily driver, as I have for the last 20 years. The Microsoft Natural Pro came out in 1999, and to this day, I think it is the best affordable ergonomic keyboard ever made. When I found out they were discontinuing them, I bought five. Unfortunately, gaming is hard on keyboards, and the WASD and left control (CTRL) keys eventually gave out on all. It took years to go through my stash, but I eventually did. For the next several years, I used the Microsoft Ergonomic Keyboard 4000. The 4000 has an issue in that the keycaps wear off completely in a very short time. I am primarily a touch typist, but sometimes, I need to look at the keys. The one thing both of these keyboards lack, and I would like to see, is some form of backlighting.
I finally broke down and bought a mechanical ergonomic gaming keyboard, the Kinesis Gaming Freestyle Edge RGB with Cherry MX Brown switches. It's a split keyboard, and I found I like it with the two halves about 5" apart at the top and maybe 7-8" apart at the bottom. (I have the two halves at roughly the same angles as a fully ergonomic keyboard, but further apart and at less of an angle. The keyboard doesn't have a numeric keypad, so I bought a Rottay 22-key Numpad. I put it in the middle between the two halves of the Kinesis keyboard. I took a bit of getting used to it, but I now like it. I seem to be able to type more quickly and accurately (except I seem to hit caps lock a lot).
For my mouse, I am using the Logitech G602 wireless gaming mouse, which has been replaced with the Logitech G604 wireless gaming mouse. I preferred the wired Logitech G502 Proteus because it had adjustable weights (a feature they removed). Now, Logitech has the G502 Hero, which does have a weight system. That may be my next mouse after I kill this one. (It's holding up well, though.)
I'm currently using two monitors mounted on a dual-screen support arm. One is the monitor I've had for quite a while now - the Dell U2713HM 27" Widescreen IPS Monitor that I bought from B&H Photo Video for $518 in December 2014. It is 2560 x 1440 pixels but only has a 60 Hz refresh rate, which constrained even the GTX 1080 I had in my previous system. That's now my secondary monitor.
My primary monitor is the Acer Predator XB271HU bmiprz 144Hz 2560 x 1440. I also got that from B&H Photo Video but had to pay a whole dollar more at $519. I purchased it as a black Friday special in November 2018, but because of the really good price, it was back-ordered, and I didn't receive it until the end of Jan 2019. The monitor can be "overclocked" to 165Hz, but other than to ensure it works at that rate, I leave it at the default 144Hz. I can tell the difference between games on a 60Hz and 144Hz display, but I doubt I could discern any differences between 144Hz and 165Hz. This monitor also has Nvidia G-Sync built-in, which pairs with the RTX 2080 Super to eliminate screen tearing at lower refresh rates.
Radiators, radiate - OK. This should be obvious, but until I had the system up and running in my office (10 1/2 ft x 13 ft) for a while, I didn't realize how much heat this radiator would pump into the room. The components stay at or below the mid 50°C range even after hours of gameplay, but my office temps rise about 1°C per hour. Eventually, the room reaches saturation, and both the system and the room would start rising in temperature. My takeaway from this is if your water-cooled system is going into a small room, ensure you have a good way to cool the room.
Water-cooled systems are extremely quiet - I expected the water-cooled system to be quiet at idle compared to an air-cooled system. I didn't expect it to be virtually silent. When the system isn't playing games that load the CPU and GPU, the PSU fan shuts off, and the radiator fans run (slowly and) intermittently as needed. I added a case fan to blow air over the motherboard VRM section, but even that runs slowly when the VRM is cool. Even under heavy load, the radiator fan noise is negligible, and the case fan is slightly noticeable. I'm not exactly comparing apples to apples against my previous system, as those were just higher air-flow, higher-speed fans.
Water-cooled systems are expensive - I had initially budgeted about $700 for the water-cooling parts: radiator, pump, fans, CPU water block, GPU water block, tubing, fittings, and chemicals. (However, my GPU came with a water block, which added to the cost of the GPU but eliminated the separate cost for the water block.) In total, it turned out to be about $1000. This is a simple open-loop solution. It is a single pump/reservoir combo with one loop from the radiator to the pump, from the GPU to the CPU, and back to the radiator. The drain valve and fittings for that added $30-40, and the extensions and other fittings to make everything line up cost another $50-60. Out of fear of dealing with leaks, I went with a more expensive pump, radiator, and fittings than I could have gotten, but I didn't have leaks and never had any during the build.
After two years with this system, I have to say I'm very happy with it. I'm almost to the point where I would consider a new GPU - if there were GPUs to be found. EVGA has announced new 3080, 3080 Ti, and 3090 Hydro Copper GPUs, but at this time, I can't even get on a waitlist for any one of those. I've added a second case fan, changed out the CPU water block for one that also cools the VRM section, and added a small LED screen that I use with AIDA64 to display statistics and dials. I've also changed the coolant a few times - about every 9 months. Other than that, it's been a reliable workhorse of a system.
2017 (November) Build
2017 (November) Build
2017 (November) Computer Build
Since I tend to purchase partial upgrades over time, I'll put down the dates that I bought each component as well as the price I paid at that time. As time goes on, those prices tend to drop, so you could probably pick up the exact rig I have for less than what's listed below or create a better one for the same amount. That's just the way it is with computers. Last July I pretty much did do a full upgrade including a new motherboard, CPU, GPU, memory, and CPU cooler. I wanted a rig that was guaranteed to handle any VR headset (which I still don't own). That meant a new GPU in the form of a GTX 1080 (though the GTX 980 I had probably could have done the job). But then, my CPU just hit four years old, so it was due for an upgrade, which meant a new motherboard, which meant new memory, which in turn meant a new CPU cooler. (Technically, I could have used the old cooler, but that CPU, motherboard, memory, and cooler went to a new home.)
I upgraded from an Intel Core i7 3770K to an Intel Core i7 6700K. I also opted for all-in-one water cooling, so I overclocked the CPU from 4.0GHz to 4.5GHz. I know I don't "need" the i7's extra threads for gaming versus the Core i5 6600K, but I wanted them anyway. (Not everything I do is gaming.) I also don't "need" the extra speed for the games I have, but the AIO water cooling keeps the CPU at such a low temperature that I feel comfortable leaving it there.

I bought this CPU at Micro Center in July of 2016 for $310, whereas I bought the 3770K in July of 2012 for $290. (With the introduction of the 6800K, the price of the 6700K has dropped to $260 as of November 2016.) In the past, I'd be looking for a new CPU way before a four-year run, but I didn't have any issues running the latest games. However, I knew it was going to be a bottleneck with the new GPU. The Intel 6700K uses an LGA 1151 socket as opposed to the 3770K's an LGA 1155 socket, so that meant I needed a new motherboard, too. As for the last two or so CPU upgrades I have purchased, I got them at my local Micro Center. The CPU was about $50 cheaper than Newegg or Amazon. The catch is that it is in-store only. Luckily, my nearest store is about 20 minutes from where I work. To sweeten up the deal a bit, they had (and almost always have) an additional $30-40 off when purchasing a motherboard combo.
About seven years ago, I chose a dual-core processor with a faster clock speed over a quad-core processor because games at the time did not make good use of the extra cores. I attended an online seminar where I got confirmation of that from an Intel person that I'll paraphrase here:
"At the Intel Core i7 and Corei5 Launch webcast that Newegg and Intel hosted, I asked the following question: Are game developers starting to take advantage of the dual and quad-core processors? A manager on the Intel extreme motherboard team said that she was a gamer, too, but she was not seeing the developers make use of the multiple cores/threads yet."
Times have changed. Now, some games perform poorly on CPUs with two or fewer cores because they are dependent on the hyperthreading capability to maintain high frame rates. Coupled with things like Intel's Turbo Boost, having at least four cores is probably the sweet spot at the moment. Going beyond a quad-core is probably still overkill, but there are games out now using up to eight cores (and a couple using more). DirectX12 itself encourages the use of more cores, too (up to about eight, where it currently seems to drop off a bit). There are articles from time to time that talk about PC game performance, but a good site that appears to measure a good number of games in a consistent manner is the Dark Side of Gaming: PC Performance Analysis section. They don't cover all new games for sure, but they hit many of them and games that span a number of gaming engines. They tend to avoid games that are anticipated to run well on just about any modern system.
I decided to try an all-in-one (AIO) CPU water cooler. I could have gotten a Cooler Master Hyper 212 EVO, but I planned to overclock the CPU from day one. Because my case wasn't made to support a dual-fan radiator (in fact, water cooling at all was rare when I got this case), I went with a single-fan Corsair Hydro Series H60.
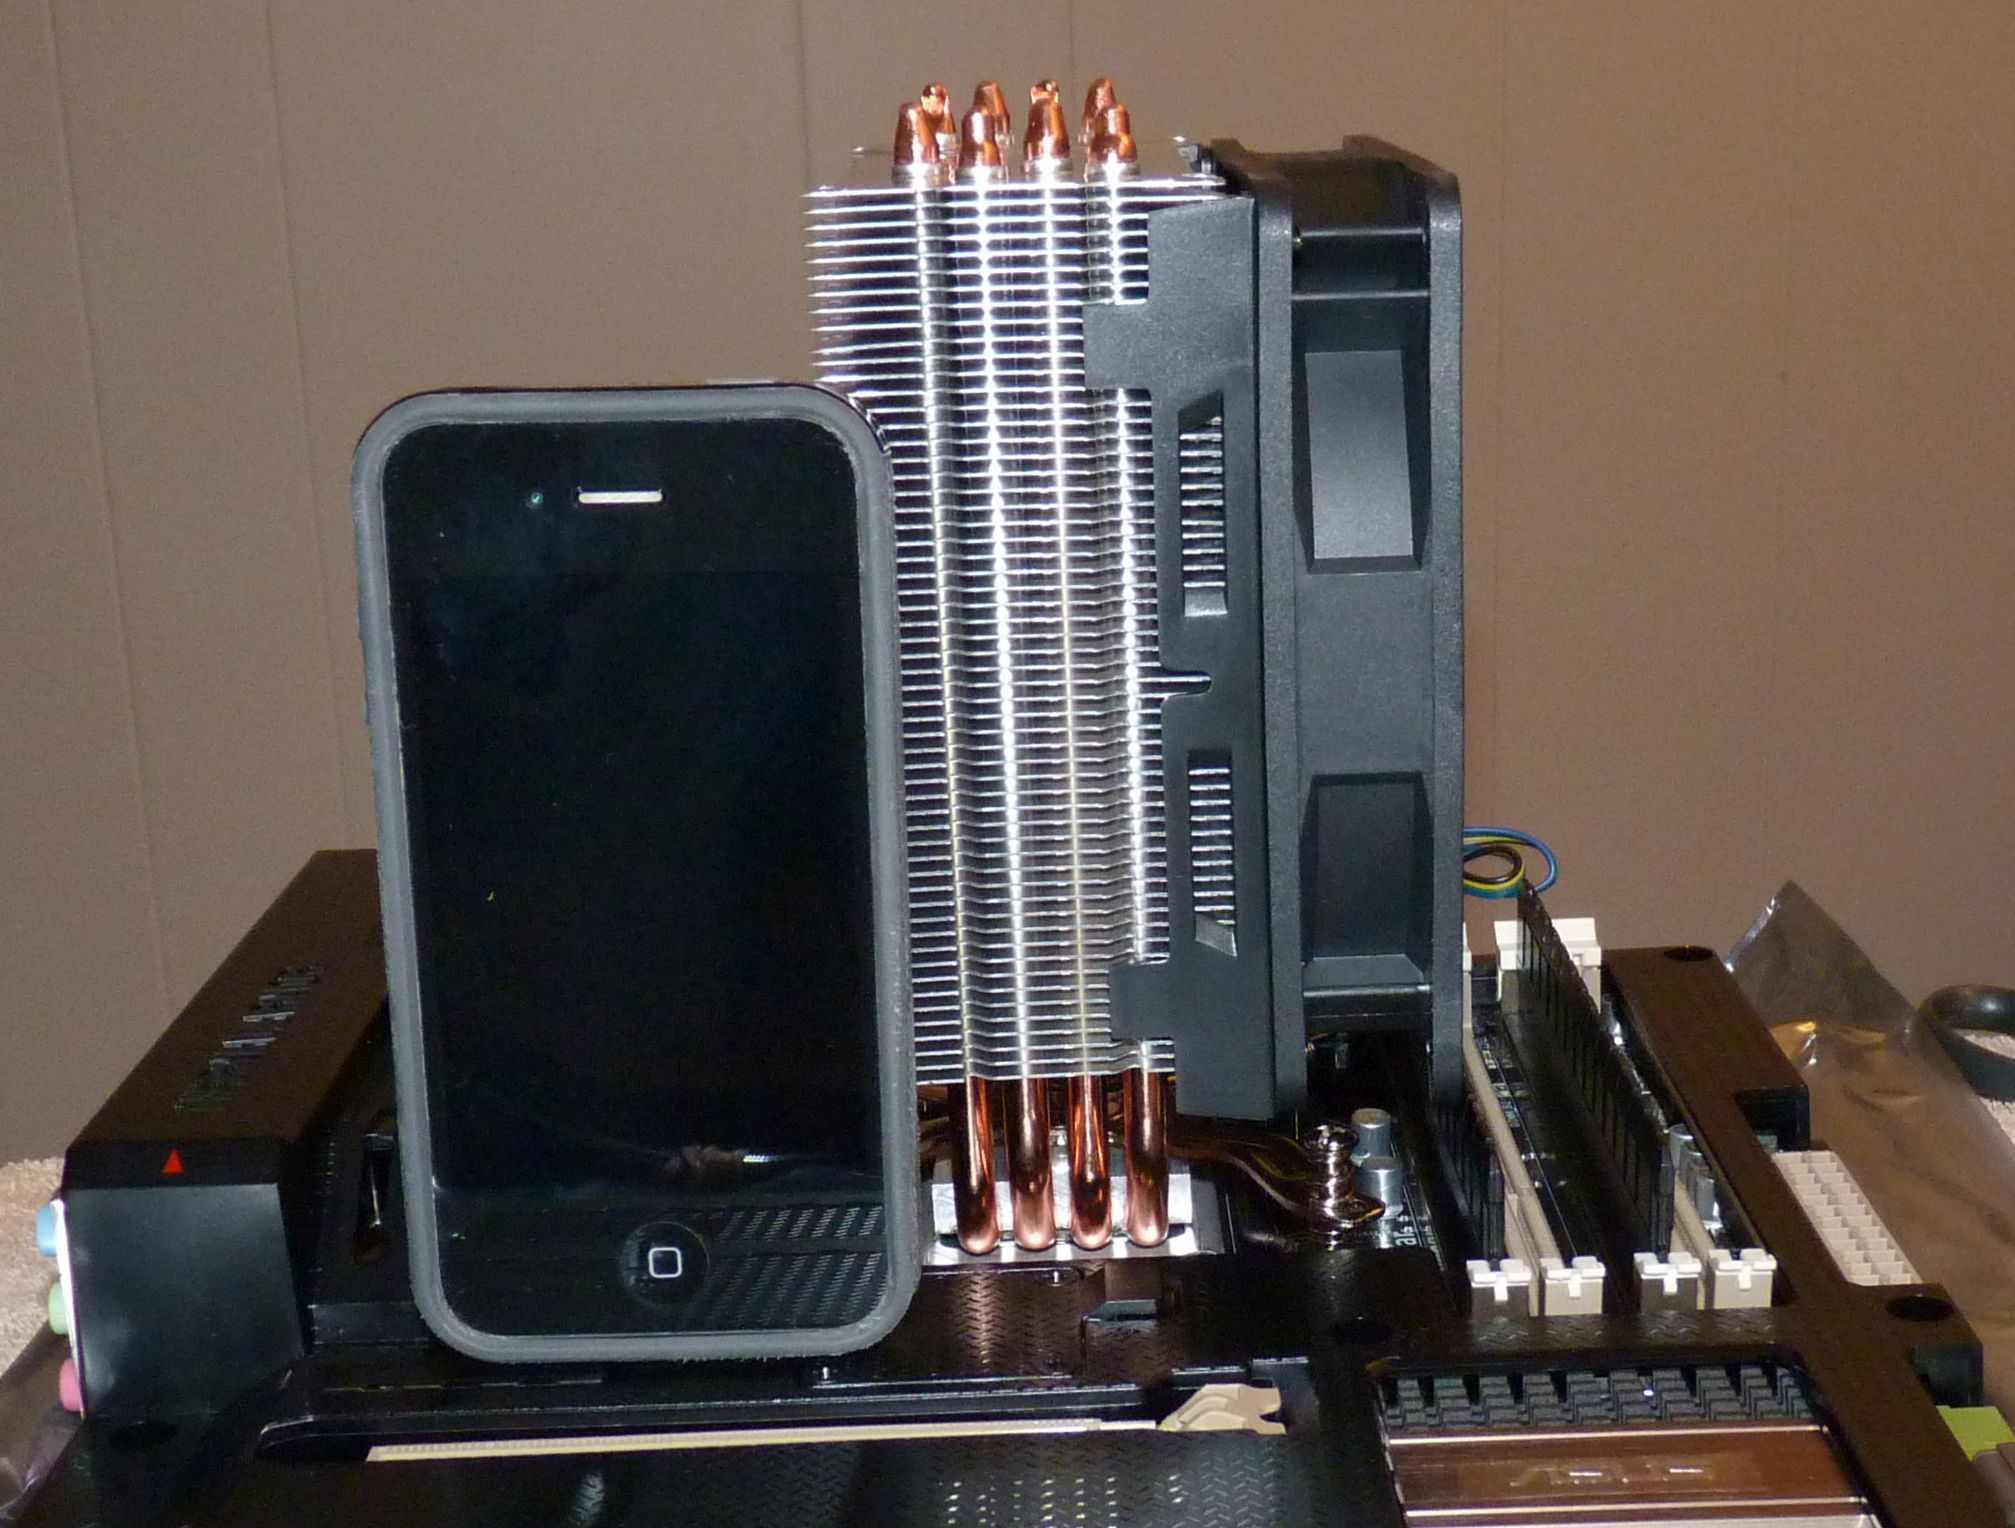
Compared to the heft of the Hyper 212 Plus it replaced, the H60 is downright diminutive. The picture on the left above is the H60, and the one on the right is the Hyper 212 Plus (shown with an iPhone 4 as a size reference). I didn't realize just how much space the 212 took. I'm sure the H60 helps airflow as well as being a better overall CPU cooler. One difference when building this system is that I put the CPU, cooler, and memory on the motherboard before installing it into the case. With the radiator/fan assembly of the H60, that's not practical. So I installed the H60's backplate before putting the motherboard in the case and installed the cooler (technically, the "cold plate") and radiator/fan afterward. I also removed the existing rear 120mm case fan and used the H60's radiator/fan in its place.
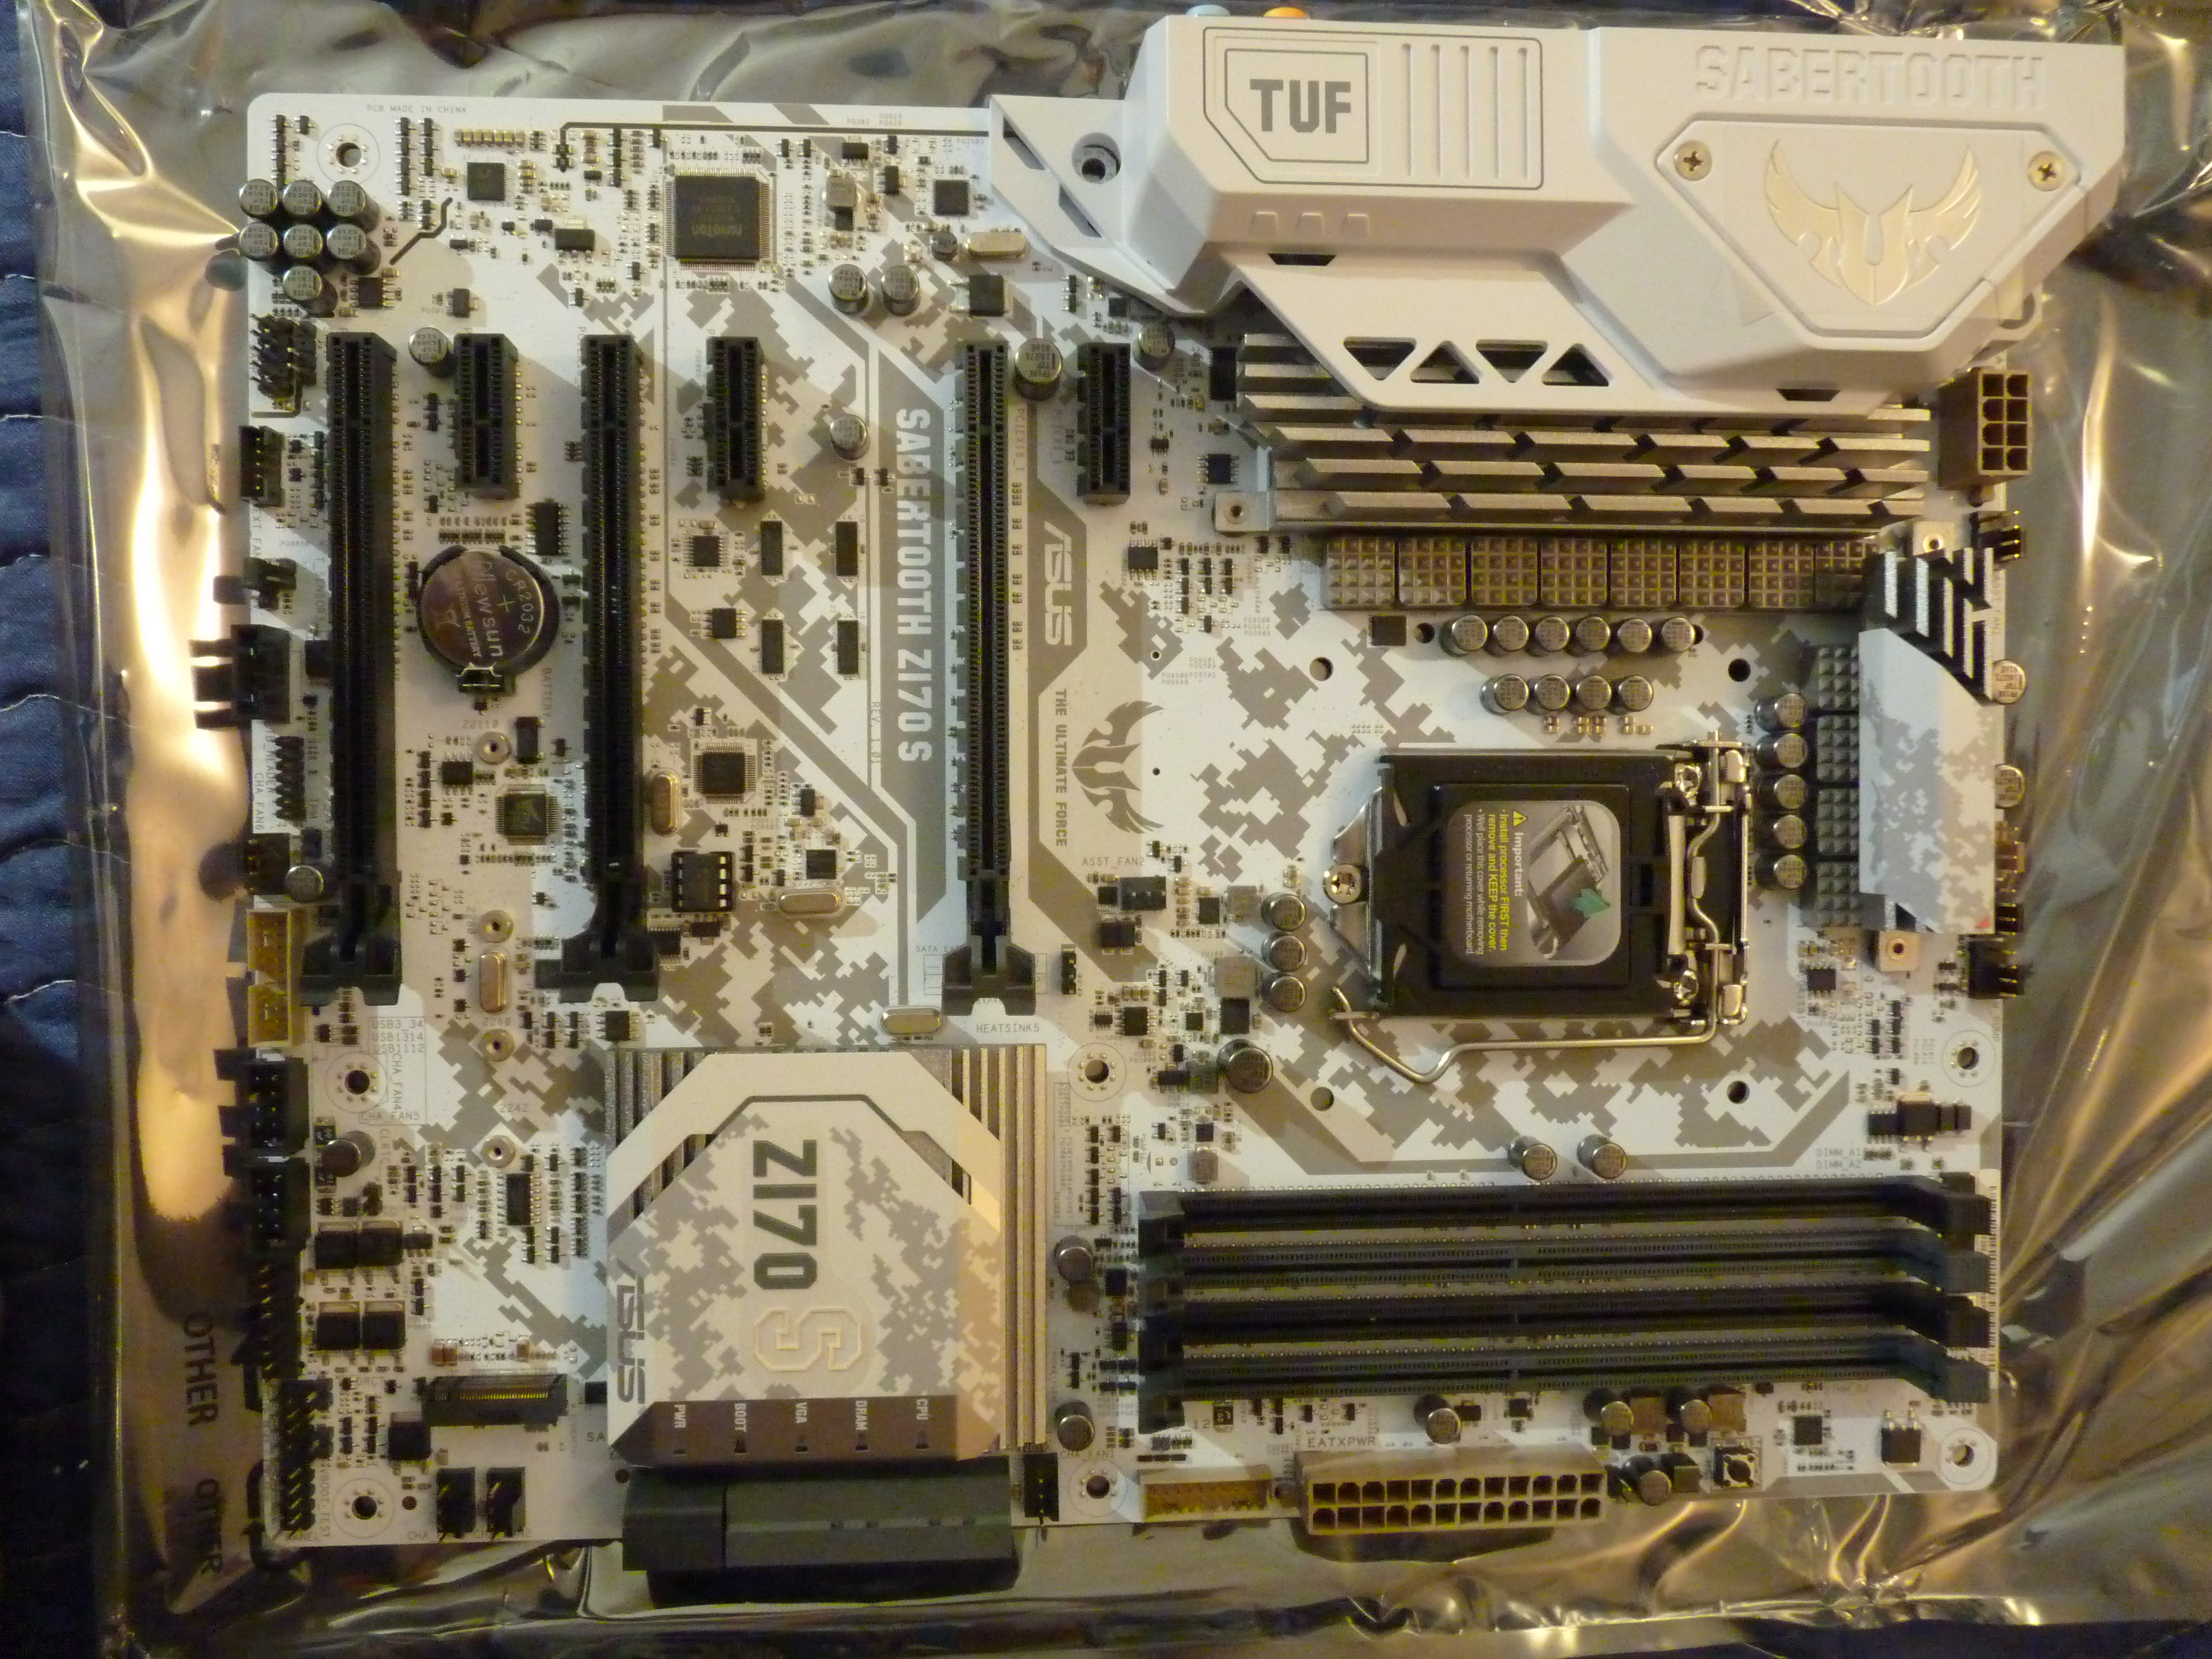
I'd been so happy with the Asus Sabertooth Z77 motherboard that I used with the 3770K that I went with the Asus TUF Sabertooth Z170S for this build. See the thumbnail below. It was purchased as a bundle with the CPU in July 2016 from Micro Center for $158, including a $30 bundle discount. (So it was regularly $188.) This motherboard has six SATA 6.0Gb/s and/or two SATA Express connections (that would overlay four of the six SATA connections if both were used), one M.2 socket (2242 through 22110 with PCIe mode), six USB 3.0 ports (two on the back and four motherboard headers), eight USB 2.0 ports (four on the back and four headers on the motherboard), a single USB 3.1 port, a decent audio chip with shielding and a separate layer (which I don't use). There are four DDR4 memory slots supporting up to 64GB of RAM and XMP profiles up to 3200MHz. There are two PCI Express 3.0 x16 slots for graphics or other expansion cards (of which I use one in x16 mode as opposed to two graphics cards in x8 mode) and one PCI Express x16 slot that supports up to x4 mode. Additionally, there are three PCI Express x1 slots.

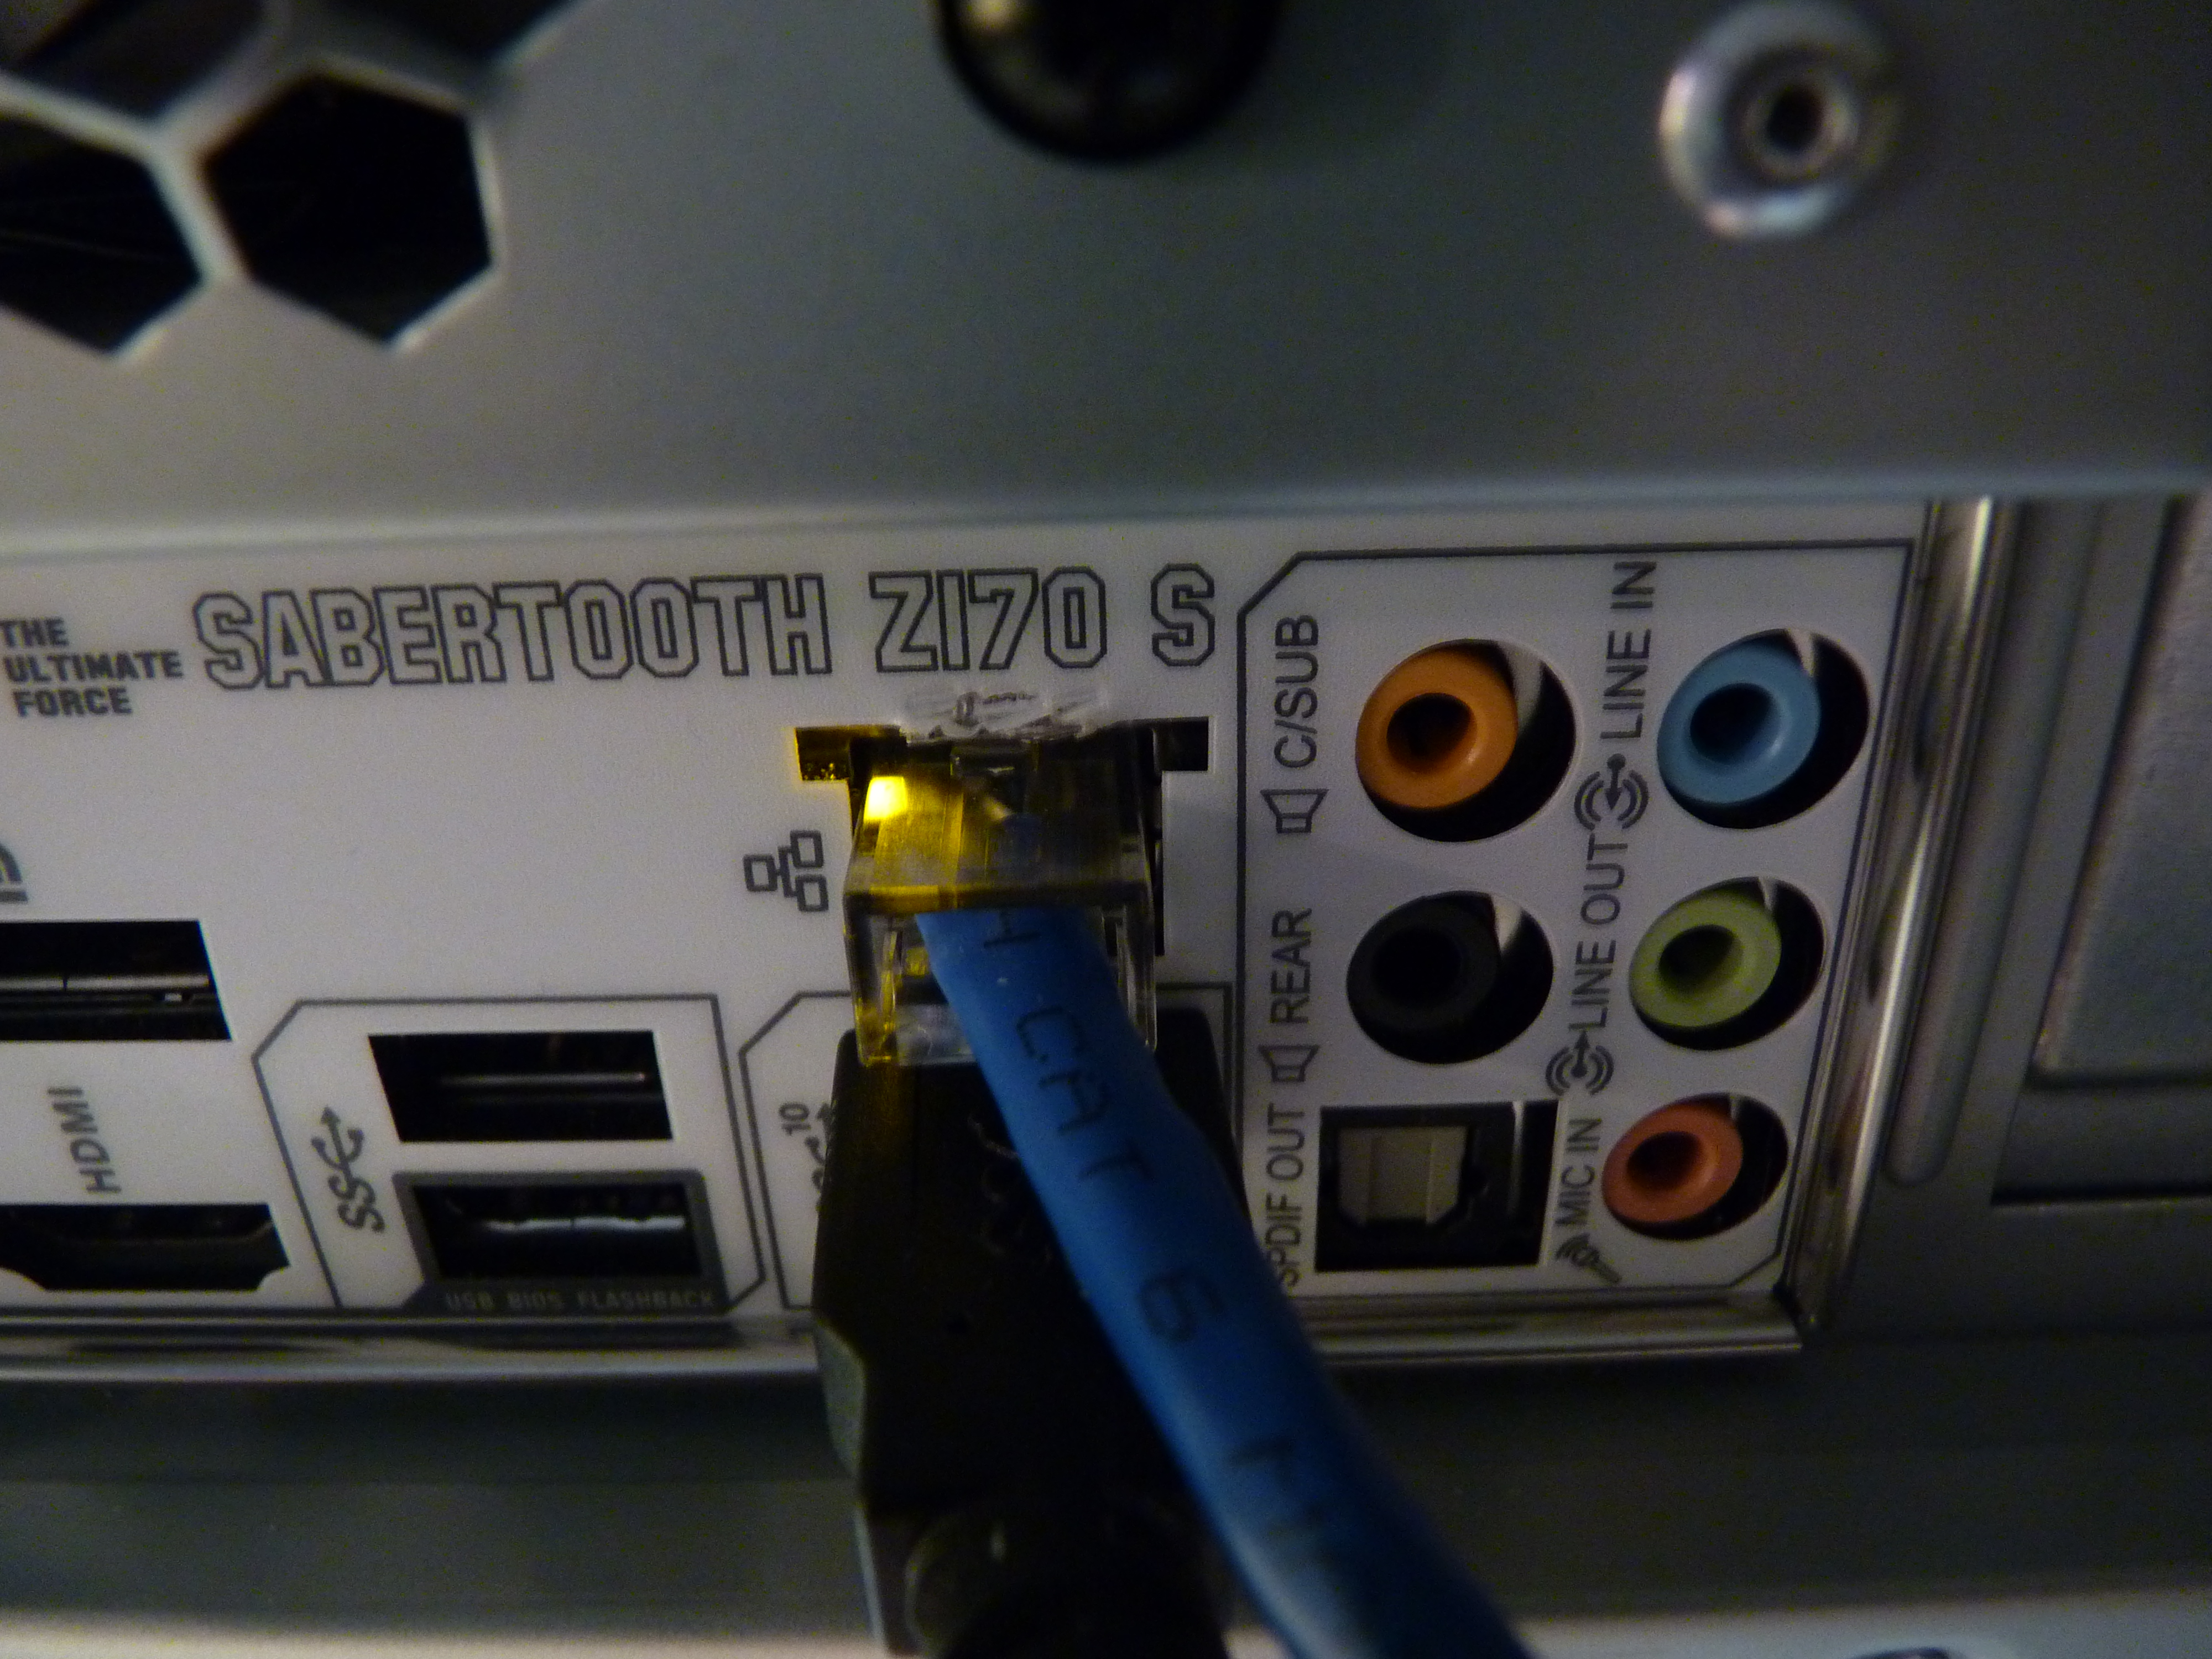
I had a few issues with the I/O shield during installation, which is a bit unusual. That's usually an innocuous part. First, remove the TUF LANGuard sticker over the Ethernet port before building (as shown in the second image above). I saw that sticker and realized it would be a PITA to get off after installing the motherboard. One potential issue was avoided.
It's not visible in the picture, but the I/O shield is backed with a thin foam layer covered with conductive foil. It's a nice alternative to the metal grounding "fingers" most I/O shields use (that can get stuck into various ports when the board is inserted). However, the lower-left corner of the foam got folded over when I inserted the motherboard - covering a couple of the USB 2.0 ports. I could have fixed that with a razor knife, but I ended up fixing it the "right way" by taking the motherboard partially back out and straightening out the foam. That added an hour to the build that wasn't necessary.
However, the I/O shield wasn't done being a pain. When I went to plug in my Ethernet cable, it wouldn't stay in. There's a tab in the shield that surrounds the Ethernet port that sticks up enough to depress the Ethernet cable's release tab. I have no idea what possessed the designer to put that tab there. I fixed the problem with an "end-user modification" involving needle-nose pliers. (See the third picture above.) The final picture in this series is the "as-built" view of the motherboard with all the parts installed.
This motherboard supports very fine-grained tuning for overclocking, and I intended to overclock from day one. The auto-overclock similar to earlier boards was still available, but I found manual overclocking to be more beneficial. I am running the CPU at 4.5GHz as opposed to the stock at 4.0GHz. I could probably get more, but this is stable and seems to be sufficient.
I had already recently splurged big time on a new GTX 980 graphics card. However, I wasn't convinced it would handle a VR headset (assuming I buy one shortly). I was lucky enough to snag an ASUS GeForce GTX 1080 8GB ROG STRIX OC Edition Graphic Card (STRIX-GTX1080-O8G-GAMING) in July 2016 for an outrageous (for me, anyway) $680 from Amazon. The supply chain isn't quite as constrained as it was when I got this one. I discovered (and credit) NowInStock.net for getting it then at all. I set it up to notify me when it was in stock, which it did. It was sold out by Amazon less than 10 minutes later.
One word of caution to others: this card is really, really big. In the first picture below, I laid the Asus GTX 1080 next to the EVGA GTX 980. It's probably an inch and a half longer than the 980. The precise dimensions at Asus are 11.73" long x 5.28" high x 1.57" thick. In the second picture, you might be able to see that to get this card to fit, and I had to move the drive cages one notch farther out. It doesn't look bad, but it's the absolute maximum-size graphics card that I could get in this case. The third and fourth pictures show the front (cooler), and top views and the final image is of the video ports supplied by this card. Unlike other manufacturers, Asus has two HDMI 2.0 ports and two Display Port sockets (as opposed to one and three of the same, respectively). The two HDMI ports are to support VR headsets.
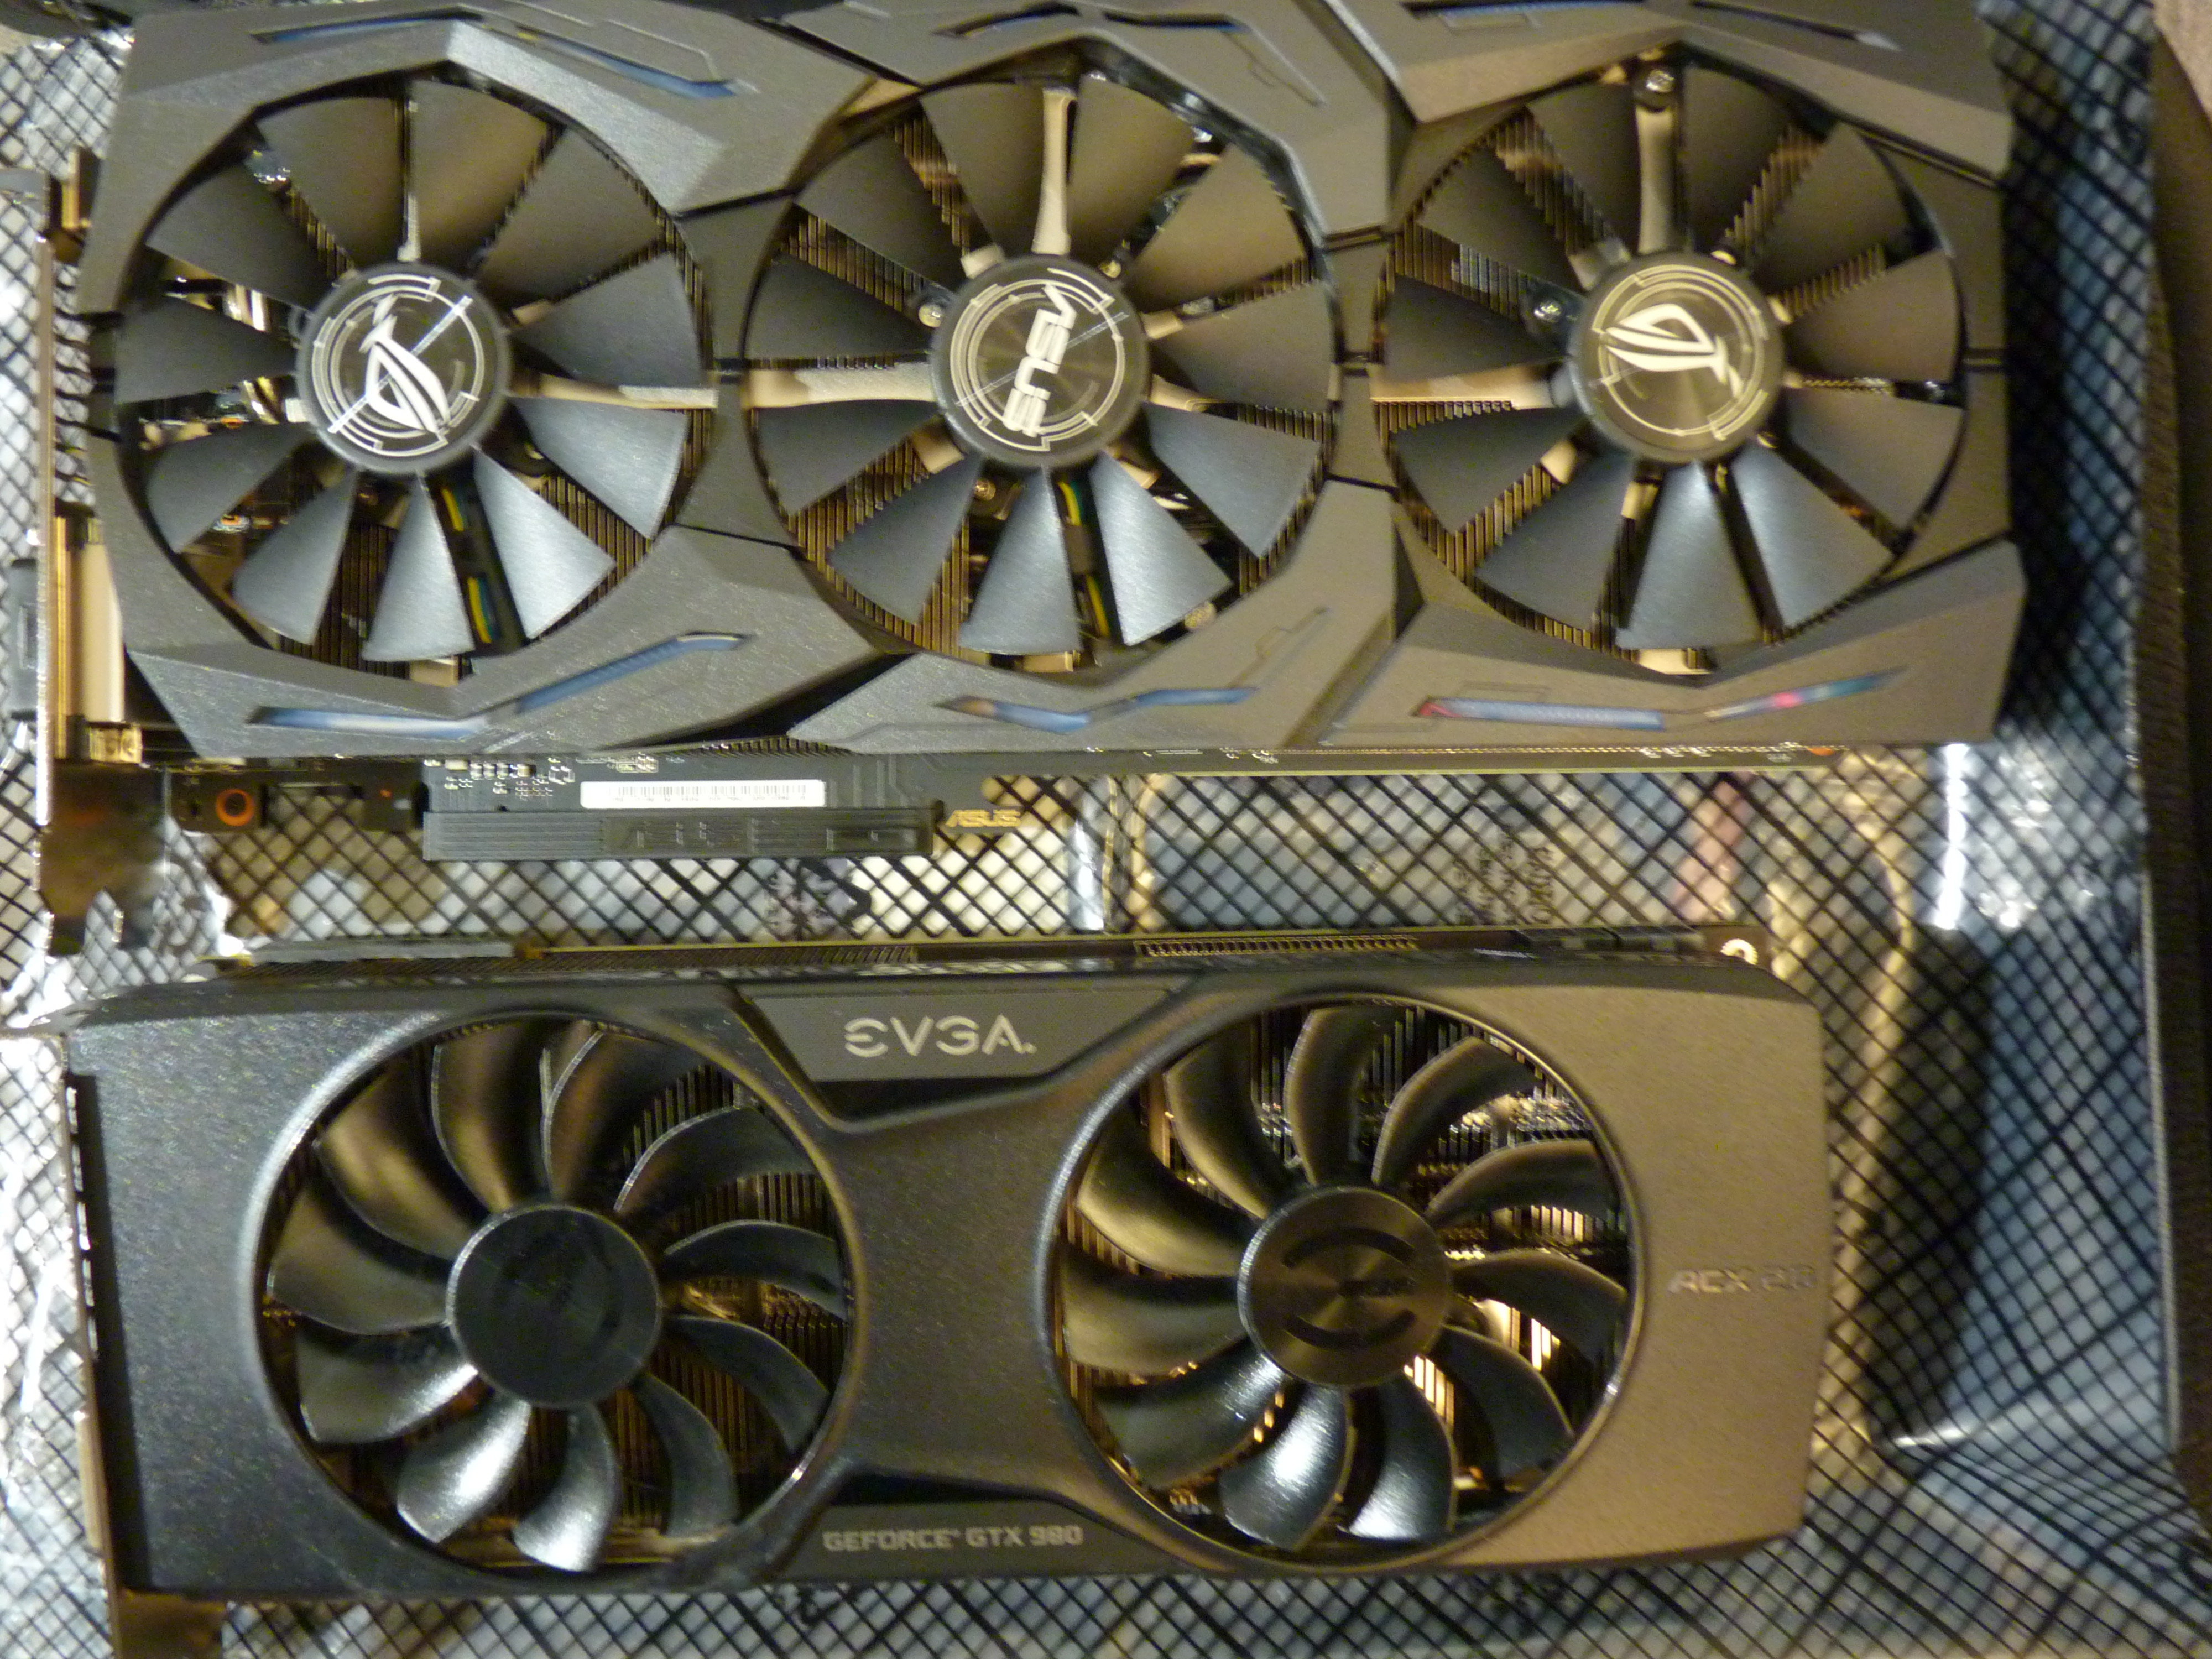
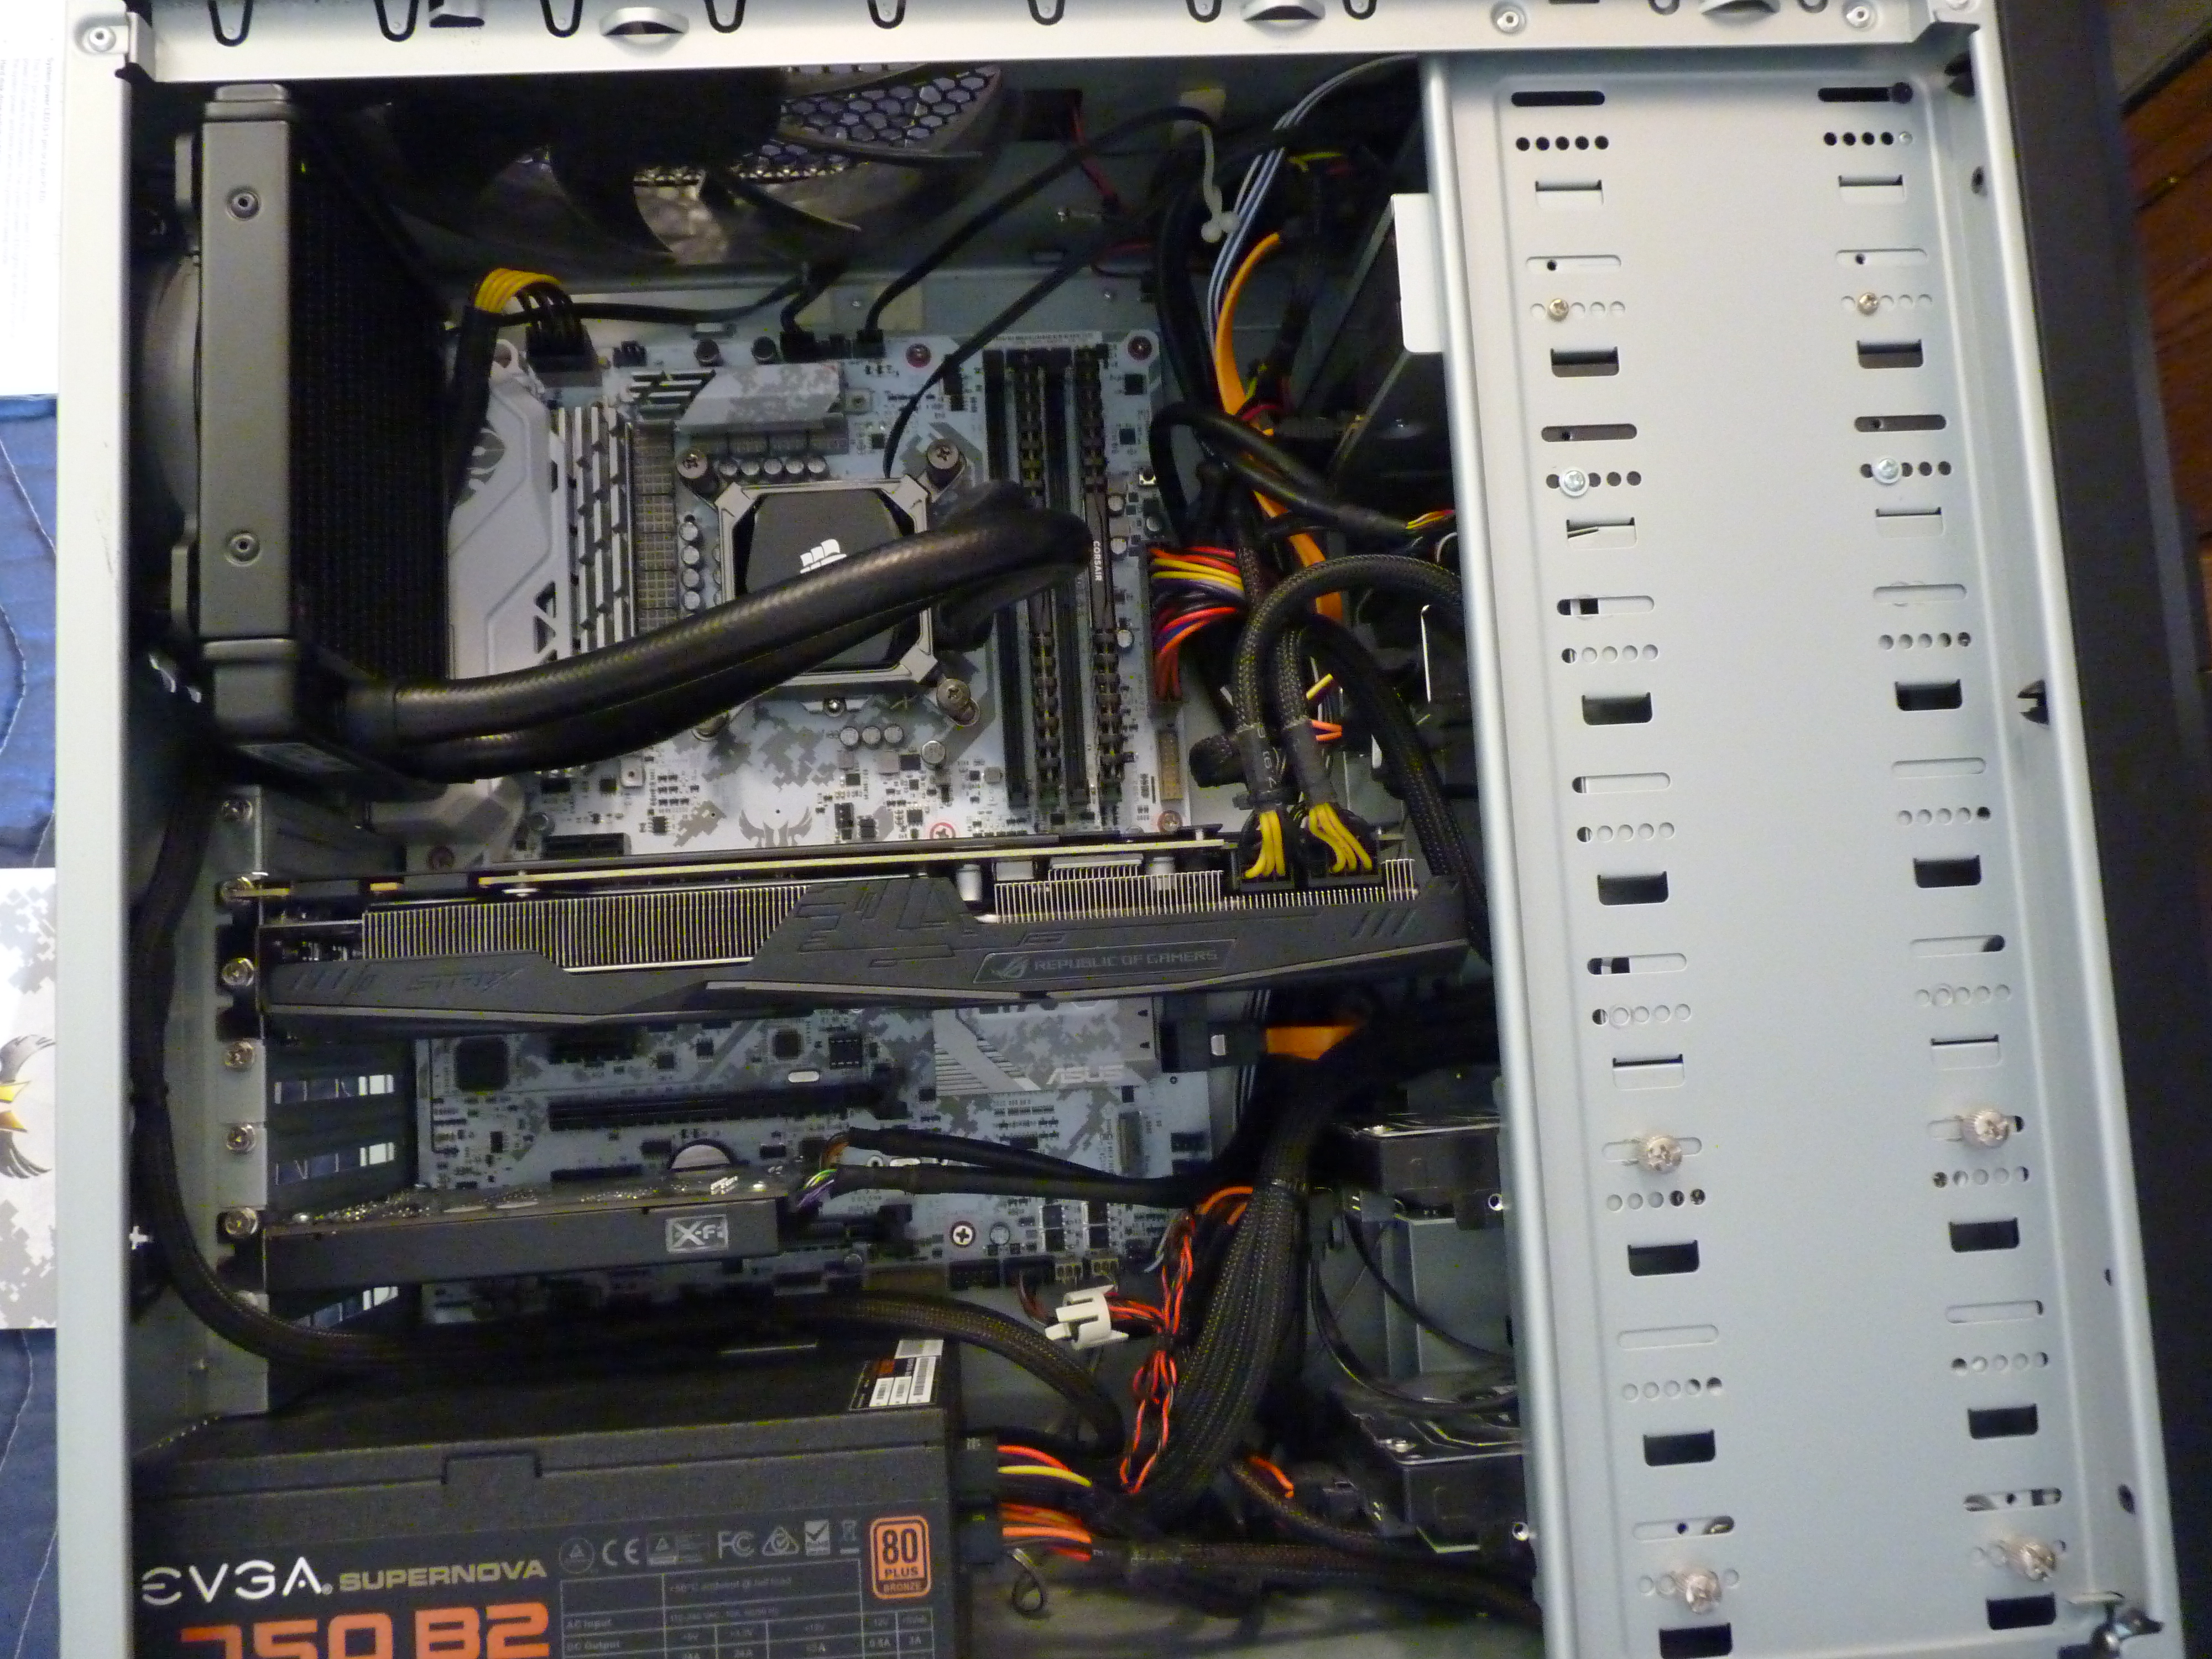
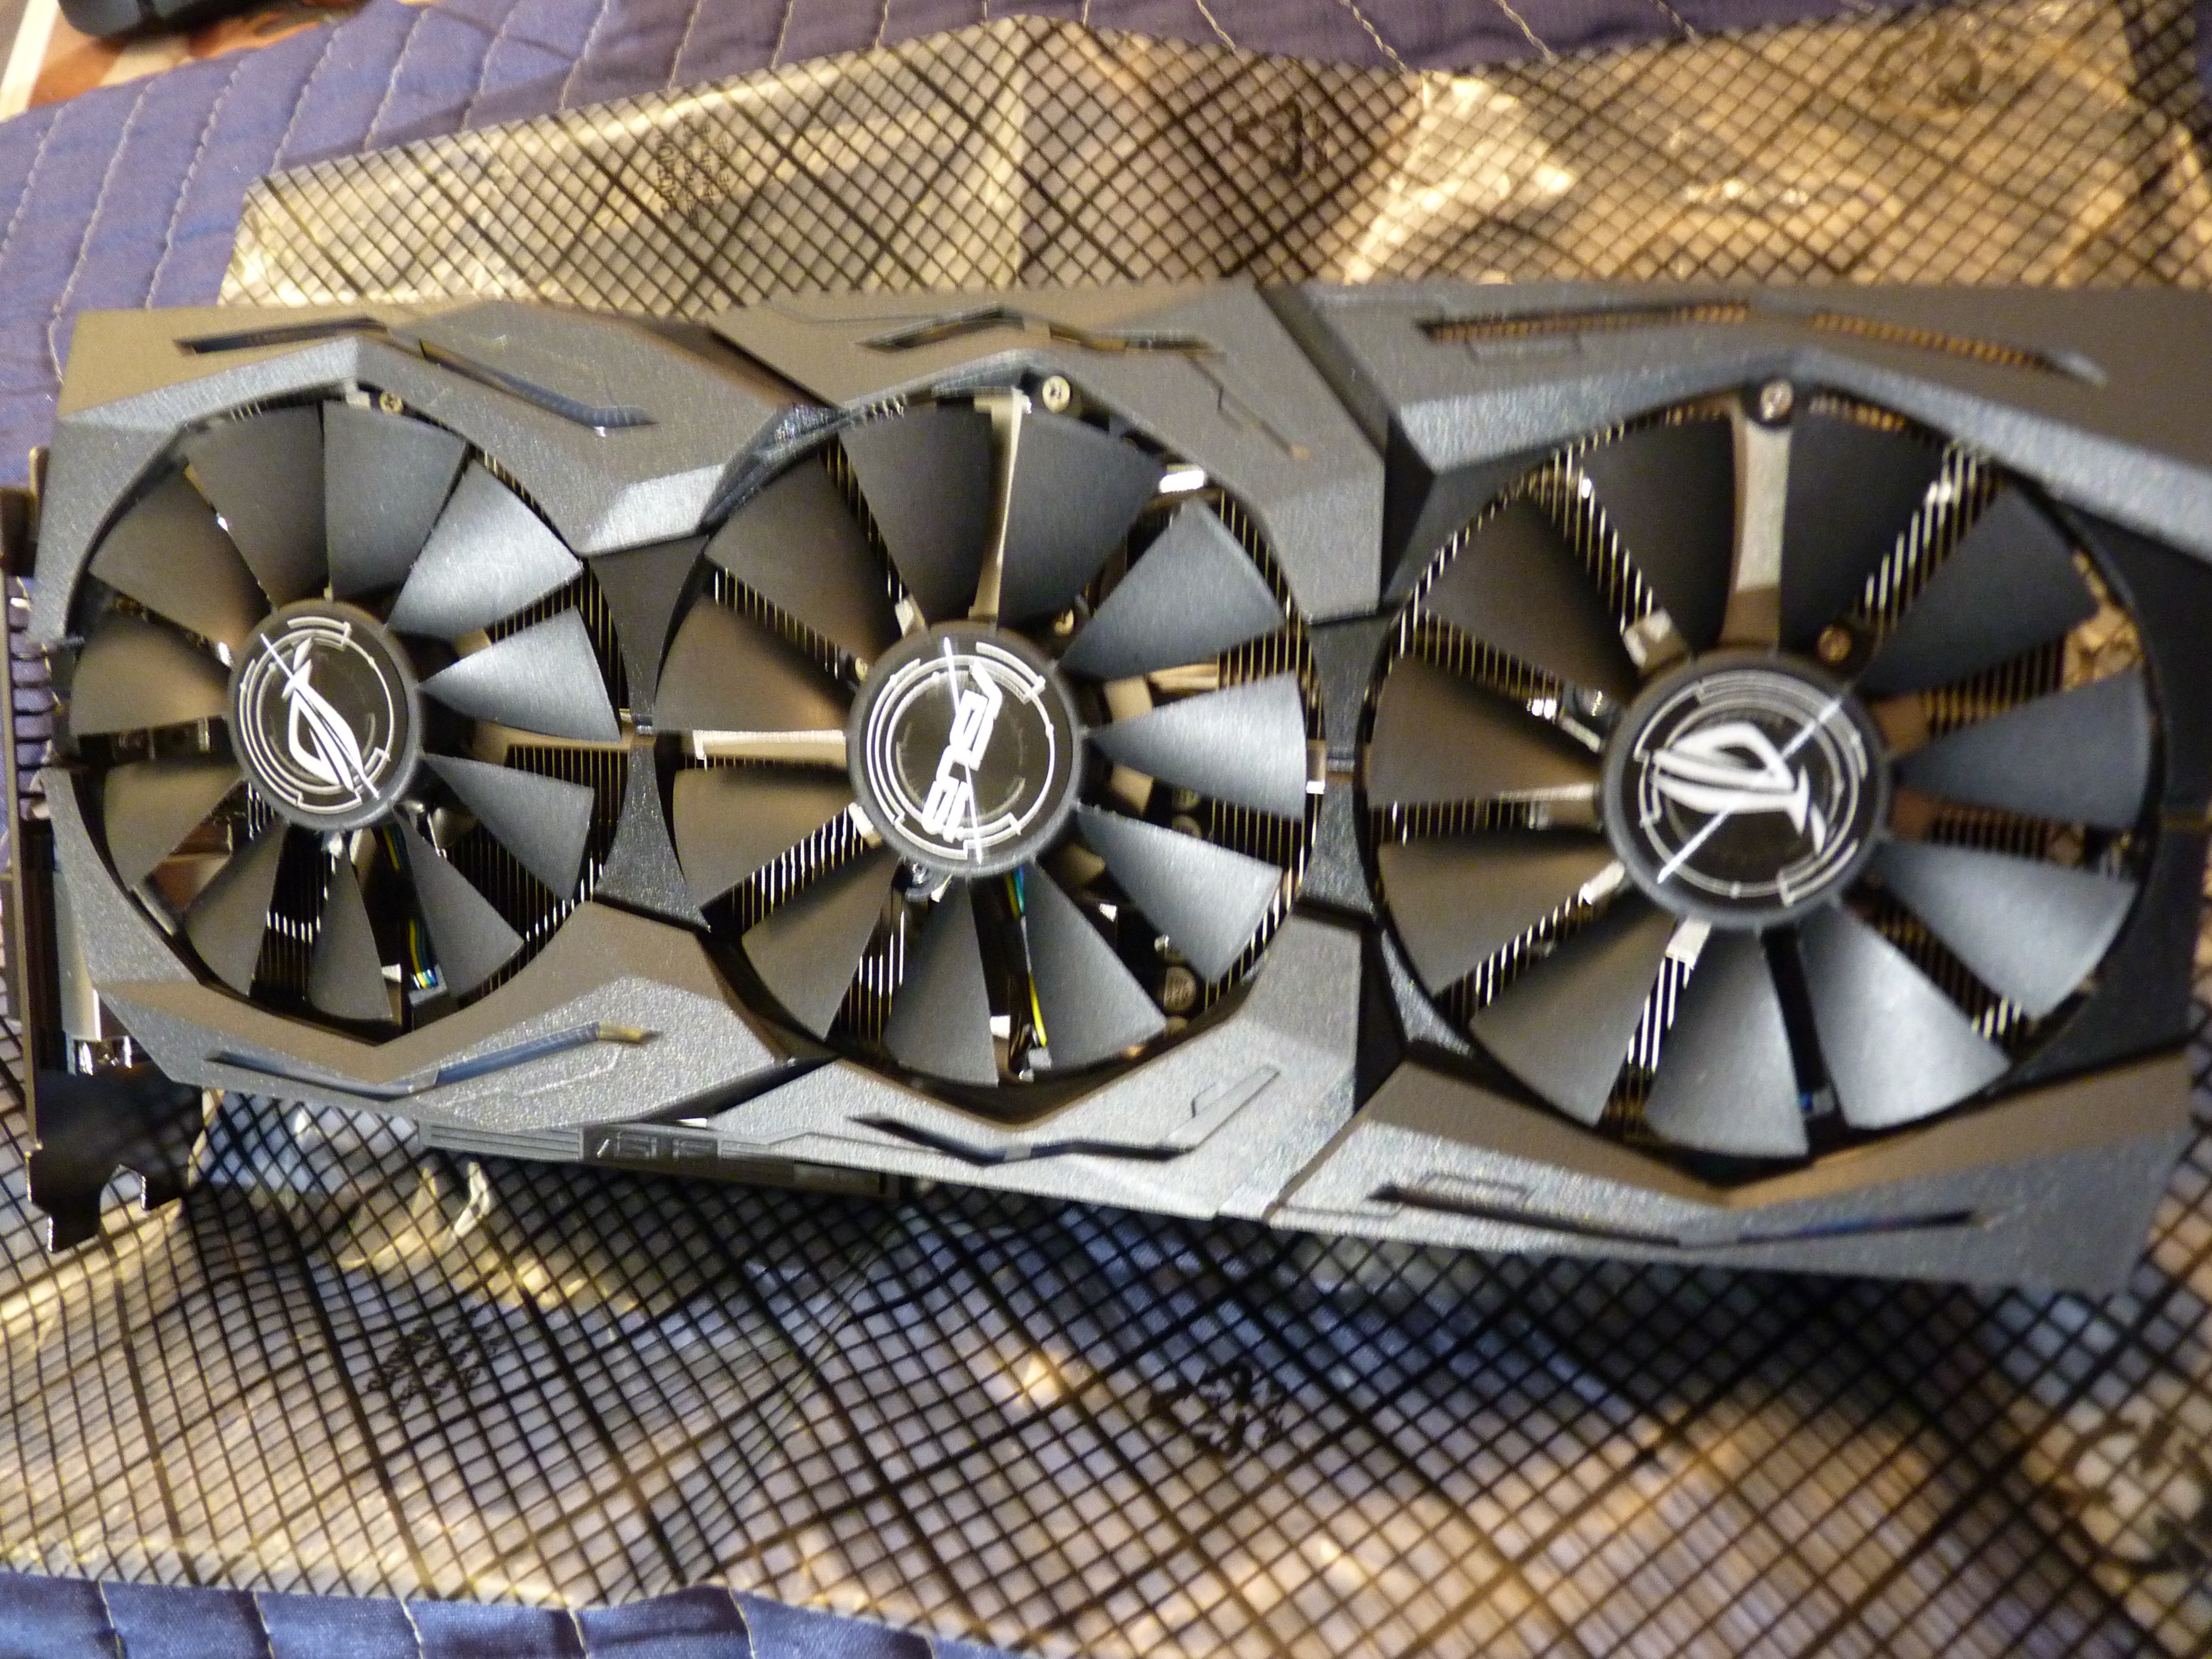
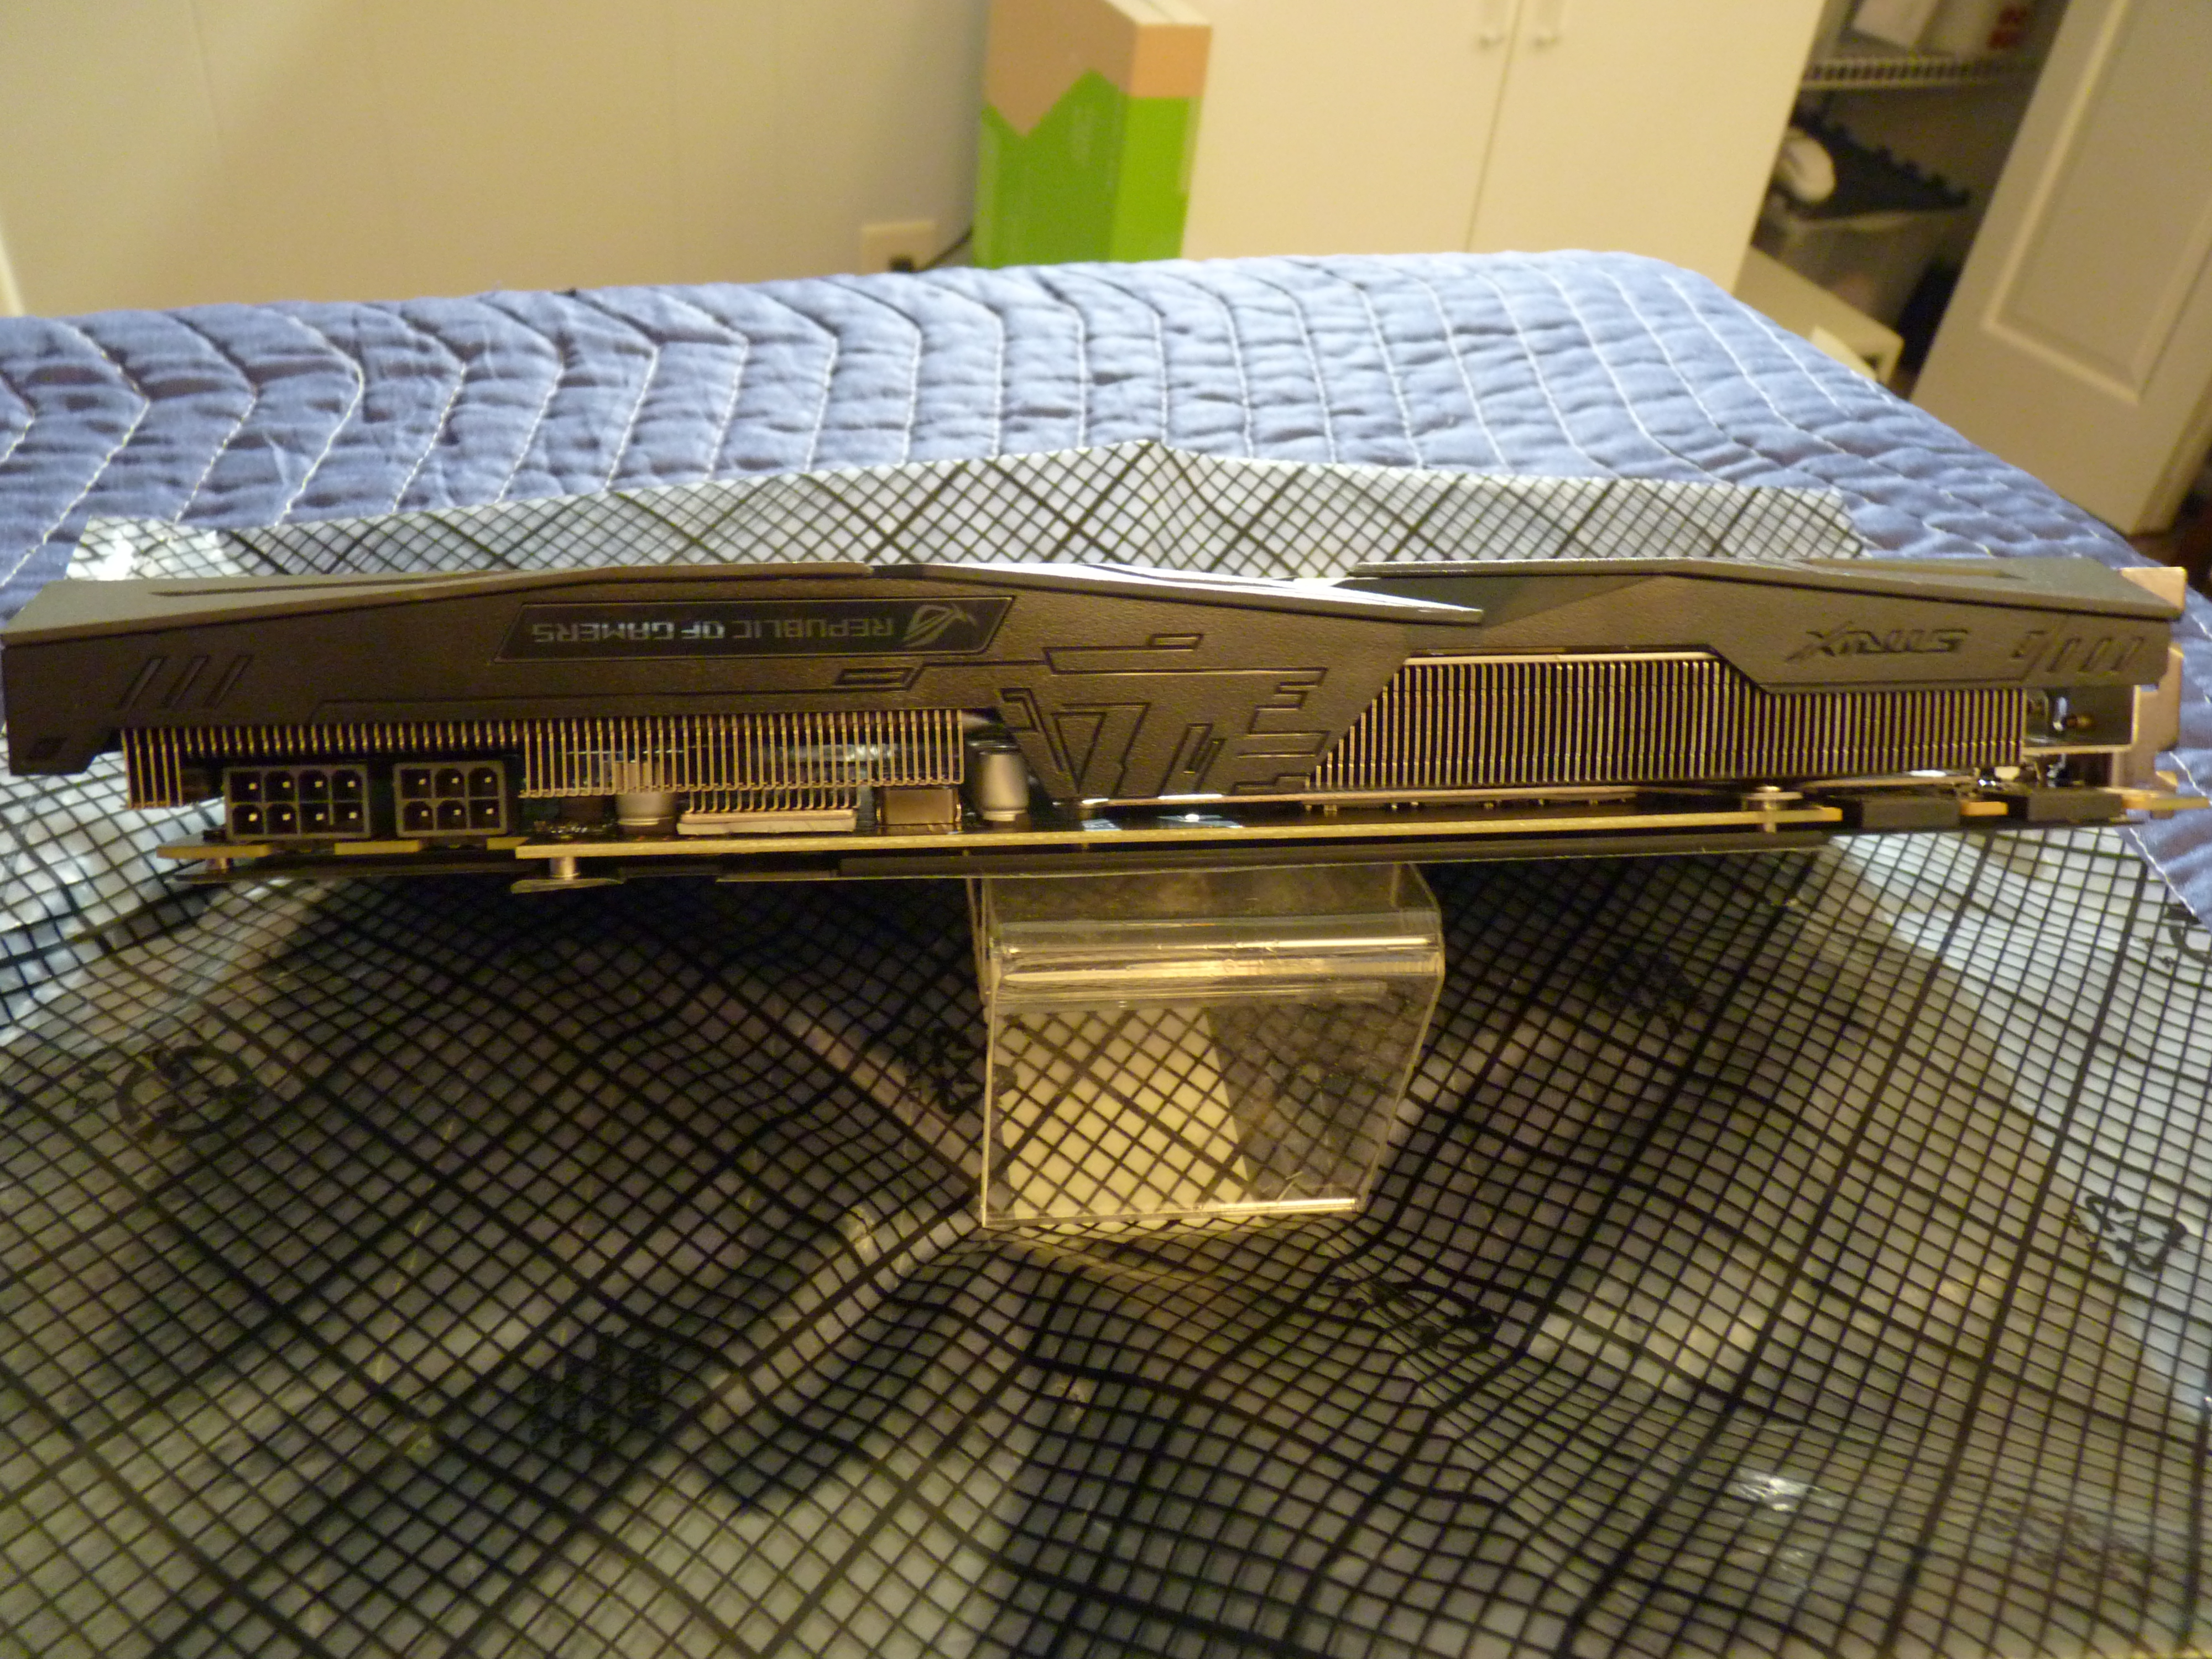
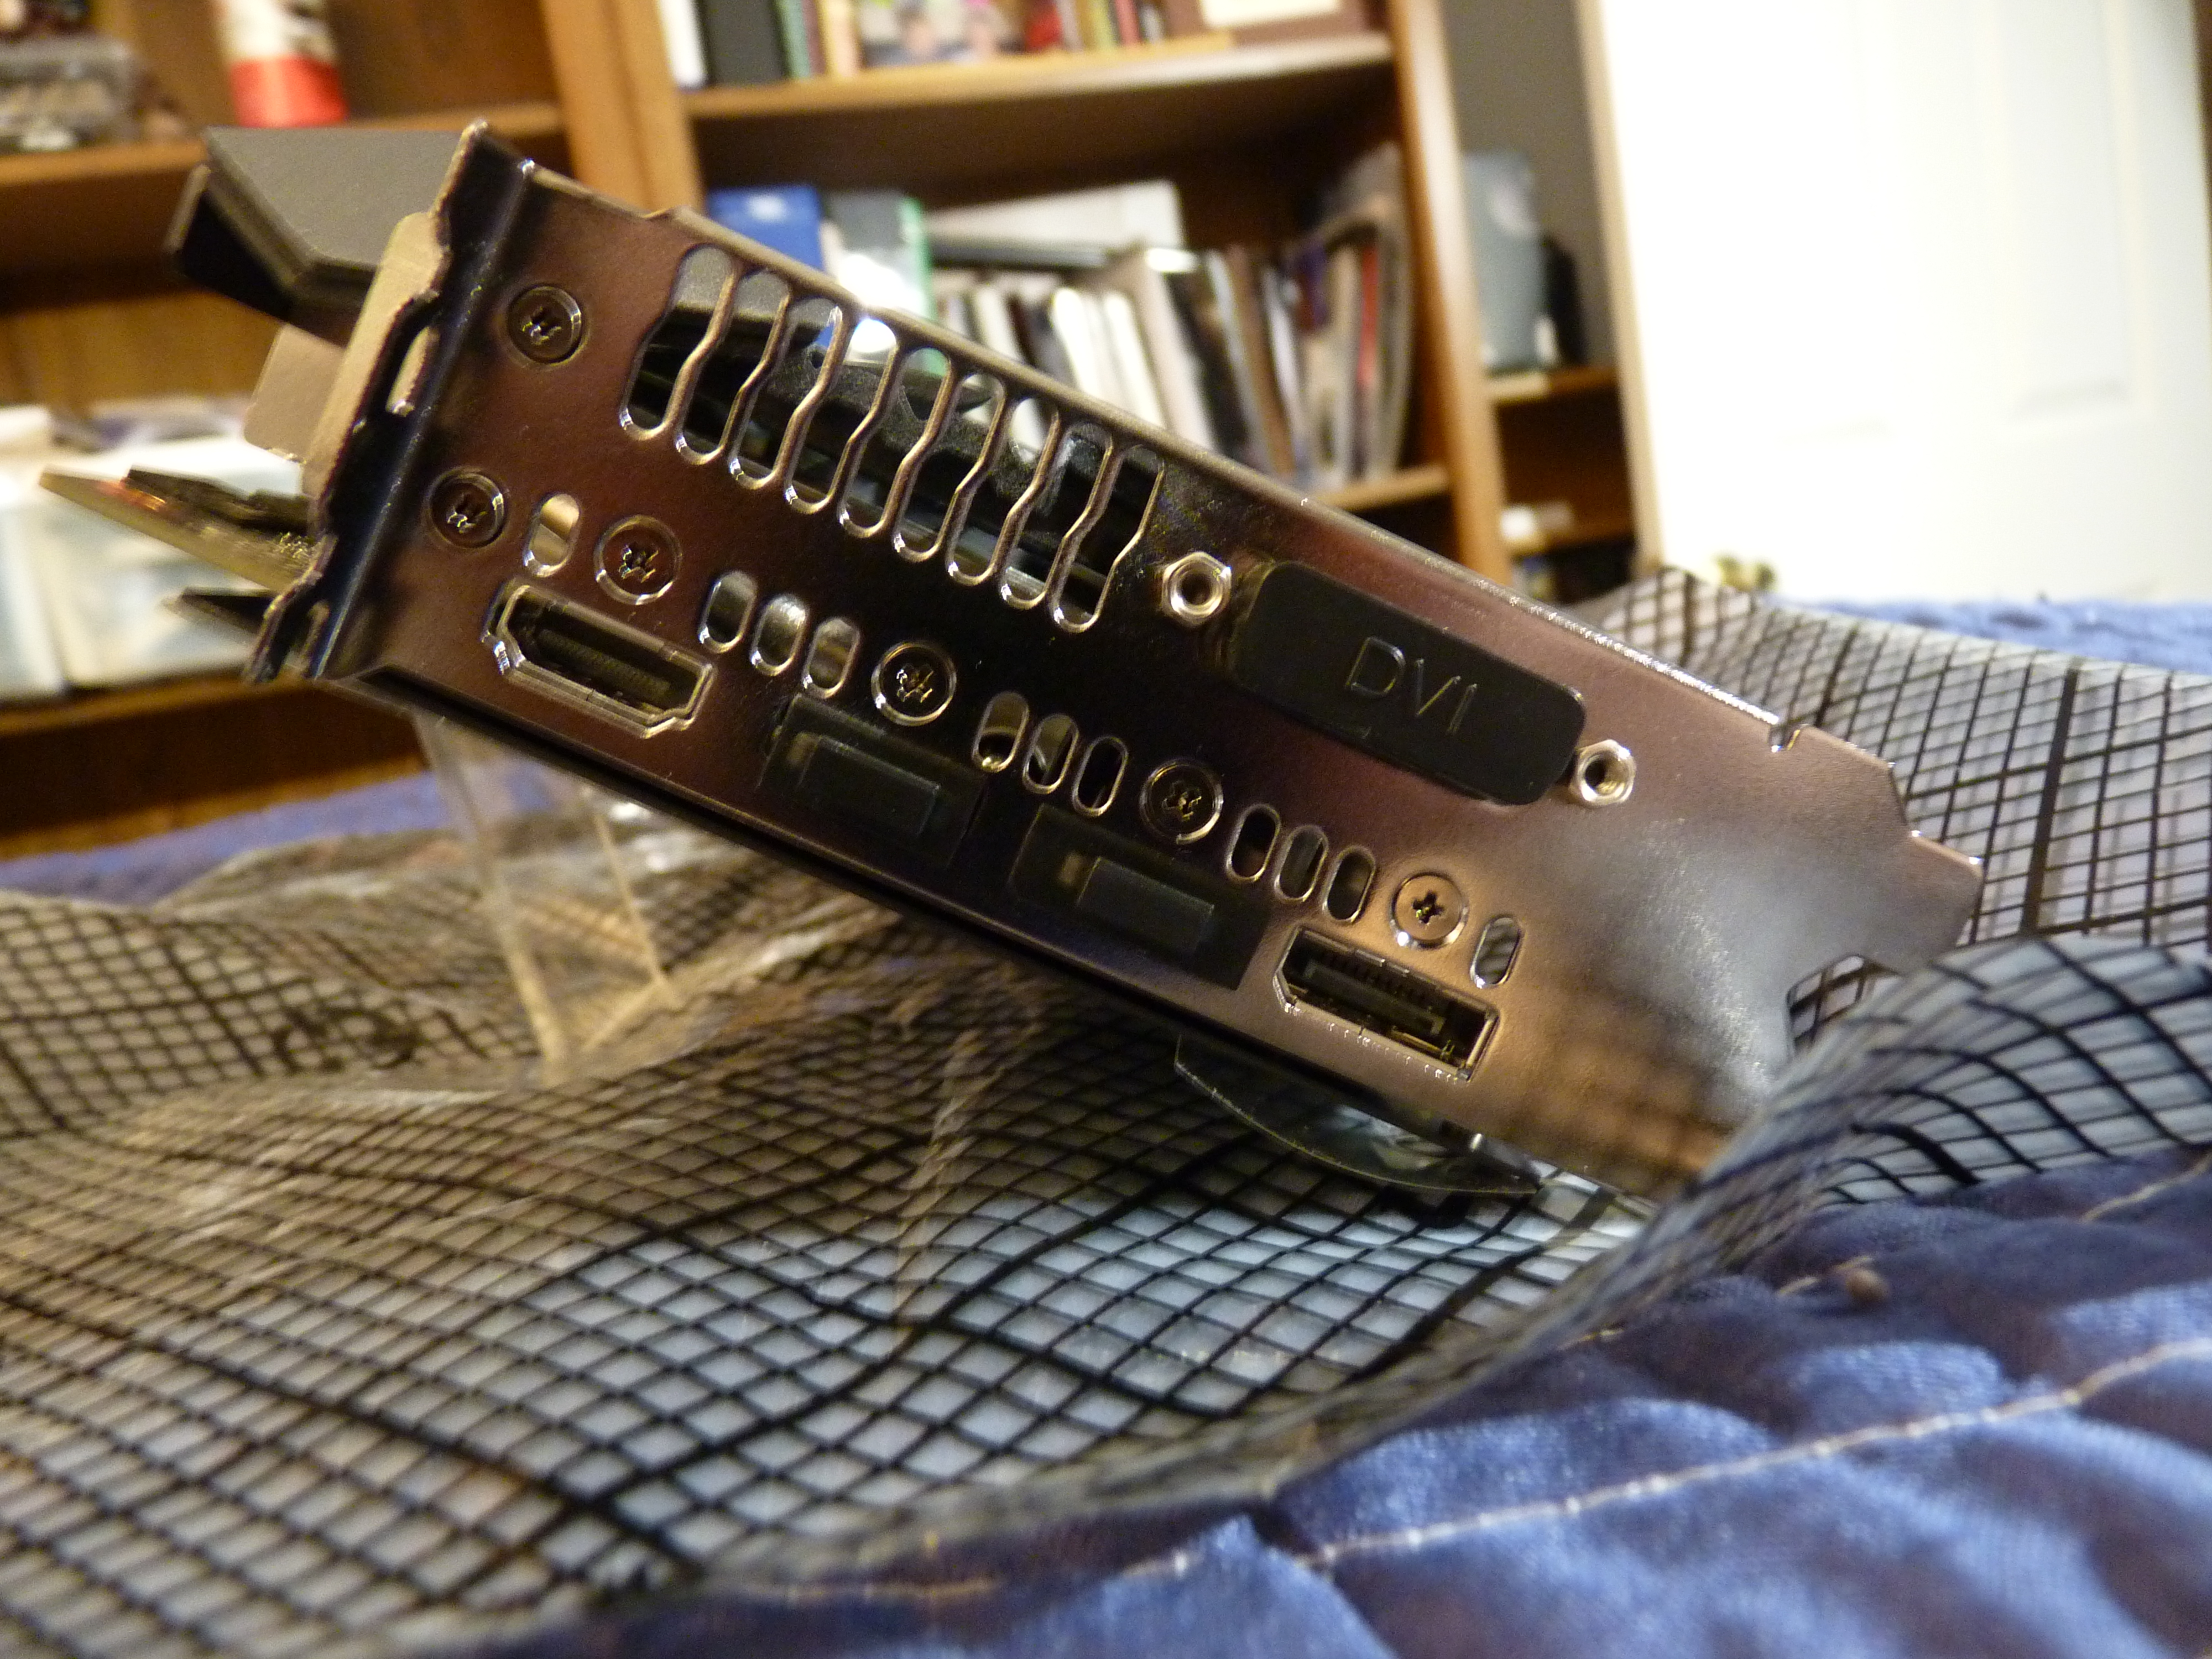
The rule of thumb I usually impart to others is that when building a mid-range gaming system, expect to pay from 100% to 130% of the cost of the CPU on the video card. This rule holds pretty well. This time, I didn't listen to myself. You see, I had been lusting after the 2560x1440 pixel resolution (aka 1440p) ever since those cheap Korean panels started showing up on eBay. At one point, I was on my way to Micro Center to buy one of them. I was listening to a Maximum PC podcast during the drive, and a listener asked the question if an Nvidia GTX 670 was good enough to drive one of the monitors. The response was, "Oh, hell, no." That's the exact graphics card I had at the time; I drove right on past.
Driving that number of pixels takes a serious high-end card. The kind of high-end card I never seemed to be able to bring myself to lay out the cash on. Now that I have it, let me say that gaming at 2560 x 1440 is very, very nice. If you can swing it, I highly recommend it. The GTX 1080 was 234% of the cost of the CPU. I bought an EVGA GTX 980 SC in December 2014 for $560, but when I heard the statistics for the new 1080s, I was sure that's where I needed to be for full-out 1440p gaming and VR. I'm a very bad person. But I am a very happy gamer.
While I lusted after the Korean 2560 x 1440 monitors, I never pulled the trigger on buying one. However, when I was throwing lots of cash at the video card, I also got a Dell U2713HM 27" Widescreen LED Backlit LCD Monitor from B&H Photo Video for $518 in December 2014. Yep. Paid less for the monitor than I spent on the (original GTX 980) video card to drive it. My previous monitor was also a Dell, and it always worked well. (Still does, in fact. That monitor developed a mysterious "tear" where a three-inch high and 1/4-inch wide vertical line just stopped working. I never figured out why.) I upped my resolution from 1920 x 1200 to 2560x1440 (WQHD), changed from a fluorescent to LED-backlit, and changed from a TN panel to an IPS panel. What a tremendous difference. I think that model has now been replaced with the Dell U2715H.
To go with the new motherboard, I needed new DDR4 memory. The motherboard supports XMP up to DDR4-3200, so the memory I went with was 16GB (2 x 8GB) of Corsair Vengeance LPX DDR4-3200 (PC4-25600) (CMK16GX4M2B3200C16) for $87 also from Micro Center. I used a similar Corsair Vengence memory kit with my last motherboard with really good results. For me, getting this to work at 3200 MHz consisted of setting the XMP profile in the BIOS and rebooting. That's it.
I still have two of the four slots on the motherboard open, so I could bump up to 32GB or 48GB of RAM (or 64 GB if I replace this 16 GB) if I ever need it. I didn't even need 16 GB as the games I played seemed to be happy with just 8 GB. However, I don't have to worry about having a browser or other apps open when I play games.
For over a decade, I was a proponent of using the motherboard's onboard RAID controller to set up RAID 0, RAID 1, or even RAID 0+1. There was a "dark period" when the reliability of the major manufacturer's hard disks seemed to go into the toilet. Having mirrored drives (RAID 1) saved my bacon more than once. But the speed of striped drives (RAID 0) is very appealing to gaming. I went with a four-drive configuration that combined the two (RAID 0+1). When hard drives are a bit flakey, stick four of them in your rig. Well, let's just say I got good at swapping drives. It's all good, now. I don't use any form of RAID anymore. Why? SSDs.
Along with a new motherboard, I bought a pair of Samsung 830 2.5" 256 GB (MZ-7PC256N/AM) SSDs in July 2012 from Amazon for $240 each. I was waiting for the price to drop below $1 per GB, and it happened. One drive would be dedicated as the boot drive, user files, and the basic apps like the Microsoft Office suite. The other would be dedicated to games - mostly a big Steam folder. I expected the difference to be dramatic. I underestimated it. I was blown away. From cold power on to the Windows login prompt, it now takes less than 30 seconds. If I discount the time for the motherboard to POST, it's about 20 seconds. Game levels load so fast that I don't get time to read the tips. I used to dread Windows updates - especially if there was a .NET update. Now, if I have a few minutes to spare, I've got time for the update. I will never build another system where the primary boot drive isn't an SSD. Period.
Many cases available today have mounts for 2.5" SSDs. My case doesn't have that, so I bought a SilverStone Technology 3.5-inch to 2 X 2.5-inch Internal Hard Drive HDD / SSD Bay Converter, Silver (SDP08) converter to mount both drives in a single 3.5" internal slot. I had to mount one of the drives upside down so that the cables didn't interfere with each other. Since SSDs have no moving parts, that's not a concern.
In November 2013, I upgraded the game SSD to a 500GB Samsung 840 EVO (MZ-7TE500BW) I bought from Newegg for $285. I know that spec-wise, the 840 is faster than the 830 was, but I can't tell the difference. I just needed more space. The exciting part was that just a little over a year later, I doubled the space for a price not too far from the same as the 256 GBs. The price just keeps on coming down. The 500 GB 850 EVO that replaced my 840 EVO is now $180 (i.e., over $100 less). I still recommend getting the largest capacity you can afford. An interesting characteristic of SSDs is as the capacity increases, the drive tends to get faster since the SSD's read memory in parallel "channels." The bigger the capacity, the more channels.
I regularly use the Newegg app on my Android phone to check the daily specials, which Newegg calls "Shell Shockers." In addition to the same specials everyone sees on the website, the app also has from zero to five "Mobile Exclusive" specials. In January 2016, one of those was the 1TB Samsung 850 EVO (MZ-75E1T0B/AM) for $289 shipped. That was $41 bucks off the price at the time, and I snatched one while cackling evilly. Just a month later (February 2016), the regular price was $295 at both Newegg and Amazon. I figured I just got out a little ahead of falling prices. It turns out that was wrong, as the NAND memory shortage drove prices back up.
I switched to the 500GB 840 EVO as my boot drive and the 1TB 850 EVO as my games drive. Note that it took two years (instead of one year) for the price of the 1TB 850 EVO drive to fall to the same price I paid for the 500GB 840 EVO drive. Now, I'm at 1.5 TB of SSD storage (and 4TB of regular HDD storage - next paragraph).
In addition to the SSDs, I recently updated to a single 4TB Western Digital Black (WD4004FZWX - SATA 6Gb/s) (partitioned into two 2TB partitions). That drive replaced a pair of Western Digital Black WD1001FALS 1TB drives (SATA 3 Gb/s) interface purchased in 2011. They were a year past their five-year warranty, and though I'd never had a single issue with them, they were making me nervous. I purchased the new drive from Amazon for $190 in November 2017. I don't use it as a game drive, but I have been putting more and more videos and pictures on there. I also use SteamTool to offload games I have finished (but I'm not quite ready to uninstall) onto one of the two partitions (which appear as two drives).
While the sound quality of motherboards has improved, I still prefer a dedicated sound card. I'm currently using a Creative PCI Express Sound Blaster X-Fi Titanium Fatal1ty Champion sound card that I bought from Newegg for $105 in October 2011. It has a separate break-out box that fits into an external 5-1/4" slot. I still like being able to control the effects and volume with real knobs and buttons. It's a control thing. This version uses a PCI Express x1 slot.
My speakers are ancient by any standards. I have had Klipsch 4.1 Promedia surround sound speakers since about 1999. I just about bought another speaker system because both subwoofer speakers had just rotted out with age. Someone clued me in that Klipsch sells replacement parts, and I took advantage of that. It's still going, and with the repair mentioned above, sounds great. I paid $400 for these (as part of a system from Falcon Northwest - the only gaming system I ever bought instead of made myself). The replacement speakers were something like $60. They can put out way more than the volume needed to enjoy any game, video, or audio. The volume knob is starting to go, but I'll hold onto these as long as I can. I'd buy another set of these exact speakers, but Klipsch stopped making the four-speaker version years ago. They still have the two-speaker version for sale.
I've had more headsets than I care to recall. My current one is the Kingston HyperX Cloud Gaming Headset (KHX-H3CLW) - the white one. I'm not sure I can recommend these highly enough. They weren't super cheap at $70 (on sale) from Amazon, but they sound better than headsets for which I paid more. They are comfortable for hours, too. That's what the "cloud" part is. It's like putting a comfy cloud over my ears. At least, they stay on my head without putting it into a vise. The mic is detachable, and I leave it off when I don't need it. They come with every connection option I've ever seen. I can connect these to every device in my house (and my phone in my pocket) using one of the included adapters. They even have an airplane adapter (and come with a carrying pouch). Buy these.
I will take a moment here to bow my head and say a few kind, respectful words about my now-deceased OCZ GameXStream 700W (OCZ700GXSSLI) PSU. I purchased it in December 2006 from Newegg for $149. I used that same PSU for at least four different builds. I wrote in April 2015 that time is an enemy of PSUs, and I should probably think about replacing it soon. My "soon" was June 2015, when one morning, I awoke to the UPS complaining that one of the inputs to it was shorted out, which turned out to be the PSU inside my desktop. OCZ's PSUs were apparently pretty hit-and-miss as far as quality, but for me, working for 8-1/2 years in a high-demand gaming PC rig is pretty darn respectable.
OCZ bought PC Power & Cooling - a well-respected PSU maker, and I believe their expertise went into the OCZ PSU I had. I'd even consider buying a replacement PSU from OCZ, except they went bankrupt at the end of 2013. Their SSDs are still available for sale, but that part of OCZ is now a subsidiary of Toshiba. PC Power & Cooling was sold to and became FirePower Technology, Inc., and their PSUs are getting good reviews.
My (new) current PSU is the EVGA SuperNOVA 750W B2, which I purchased from Newegg for $75. EVGA doesn't make its own PSUs. These are made to EVGA's specifications by Fortron Source Power Group (FSP Group), which is a well-respected brand. This unit is "semi-modular," meaning that some of the cables are fixed and permanently connected to the unit. Others are optional and can be plugged into the PSU as needed (that's where the modular term comes in). The fixed cables are the 8-pin CPU connection, the 24-pin motherboard connection, and a pair of 6/8-pin GPU connectors. That's a pretty good guess. I used two of the three SATA power cables and one of the Peripheral (old 4-pin Molex power) cables. The latter exists solely to power case fans in the top and back.
I've recently become a fan of SeaSonic, Corsair, and EVGA's SuperNOVA line (made by Fortron/FSP) power supplies. Because I have at least three desktops in the house at any given time, I keep a spare PSU handy (as well as case fans of all sizes). That's why the purchase date of the EVGA SuperNOVA is May 2015. I'd actually purchased the exact model before that, but it went into a friend's gaming rig when he shorted his out. As my new backup to replace the EVGA B2, I've got an XFX Core Edition PRO850W coming from Newegg, which cost $90 but had a $30 rebate. (Normal price is $100.) Like EVGA, XFX doesn't manufacture the PSUs, and that PSU is made for XFX by Seasonic. There's a really handy list of who's who are PSU manufacturers at Tom's Hardware. Unfortunately, it tends to fall out of date. Still, it's a very good reference.
Interestingly, almost all of my recent system upgrades are faster but use less power than their predecessors. CPU - faster and uses less power; GPU - faster and uses the same power (I was already using a Kepler-based card when I moved to a Maxwell-based one and finally, a Pascal-based one - and really, I went from a GTX 670 to a GTX 980 and then a GTX 1080, so it would have been great just to break even.); disk drives - hugely faster and use less power. I also have fewer drives in my system. Overall, the load on the PSU is decreasing. (My UPS confirms this with the estimated runtime, which has gone up with every upgrade.)
My case is the second oldest part of my system (now that my old OCZ PSU died). It's an Antec Nine Hundred (the original version with USB 2.0 front ports rather than USB 3.0). I'm on the fourth build into the same case. That case has since been replaced by the Antec Nine Hundred Two V3. The flexibility of this case has always been fantastic. This case has lots of features that I like, including:
- Bottom-mounted power supply
- There are two removable drive cages (with independent cooling fans) that each can hold three drives. Without the drive cages, the case can hold even more. I tinker with my machine more often than most, and these drive cages make life much easier.
- Again, there are lots of that ever-important airflow and fans, including a huge top fan.
- Sides come off and go on very smoothly and easily.
At some point, I did have to replace both front 120 mm fans. That's it. I got this during one of Newegg's weekend sales for $99 and $10 shipping back in June of 2009. A similar case is still for sale, but the USB has been upgraded to USB 3.0. It's $95 from both Newegg and Amazon. Newegg has free 4-7 day shipping or $18 three-day shipping. (Three days was the cheapest option at the time I got mine.) If you are an Amazon Prime member, two-day shipping is free.
Since I spend so many hours at the keyboard between my job and my hobbies, I've been using an ergonomic keyboard for over 20 years. My first one was the Microsoft Natural keyboard, made in 1994. I was forced to use a Microsoft Natural Elite for a while (when I wore the first one out). The Microsoft Natural Pro came out in 1999, and to this day, I think the Microsoft Natural Pro is the best affordable ergonomic keyboard ever made. When I found out they were discontinuing them, I bought five. Unfortunately, gaming is hard on keyboards, and the WASD and left control (CTRL) keys eventually gave out on all. It took years to go through my stash, but I eventually did. Now, I use the Microsoft Ergonomic Keyboard 4000. These keyboards pale in comparison to the Microsoft Natural Pro, but they are decent and cheap (at around $30-50). I bought a 3-pack on sale from Newegg for $60 in August of 2014. I still wear them out regularly, but I don't feel as sorry about it.
I'd gladly put real money into an ergonomic keyboard with mechanical switches if anybody made one for a decent price. No, $250 isn't a decent price. No, $400 and $1,000 aren't decent prices either. It should be $200, tops - preferably $150. Somebody, get on this, please. Oh, and please make it look like a keyboard rather than something that belongs in a medical examination room.
I'm currently using a Logitech G602 Wireless Gaming Mouse that I purchased from Amazon for about $40 in January 2017. I used to use the Logitech G9X, and I liked it a little more because it was a bit wider. That's been discontinued and the remaining stock is astronomical in price (over $250). Prior to that I used the G502 is a pretty darn good mouse, but my major gripe was that they "improved" it and made it so that the weight was not adjustable (as it was on the Logitech G502 I had before). The G602 doesn't have weight adjustments either, however, since it's wireless and takes 2 AA batteries, it's still pretty heavy, which is the way I like them. One of the G602's features is on-the-fly dpi ranges. That is, you can set three different DPIs as the default onboard profiles. In addition, there is a thumb button that serves to "downshift" from a higher to lower DPI for things like precision sniping in first-person shooters. I believe the mouse software supports loading different DPIs for different games, but I really don't bother. The three onboard profiles do the job for me.
I'm a subscriber to the Microsoft Action Pack program. As such, I have access to just about every operating system version Microsoft supports, is actively selling, or is about to sell. Until mid-September, I used Windows 8.1 64-bit on my gaming desktop. Now, I am using Windows 10 64-bit. (I see no use for 32-bit anything anymore.) I like having something like the Start menu back and the fact Windows 10 understands SSDs (like using the TRIM command to maintain them and performing less frequent and more intelligent defragmentation of them). To be fair, Windows 8.1 handled my SSDs gently, too. Technically, I updated for free (as did most people I know). However, I'm still going to tally in the cost of an OEM Windows 10 license. (I can get mine via the Microsoft MAPS program.)
DVD/RW Drives - I had a pair of these in my system. (No Blu-Ray/RW here - not even a Blu-Ray reader.) They are pretty much a waste of space. I bought a pair to make copying easier. Copying what, I can't say? I've purchased maybe three games in the last few years that weren't downloadable online. Those did require a DVD reader. Once or twice a year, I'll burn a Windows OS DVD to use for installation. I could get by with one USB DVD/RW shared among all my systems. There's no need for a pair, so I recently removed the top one when replacing my PSU. I bought the pair from Newegg in June 2009 for about $30 each. They have SATA interfaces, and so long as I have spare SATA ports on my motherboard, there's no reason not to hook them up. There's very little reason to hook both of them up, though.
Microsoft Xbox 360 Game Controller for Windows - I bought one of these to play Brother's - A Tale of Two Sons. I bought it from Amazon in January 2014 for $37. I think I paid less for the game than the controller. I figured I would use it for some other games since many have controller support. That didn't happen. I find the controller way too imprecise for the first-person shooter games I prefer. It does come in handy, though. Occasionally, I'll find some jumping puzzle or the like that requires excruciatingly accurate targeting to complete. If I just can't get it done with a keyboard and mouse, I'll use the controller. The sloppiness required to allow a controller to be usable in such a game is generally enough to get me through. I never use them in a fight, though.
Metal Front Panel 3.0 USB Hub - Since the version of the Antec 900 case I have does not have any front-panel USB 3.0 ports, I added a four-port USB 3.0 hub that fits into an open 5.25-inch drive bay. I paid $25 for an E-SDS USB 3.0 4-Port 5.25-inch Metal Front Panel USB Hub from Amazon in September 2016.
| Component | Description (Purchase Month/Year) | Cost |
|---|---|---|
| CPU | Intel Core i7 6770K (07/2016) | 310 |
| CPU Cooler | Corsair Hydro Series H60 (07/2016) | 72 |
| Motherboard | Asus Sabertooth Z170 S (07/2016) (Micro Center bundle price) | 158 |
| GPU | Asus GTX 1080 8GB ROG STRIX OC (07/2016) | 680 |
| Monitor | Dell U2713HM (12/2014) | 518 |
| Memory | Corsair Vengeance LPX DDR4-3200 (PC4-25600) (CMK16GX4M2B3200C16) (07/2016) | 87 |
| Storage | Samsung 840 EVO 512 GB SSD (11/2013) Samsung 850 EVO 1 TB SSD (01/2016) Western Digital Black 4TB HDD (WD4004FZWX)(11/2017) | 285 289 190 |
| Sound Card | Creative PCI Express Sound Blaster X-Fi Titanium Fatal1ty Champion (10/2011) | 105 |
| Speakers | Klipsch 4.1 Promedia surround sound with subwoofer (12/1999) | 400 |
| Headset | Kingston HyperX Cloud Gaming Headset (04/2015) | 70 |
| PSU | EVGA SuperNOVA 750W B2 (05/2013) | 75 |
| Case | Antec Nine Hundred (06/2009) | 99 |
| Keyboard | Microsoft Ergonomic Keyboard 4000 (08/2014) | 20 |
| Mouse | Logitech G602 Proteus Core (01/2017) | 40 |
| OS | Windows 10 Pro 64-bit (Estimated) | 100 |
| Miscellaneous | 1x DVD/RW Drives (est at $30 - from a long time ago) Microsoft Xbox 360 Game Controller (01/2014) E-SDS USB 3.0 4-Ports 5.25-inch Metal Front Panel USB (09/2016) | 30 37 25 |
| Total | 3590 |
That final tally is a startling number. I ought not to let my wife see it. That said, I didn't buy these parts all at once. The purchases go back as far as 1999, but the average is probably more like 18 months to 2 years ago. That's pretty normal for me, as I tend to roll the system over piecemeal to stay up-to-date. The big-ticket items are the graphics card and monitor, which total almost $1,200. That's an uncharacteristic splurge for me, but wow, is it nice.