Wired Network
Wired Networking Equipment
This was probably the part of the home network that you suspected you needed. The hardware. The stuff that connects it all together. To create a home network you need a couple of things. If you're planning on installing a traditional wired network, you need 1.) a port (jack, connector) in each PC that you want to connect (or in every other device like an Xbox or DSL router), 2.) an Ethernet cable to connect each device to the network, and 3.) a router or switch (or combination router/switch) that lets you connect all the cables together. If you're thinking of installing a wireless network either instead of or in addition to a wired network you will want to make sure to read the section on.
This section discusses in detail the basic equipment needed for a wired network for both the LAN and Broadband Sharing networks, and outlines the differences where appropriate. If you are planning to have a wireless network, you will have somewhat different equipment needs. You'll still have to deal with a couple Ethernet ports and at least one cable, most likely, but much of what in this section won't be as applicable. You should skim the beginning of this section and then proceed on to the section on Wireless Networking Equipment. If your network is going to have some wired devices and some wireless devices, you get the fun of getting both to work, but start with the wired portion of your network first.
Wired Ethernet Adapter
Whether it's a card that you install yourself, it came built in on your desktop or laptop, or it's some other type of Ethernet adapter, you need a physical Ethernet port for every device you plan to connect to your home network. These are analogous to the jack on the back of a telephone. Originally, a Network Interface Card or NIC (pronounced "nick") was a hardware card that was purchased separately and installed inside the computer to provide a physical Ethernet port outside of the case. However, it's now very common for new desktops and virtually all new laptops to come with an Ethernet port built in.
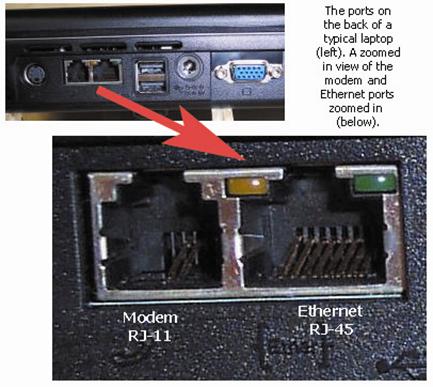
If you're hooking up fairly new equipment on your home network, you should first determine which, if any, devices are going to need to have an Ethernet NIC (a.k.a. Ethernet adapter) added. Look at the ports on the back of your desktop, laptop, or gaming console. The Ethernet port looks like a RJ-11 modem jack, but it's physically wider and has eight copper/gold connections inside instead of the two or four that a modem jack has. On newer desktops, a built-in Ethernet port is usually found near the USB or keyboard ports. The following table lists several different kinds of Ethernet adapters along with their features and uses.
| If your desktop computer doesn't have an Ethernet adapter already, you can install a NIC (like the one shown to the right), the Linksys LNE100TX. (Unless the computer in question is older, it's very likely it has a built in Ethernet port. Check along the back for an RJ-45 jack similar to the one in the picture.) | 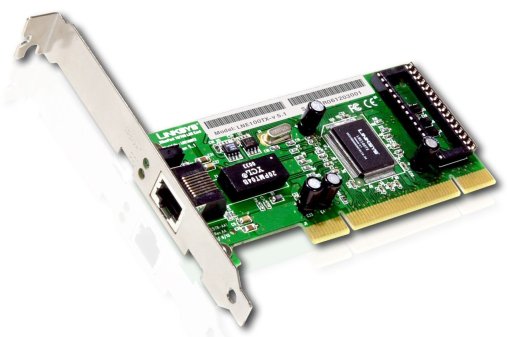
Copyright 2010 Linksys Corporation |
| For those of you who have computers without built-in Ethernet ports (especially laptops) and don't feel up to mucking around inside your computer to add one, there are also USB to Ethernet adapters like this one shown at the right. The USB end of this adapter includes a USB cable that plugs into any available USB (2.0) port on your desktop or laptop computer. The other end has of the adapter has a standard Ethernet port. (It's very unusual for any late model laptop to not have a built in Ethernet port. A number of netbooks do not have such a port, so this type of adapter is useful for those.) | 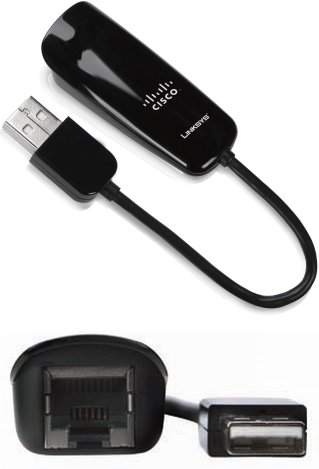
Copyright 2010 Linksys Corporation |
| Another alternative for laptops without built-in Ethernet ports is a PCMCIA Ethernet card like the one shown to the right can be also used. This card slides into a PCMCIA slot on the side of your laptop. If this is an option on your laptop, this adapter is preferred as it is faster than a USB connection. Unfortunately, PCMCIA (and Cardbus) slots have fallen out of favor as of late, so such ports are becoming rare. That said, laptops without the PCMCIA/Cardbus slot most often do have an Ethernet adapter port built in. | 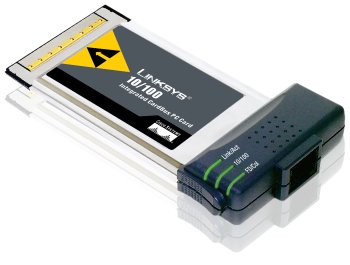
Copyright 2010 Linksys Corporation |
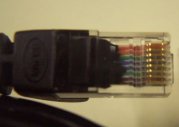
Some terms you will often hear mentioned in regard to telephone and Ethernet ports (jacks) are RJ-11 and RJ-45, respectively. RJ-11 is the 4-wire (or 2-wire) jack used with telephone (modem) connections and RJ-45 is the 8-wire jack/cable used with Ethernet connections.
Once you have installed the Ethernet adapter and loaded any drivers to support it (if necessary), it's a good idea to check to make sure that the operating system has recognized the adapter, and all appears to be in working order. Do that by performing Testing the Ethernet Adapter section.
Cables
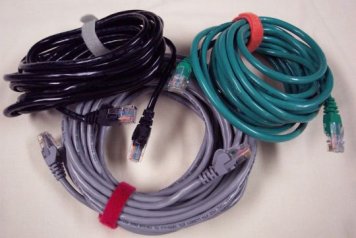
If the Ethernet ports are the equivalent of the phone jacks on a telephone, the cables are analogous to the telephone wires that connect the telephone to the wall jack. Like telephone cables, they come in a variety of lengths and colors. Also, like telephone cords, Ethernet cables are almost always male-to-male plugs in terms of the connectors on the end like the picture to the left. For this discussion, we are going to assume that you are using pre-made cables for your home network (or that your home network was professionally wired and the only cables you need to be concerned with are those from the wall jacks to the devices attached to the network). You will need one cable running from each computers, game console, printer, etc. that you plan to connect together. Even if your network is going to be "totally wireless," you'll may still need a cable or two for your Internet connection (if you have one)
Like telephone cords, if you wish to have cables that are exactly the right length, you can make your own. Even if you are planning on wiring your home as part of installing a home network, it's probably best to start with pre-made cables. That tends to eliminate one variable in the event you have problems getting your network up and running. (You can start with pre-made cables running from room to room and replace them later with custom made cables. You can even cut one end off of the pre-made cable, run it to the new location through a wall, ceiling, etc., and then attach a new Ethernet plug.)
The good news is that practically any Ethernet cable you would find to buy today is going to be the right type. As long the cables you purchase are rated at CAT-5, CAT-5e, CAT-6, or CAT-6e, you should be fine. If at all possible, get cables with a CAT-5e rating or higher, where the 'e' stands for "enhanced." CAT-5 would support most home networks (except those of you planning on having gigabit networking speeds [1000 Mbps] where CAT-6 and CAT-6e are more appropriate). CAT-5e cables (and above) also tend to be better made, so they put up with more abuse and last longer. Additionally, they are better shielded from electrical interference. Generally the rating will be prominently displayed somewhere on the package. Nowadays, it's pretty hard not to get at least CAT-5e rated cables. (There is a CAT-7 specification in the works as well.) You may also see the terms "Patch Cable" and "Straight Through." Those describe the same type of cable and are the type of cable we need to hook computers and other devices up to switches and routers (to be discussed in the next section).
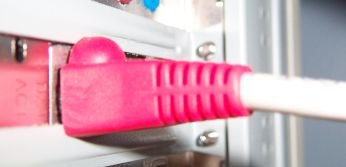
One cable to watch out for will (hopefully) be labeled as a "crossover" cable. A crossover cable is made with the transmit and receive wires reversed on one end (hence, crossed over). That allows the cable to be used directly between two network devices without an intervening hub or switch. This means you can connect two computers together using only a crossover cable. (This cable is popular for hooking two Xboxes together, for example.) For most home networks, you will only need straight through cables. The exception I have seen to that is that sometimes a crossover cable is necessary to connect the DSL or Cable modem your ISP supplies to the DSL/Cable router that you buy. Many crossover cables are labeled or stamped with the word "Crossover" on the cable itself. Another way to tell - that I wish had be made a standard - is that crossover cables have red "boots" or red covers over the plugs on the end of the cable. (See the picture to the right.) Unfortunately, that's not standard and if you buy red cables they will probably have red boots and still be straight through cables. Ah, 'tis not a perfect world. Probably the easiest way to tell you've accidentally gotten a crossover cable is that when you use it to connect a computer to a router (or switch) none of the lights come on as if it wasn't connected. (Unfortunately, that's also the sign of a bad cable.)
Cable length is also another consideration. Pre-made cables come in lengths from 1 foot to 150 feet with typical numbers in between of 2, 3, 5, 7, 10, 12, 14, 15, 20, 25, 35, 50, 75 and 100 feet. The technical specification for Ethernet cablings cites a maximum of 100 meters or about 328 feet. In practice, you should try to have cables no longer than 150 feet if possible. If you must run a cable longer than 150 feet, you may need to put in an extra switch or hub (or repeater, but we won't get into what that is here) in order to maintain and amplify the quality of the signals.
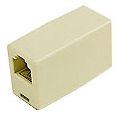
If you need a cable that's 40 feet long, you can buy the next size up (50 ft) and just roll up the extra cable into a spool. If that seems a bit sloppy, one trick is to instead buy a 15 ft and 25 ft cable and join them with an inline RJ-45 connector like the one shown at the left. This connector has two female RJ-45 ports on either end. You connect two standard male to male cables into the jacks and end up with an extended Ethernet cable. Just make sure the coupler you use is made for Ethernet cables, is rated for at least as high of a transmission rate as the cables you are connecting to it (e.g., CAT-5e), and has all eight pins. (Just so you are aware, there are also crossover couplers, which turn two straight through cables into a joined crossover cable.)
Armed with this knowledge, (buy and) install the Ethernet cables running from each device to a centralized location. A good goal is to try to keep all the cable runs as short as possible. If you are planning a LAN, just pick a convenient point near the center. If you are planning on sharing a broadband connection, you would generally run all cables to wherever your broadband connection enters the house as it's logical to install your router next to the cable/DSL modem. That becomes your location from which to branch off your network. In either type of network you will run the cables to wherever your network hub or switch is. If you have decided to use multiple switches (or a combo router/switch and one or more other switches) route you cables from the device to the nearest and/or easiest switch possible. (See the next section.)
As a final bit of advice, if you are process of getting a new home built, strongly consider having most of the rooms pre-wired for Ethernet. Get the highest quality cable you can afford (e.g., CAT-6e) because it's much harder to run once the walls are finished. Have the wires originate (or terminate depending on your point of view) in a closet that is reasonably central to the house and that you will have easy access to. Mind the lengths of the longest cable and try to stay under 100 feet.
- Printer-friendly version
- Log in to post comments